Last year an exhibition of medieval books occurred at my state library. One piece piqued my interest especially, and I kept going back to see it. It was a few leaves of parchment folded and sewn together to form a medical almanac that could be hung from the belt.
I conducted a bit more research on the topic and found that such items were used primarily as medical references, astrological calendars, and more rarely for any other uses requiring a pocket reference (eg psalms, canon lore, etc). They go by various names: Vade Mecum, folding almanac, folding calendar, and a few other rarer descriptions - no single designator for these exists, although Vade Mecum comes closest, and a variety of terms are used, such that sometimes it is not possible to determine without a photo or very detailed description if an item is such a folding book or a simply a very small bound pocket book.
A variety of folding patterns were used. Here is an examples on the Internet (unfortunately not showing how it folds) and another example which is closer to the folding pattern I saw in the state library, and finally an example with multiple views showing how it folds.
I wish to write about these more, but my notes are not in order yet. Meanwhile, I've been experimenting with making quick and simple mockups of these in paper, and I've had a request to share the process of making these.
The aim was not to make a high authenticity copy of these medieval folded reference books, but to make a cheap and easy replacement for the kind of reference materials that people often carry around at events - notebooks, timetables, class descriptions. Made from paper these would not be as durable as from parchment, but they look a lot better than a sheet of white photocopied paper, and do work quite nicely in a pouch, and presumably on your belt. (I don't frequently wear a belt, except with outer garments - often in damp or darkness- so I haven't tested this yet)
A sheet of A4 paper actually makes a nice size for turning into a folding book, although given the diversity of styles used, other sizes would work too (letter is similar enough in dimensions to use in this way). I used A4 sheets of 200gsm fake parchment card - that's about twice the thickness of photocopy paper. But photocopy paper will work fine to test out the shape you want to make. The originals would have been in vellum, which would be much more durable than paper, but as we don't expect to make these last for decades, the paper will last long enough. I advise using a wooden or stiff plastic ruler or paper folding tool to carefully press the edges of your fold below. Use some care in how you fold the paper if you want a nice symmetrical end product.
Fold you sheet of paper in half along the long edge:
Leaving your sheet folded in half (unlike the above picture), now fold the paper in half along the new longest edge (in the opposite direction) and unfold. Then fold the sides in towards this centre line to create two more folds parallel to this centre fold:

Unfold all fold except the first large one. Fold down a line parallel to this 1st fold, approximately 2cm down the page (the exact distance doesn't matter, but it must be the same for all pages so choose a distance and measure it).
Open out your paper and it should look like this:
Now, cut out a section from the center of the page , cutting along your last folded line, and leaving one quarter of the centre section uncut, like this:
Refold your pages into their final arrangement (this should be simply following the already made fold lines), first one side:
then fold the other side too:
You have one completed pair of pages. Make some more:
When you have a number of pages you are happy with (I recommend using less than 5 pairs on your first try - the paper thickness gets a bit tricky), line them up together with the pages all opening in the same direction (bulldog clips help at this stage):
For a quick folding book, I stapled the top sections together at this stage. Medieval books would have been stitched, or I could have glued this, but I was aiming for speed and this section would be covered. I also punched holes in this section at this stage with a hole punch (again, speed over accuracy). (sorry there's only a blurry picture)
Next, I took some of my trimmed off pieces of paper and glued this over the staples on the front side of the book (bulldog clips help):
When the glue was dry I folded in the edges of this snippet, so they enclosed the pile of pages, then folded over the top to hide the seams, and glued all of this. Finally, when this was dry, I punched through the hole in the top in the same place it was in the pages underneath. A finished quick and cheaty folding book: You can fairly easily setup a word processor to print to these pages, or make a blank one to use as a notebook (not a period usage, but more authentic feeling than a modern notebook if you're not quite ready for a wax tablet). In period examples, sometimes the folds are used as dividing lines for columns, and sometimes they are completely ignored - often in the same document, or even page - so don't feel too confined in your manner of writing.
Tuesday, 3 November 2009
folding calendars and almanacs
Tuesday, 7 July 2009
Hortus deleciarum puppets
I wanted something to enter into the local monthly summer picnic competition for toys. And being me, I couldn't help wondering if I could make a documentable 12th C toy.
I did some quick looking at medieval toys, and unearthed the following links:
- medieval toys you can make
- toys and games from Novgorod (13th C Russia)
- karen larsdatter's links page of toys and playthings

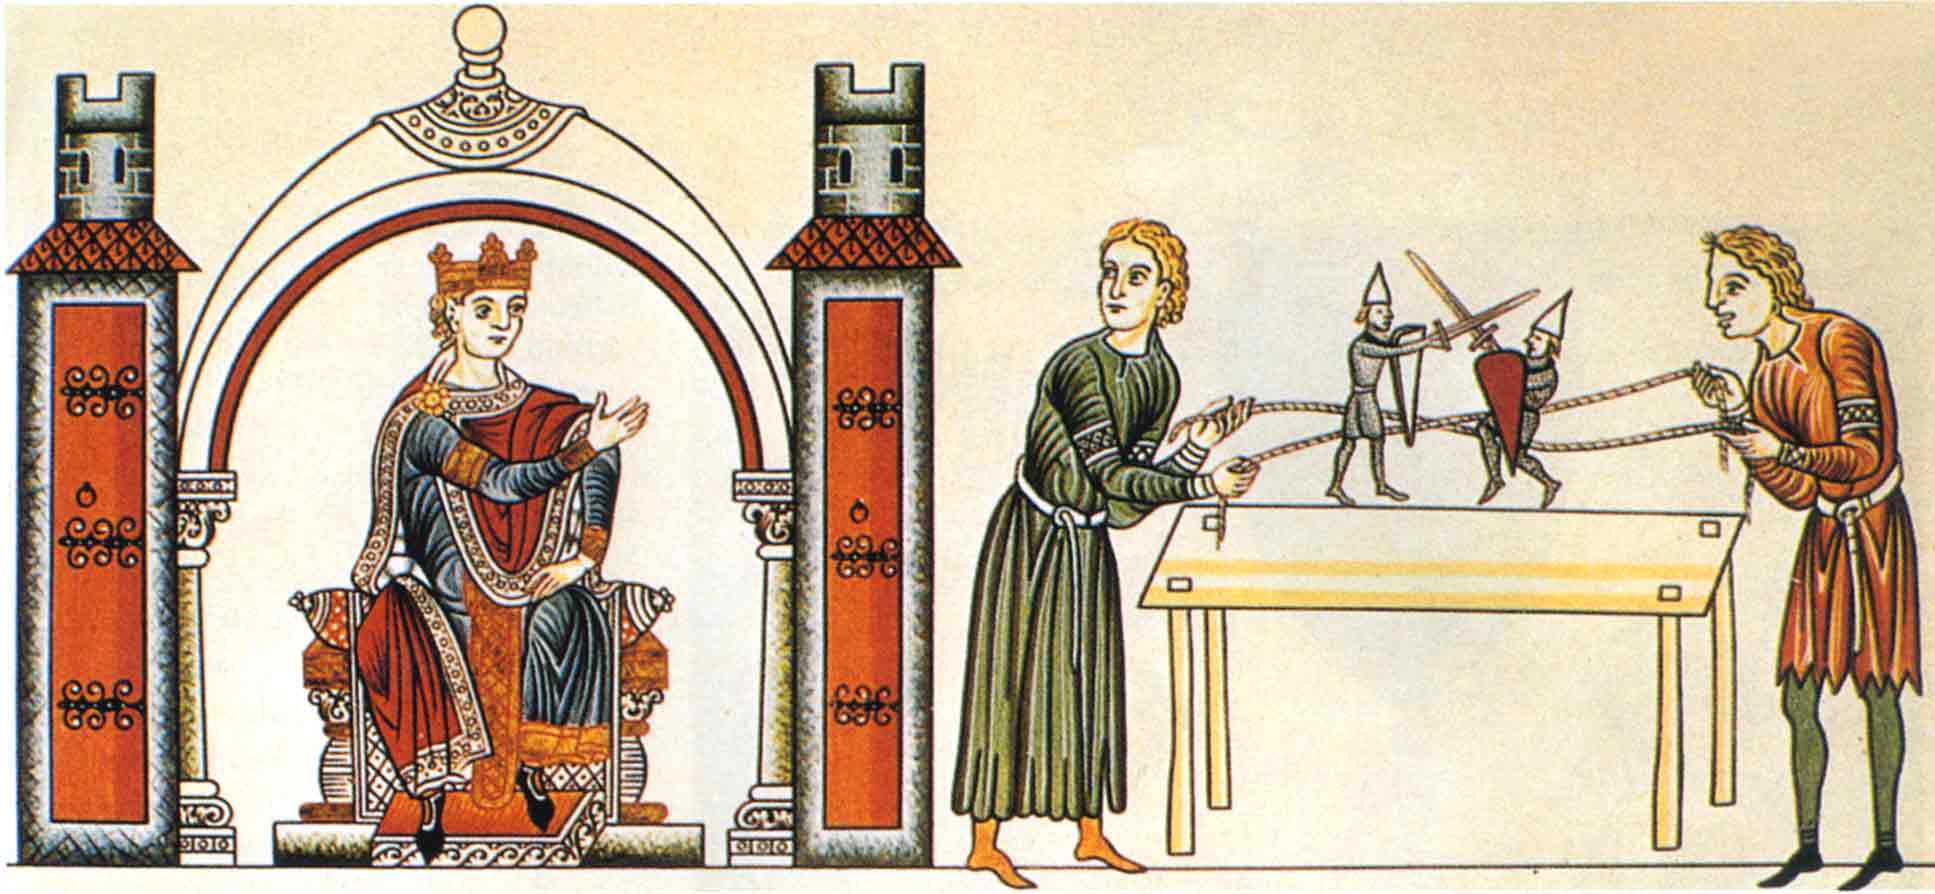
The Hortus deleciarum was a gloriously illustrated 12th Century german manuscript from Hohenbourg in Alsace, dated 1170-1200. Unfortunately it was destroyed by fire in the 19th Century. Fortunately several handdrawn copies were made before this happened, but unfortunately they were drawn by artists with strong preconceptions about what they would see in the pictures, and so many subtle errors have crept into the redrawings, for example women who look like they are wearing corsets. The above redrawing is by Engelhardt, the complete redrawings by this artist are online. Annother two Victorian era artist's redrawings of this scene can be seen here and here. While we cannot be sure of any fine details on these redrawings, the similarity between the various redrawings gives me confidence that the essentials of these pictures are correct.
This article gives a nice background to this drawing and points out that the people depicted are not children, but adults frivolously wasting time. This makes more sense to me, as the illustrations of this era do make some differentiation between adults and children, at least in terms of size, but often in the more naturalistic high quality german pieces of this era, also begin to show some of the proportion of children too.
At any rate, the picture depicts two people holding two ropes which manipulate two puppets, so I did a little research into medieval puppetry. This article and this article and this article are fascinating, but it looks like this is a very specialised topic, which would be challenging to research in greater detail.
The 1st reference refers to this kind of puppet as a "jiggling puppet", but I could not find any information on the web by searching for this kind of puppet - and my web searching skills are quite good. I briefly considered taking this research a step further and expanding my search to books, mailing lists and more in depth searches, but then decided to keep this a simple project.
Instead, I attempted to build a mock up version of how I believed the puppet might have worked. I was rather free in that all I had to recreate was the end effect, not a specific way of achieving it. It took a couple of pieces of cardboard, a rope, some twist ties and about 12 minutes. I cut the cardboard into a rough shape and used twist ties to attach one piece rope to each piece of cardboard.
Stunned by how simple this was to make something successful, I decided to make a fancy version of this. Wanting the puppet to have greater longevity, and to be able to be played with by rough children (even if the illustration is of adults, my version will go to children, in accordance with competition rules), I needed something sturdier than one sheet of cardboard. Multiple sheets of cardboard might work, but aren't very period. Leather would be harder to paint, and might bend if damp. Metal (thin sheets to keep it light) would be lovely, but metalwork is daunting to me, and I'd have to do a lot of work to finish rough edges. Wood seemed the right material for me.
A visit to my local harware store offered only balsewood (a bit weaker than I'd prefer) as a flat sheet of wood, not containing glue. Not containing glue was important since I had a new pyrography iron I'd like to test (the instructions with it contained instructions on stencil making), and I didn't want to burn glue and create noxious fumes. Also I don't think plywood was very common in medieval times, and I'm pretty sure no equivalent of craftwood and mdf (woodchips in glue) existed.
I did find a way to make the swords more study though - there was some very thin hardwood beading available, while looked quite like a sword from the correct orientation.
I traced out an image of fighting knights onto my balsawood, but I wanted a little more detail than was in the tiny Hortus deleciarum images. I'm fond of an image of knights fighting which is from an similar time and place, so I altered my traced images to look more like this image:

The barrel helms also made drawing and cutting out the shapes easier, while the surcoat allows a more colourful image, which i hoped children would enjoy more (and so they could easily tell them apart - the red knight and the blue knight).
I proceeded to cut out my images with my pyrography iron, but that wasn’t working well, since the balsa wood was about 3 times thicker than it could easily burn through. If I had been able to get some hardwood sheets, I would have preferred about 1/3 of the thickness, so I think the pyrography iron would have worked well then.
Since pyrography was working so poorly, so I cut it out with a stanley knife instead. Since it was balsawood, instead of hardwood, it was easy to cut, except a few corners which split off and had to be glued back on again.
I carved/burnt the edges of the beading to form sword shapes, and glued these to he balsawood hands. I used superglue because it was quick. I think medieval people would not have used glue in such a crucial section (perhaps rivets, pins or good socketing), but then I expect the whole piece would have been stronger, so a stronger sword section is unlikely to have been a consideration.
Once I had cut out knights, I glued on strips of cardboard to hold the ropes. Perhaps I should have used strips of leather or shaped metal, and maybe should have pinned or rivetted it on, but I was running late and out of imagination at the time.
I painted the figures with acrylic paints because they were close at hand and non-toxic. I tried to paint in a 12th C manuscript cartoon style by outlining the image in black.
The knights run along their ropes quite well. The system I ended up using was to firmly attach one set of loops to the rope, and then use a loose second set of loops which were just to hold to rope loosely near the knight. The strip of cardboard was not tight enough, so used pins to hold the rope in place on the tight loop.
The toys turned out much better than I expected (especially the rush job of cutting and painting), and looked great. They were a hit with at least one of the boys, which luckily (for him) was the winner of the boffer tourney and had his pick of the toys to take home. I'm happy to see my toy where it will be appreciated, and I hope it won't break too easily.
Monday, 27 April 2009
Past constructions I: red linen cote
This series of posts exists to record some of the cutting plans I have used for tunics in the past, and to save their dimensions for future use. It's mainly for me so I don't have to keep remeasuring and guessing, but you may find this useful to work out your own cutting plans, especially if you are a local who has tried on any of my tunics and can compare the fit.
Seams were constructed by sewing running or backstitch and then flattening the seam allowance (with cut edge folded under) to both sides of the seam and sewing it down with running stitch . I didn't know that stronger and more period methods such as flat-felling to the same side existed when I did this. Again I'd fallen for the myth that this seam style, known from the back of a pair of London hose, was a common style.
The cutting plan used for this garment used simple rectangles and triangles as are seen in various period tunics. This garment was tighter on the body to follow the fashion for tightly fitted garments in the 12th C.

The centre gore was not very easy to insert neatly, and I'm still not very fond of the look of centre gores. This was the last time I bothered inserting center gores for several garments, as side gores are so much simpler.
Originally I inserted fichets in the side seams of this dress so I could conceal a pouch beneath my skirts. I'd noticed very few pouches shown in pictures, and posited that a concealed pouch could explain this. Unlike the later garments I'd copied the fichets from, my fichets were very much to the side of the garment as they were placed in a seam rather than cut holes in the fabric (something I'm still scared of), and there were very few seams to choose from in my garment. My fichets were thus a little less practical than they might have been, but still worked fine.
However, having a pouch tangling in my skirts was a bother when dancing, and having a
gap through which my chemise showed was most improper. That's not me acting strangely, the photographer has caught me mid galliard, and you can see my fichet quite clearly. Here's a photo showing that the fichet showed even when posed quite sedately:
 Eventually I sewed up the fichets because I wasn't really using them anymore. I think having a fichet on the main dress layer, rather than an extra (overcoat equivalent) layer worn outdoors was silly, as my chemise showed, and a medieval lady would be more likely to carry a pouch outdoor than indoors when dancing. Unfortunately my mild climate seldom allows me the chance to wear an extra layer outdoors in summer.
Here's a shot with the simple yet elegant keyhole neckline showing clearly: I normally fasten the neckline with a penannular or disc broach, but it sits quite happily and decently without one.
And a photo of the tunic laid flat - see how there really are no cures in the design, yet it does curve to the body. I really like the cut of this garment for an everyday garment.
Overall, this garment has served it's purpose very well indeed. This garment is so practical and comfortable that it has had 3 times the wear of any of my other dresses. It packs up small, washes easily, is cool in summer and hides wine stains quite well. (I don't drink wine that often, but I seem to always manage to spill some on me, even if it's only the sauce on the pears)
The only thing that I regret on this garment is the fabric and the seam finishing treatments. The linen is a bit more drab than wool or silk, not easily doccumentable (as a coloured fabric), a little cold when wet, it just doesn't have good drape, and the fabric is so weak that it will tear into rags soon. And thus was hatched my plan to make a really thin woolen dress cut to this pattern to replace this garment.
Monday, 23 February 2009
Pictures of Beds - 12th Century of course!
Some pictures of 12th C beds, for Amalie, who made almost exactly the tent I want, so I'm hoping she'll make the bed I want and then I can find someone to make a copy of her prototype :-). The other pictures of people sleeping show what may be simple pallets on the ground, people just wrapped in cloaks of blankets, pictures which smudge out the details of what they are lying on, and people lying on beds that look like slabs with no upright features. These depictions of beds are all fairly similar in construction, and look lightweight enough to use for camping, indeed one is shown in a tent below. Notice how these beds often double as couches.
Bede "Life of St. Cuthbert" (British Library Yates Thompson 26)
Durham; last quarter of 12th century
Images online here and there, with lots of beds in it.
f21. The dying Boisil instructs St. Cuthbert, and prophesies things which were to come to him.
f.80 A paralytic is healed by contact with one of St. Cuthbert's shoes
f61. A sick man is healed with bread which St. Cuthbert had blessed
f33v. St. Cuthbert drives out a devil from the wife of Hildmaer, a prefect of King Ecgfrid
f54. After St. Cuthbert's election to the bishopric, an earl's servant is cured by water blessed by the saint
f58v. The wife of an earl is cured, after a monk sprinkles her with holy water sent by St. Cuthbert
Admont Bible (Österreichische Nationalbibliothek, Wien. Cod. ser. nov. 2701)
Salzberg early 12th C
I've rambled about this manuscript before.
f18. The story of Hoshea
Copenhagen Psalter (Kongelige Bibliotek Thott 143 2º)
England, 1175-1200.
f9v Nativity
 Aberdeen Bestiary (Aberdeen University Library MS 24)
England around 1200
f57r The Caladrius looks at a sick person, takes the illness upon itself and flies away with the disease to the sun.  I quite like this one - a couch and bed combined, the rails at the back, as well as acting as backrests, could be used to hang clothing over. Although they may limit how close the bed can be placed to sloping tents walls.
Skylitz chonicles (Biblioteca Nacional, Madrid Bibl. Nac. vitr. 26-2)
mid-12th mid-13th century,  Look how large the bed is compared to the tent.
Winchester psalter (British Library MS Cotton Nero C.IV)
c1145-1155
f 29. The Death of the Virgin
Worchester Chronicle (Oxford, Corpus Christi Library, MS 157)
Worchester Cathedral Priory, England, c1130-40
The Visions of Henry I in Normandy
 This bed is a different style - we can't see the legs properly, but the bed head is a solid piece, instead of two poles and a crossbar.
Wednesday, 21 January 2009
peasant shoes II - peasant shoes for royals too! part 1
[pushed out early - please check in a week or two for updates]
While I was making the previous two prototypes I noticed this picture:
I have shown this before, but hadn't thought about how they were constructed.
So I tried to make my own copy:
 I made these the same as the previous pair of peasant shoes, but with an initial higher cut at the ankle, which I then cut into tabs. There were less gathers at the front, due to the way the tabs pull. It might even be possible to remove the gathers completely for someone with a narrower foot than mine.
It wasn't much harder to make than the last pair, and looks more interesting. I didn't end up with an exact copy because I was working from memory and put too many tabs in.
Here's the pattern laid flat:
This didn't really look like the picture unfortunately. And something was not quite right to my mind about the fit of these too - there were stress lines the at ran along a diagonal over the outside of the heel. I began to wonder if instead of drawing on the curving tabs, I should just be making slashes, and letting them become their own tabs on my foot.
And then I found this, lurking in an article I'd looked at before and put away:
An extant shoe made in one piece! And one that looked quite similar to the ones I'd been making.
The Article: Gall, Günter. "Die Krönungsschule der deutschen Kaiser." Waffen- und Kostümkunde 15 (1973): p1-24
The caption to the above diagram says:
Die Schnittmuster für die Sandalia des 12. Jahrhundert, die aus einem Stück Brokat, wohl mit unterlegtem Leder, geschnitten wurde. Die Konstruktion dieser Sandalia zeigt die Nähte auf dem Rist und an der Ferse, die durch die Goldborte verdeckt wurden.
Roughly translated by me (corrections welcome) that is:
"Cutting diagram for the 12th Century sandals, from one piece of brocade, probably cut in one piece with the underlying leather. The construction of these sandals shows the stitches on the instep and heel, that were concealed with gold bands." (Note- I believe this should read vamp, instead of instep.) The article talks about these shoes and 2 other existing and many post medieval lost pairs, one of which is the more famous "shoes of ". It notes that on this pair the gold bands are used to conceal the seams, but the other two pairs are made in a different fashion (a 2 piece construction similar to ordinary turnshoes of the day I believe), but still use this decoration placement. The article contains few details of the construction, but talks extensively regarding the historical provenance of the shoes. There are probably many more details I am missing in the translation.
I then enlarged the cutting diagram shown above to the width of my foot at the instep, and made a mock up shoe out of felt from this tracing.
Unsurprisingly, the shoe is too long for me - I do have wide toes, a narrow heel and high insteps, that mean few modern shoes fit well.
I decided to make a version that fitted my foot's peculiarities, adapting the above pattern to my measurements.
The next step will be to make a version in leather an brocade fabric, but that will be in the next episode I think. Just a warning - this project is being nudged aside by other projects that are more wearable at the event's I'm attending soon, so it might be a while to wait.
Tuesday, 13 January 2009
A Chemise for the Austrian Dresses III - Construction underway
Well, everything was going so well with the new chemise. I've started sewing and my seams are much narrower than last time I sewed a chemise.
And my sewing is happening really fast. I'd forgotten how fast I could sew, since my last few projects have all experimented with tricky materials, curving seams, new seam types, or have used new cutting diagrams and a lot of picking.
And then tragedy struck. I'd been carrying my chemise bits in a bag to work and back, sewing on the train. And somewhere the gussets fell out and didn't get picked up again. And I don't have any more of this fabric. Thankfully my sleeves are so long that I can easily shorten them by a gusset length.
Here's the sizes of my pieces now:
And now back to construction. Maybe I can finish it within the week!
full length hose
We're revisiting my 2008 creations here - I'm determined to get all my 2008 making things projects (the research projects will take too long) recorded before we get too far into 2009.
Here's my first foray into full length hose:
The fabric is linen, as is the thread (cheaper than wool, and friendlier on the thighs). The pattern for the bottom half is the same I've used previously, while the upper half is an attempted extension of this. seams are run and fell over the whole hose, since I can't work out just why the london hose open the back seam on their hose yet. It's weaker, I guess it could be more elastic, but is that really needed? The top of the hose fabric is turned over and a line of backstitch located about 3mm from the top edge to provide stiffness and reinforcement. The edge of the fabric turned over at the top is turned under and whipstiched to the rear of the inside. I have no historical justification for doing this, but it seems right given I'm not strengthening the portion by
This pair turned out fairly well for a prototype. The legs are possibly a little short, and maybe a little tight at the back of the knee. I discovered why so many period examples have a particular type of join at the top of the leg when my pattern exceeded the width of my fabric. This strange curving shape is in fact the straight line where a bias cut pattern meets the edge of the fabric at 45degrees. Here's another example in linen, although the seam is seems to be on the wrong side. I remember at least one more example in the latest patterns of fashion book. I wish I had used such a seam to give me extra room in these hose, but I'm reluctant to unpick a finished article.
I think the tightness at the back of the knee problem relates to me making this section moderately tightly fitted like the rest of the hose - I think this may be one of the places where a bit more looseness is needed. Experimentation with more wear and on later models will tell.
The top of the hose has an eyelet bound in buttonhole stitch, from which I used ribbon (a temporary measure) suspended from a band of ribbon at the waist. This mostly worked, which is surprising since I expected to need proper braes to make the suspension work properly. I don't think these hose will get a lot of wear until I have braes though.
That's about all I can think to say about these hose for now. In the interests of discretion, I'm not providing photos of me wearing them until I have braes.
Monday, 12 January 2009
Blue Wool Cote I: cutting plans
The most frequently worn item in my wardrobe is my red linen cote. It's very practical, easy to move about in, quick to slip on, and I can even slip it over modern clothes. It's also quite cool, which helps on our hot days, and is easily worn under my thicker wool garments on the colder days. In fact it makes life easier to have a dress under garments such as my thick burgandy wool dress, since if I get warm I can remove the wool dress and still be respectably dressed.
I have two main problems with this dress. Firstly it's made from coloured linen, and I'm fairly confident that coloured linen was not at all common in the era I try to portray, especially not in garment which would need more cleaning. There are references to the white chainse, a form of linen dress in the 12th C, but the very fact that this linen garment is synonymus with the colour white makes me think coloured linens were unusual, and generally not worth the effort for clothing. The linen doesn't flow on the body like my wool dresses do (the aforementioned chainse incorporates pleats for a non-flowing look), and the colour is fading, and when the day cools down, or the garment gets wet, it's so much colder than wool.
The second problem is simply that the garment is getting old and wearing out. I made it in 2003, and wear it at least one day a month, often more. It gets washed at least 4 times a year. Servants were given one new set of clothing per year, so I guess this is a guide to how long a garment might be expected to last. My garment hasn't but it is getting laundered more than I'm sure most medieval garments do, and it is made from a noticeably thinner and weaker weight of linen than I would expect most medieval people to have had access to. The garment is pulling out fabric around stitches, developing wear patches and similar. While the points that are wearing out first do reflect weaknesses in my sewing a tailoring technique, the cloth of the whole garment is on the verge of unravelling.
Well the solution has been at hand for a while, I've had a nice bargain buy piece of navy wool suiting waiting in my stash for me to be ready to cut it up. It's a lovely thin suiting, so It should be nearly as cool as the linen on the hot days. (Well the navy colour may be a mistake if I'm in the sun, but as long as I stay in the shade it should be good). My inspiration to make this the time to cut up the fabric was two-fold - I'm going to canterbury faire, and want to look my best (and have clothing that reflects the state of my knowledge today, not 5 years ago) when I meet a lot of new people, and I'd just read a lovely ladies description of a 13th C dress, and detailed answers to my questions regarding seam treatments and this seemed the perfect place to try them out.
So this is the general shape I decided on:
It's a general shape that seems to be in line with what we know of 12th C tailoring. It doesn't incorporate any of the fancy features of bliauts, and it is very tight about the body, unlike the 13th Century fashions. In fact I may have made it a little too tight in the body compared to historical reality (although with so little in the way of extant female garments you'll find it difficult to prove me right or wrong), but let's just call me a fashionable young girl. I'm not going to try and explore proto set-in sleeves in this garment - being a cote, it is more likely to have been of a simpler older-fashioned cut with less technological innovations than the bliauts.
It's basically the same lines I used on my red linen and burgandy wool tunics, but with the following alterations:
- the seam allowances will be smaller in line with the different sewing technique
- the dress will be a little longer than the red linen dress - the dress was always intended to be longer, but I made an error in placement of the gores and was too heartbroken to resew everthing, so I moved the sleeves down and resewed the shoulder seam lower, thus reducing the whole height
- the dress will have slightly longer sleeves. I would like to play with the concept of rucked up sleeves on an ovegarment, and if I don't like them, I can easily shorten the sleeves.
- the dress will be slightly narrower in the body. I want to see how tight I can make the garment (in line with 12th C fashion), before lacing is required. If I can't pull this on easily then I will lace the sides.
 And here's the way it fitted on the fabric (wastage/scrap in pale blue):
The exact length of the sleeves and width of the gores was determined by the fabric width. Likewise the choice to have a shoulder seam or continuous fabric was make by the fabric (too short, but wide).
Sunday, 11 January 2009
A Chemise for the Austrian Dresses II - revised cutting plan
Well my plans have hit their first hitch. I conducted burn and other tests on my suspected linens, and I'm not really sure what the larger piece is, but I'm no longer sure it's linen. The smaller piece though, that at least behaves more like linen, though in my more skeptical moments I'm not sure it's pure linen either.
The smaller piece is 4m long, but it's only 112cm wide, so it's just enough to cut out a chemise. But if I use a trapezoid shape for each piece that is originally a rectangle, I gain only the width of the rectangle added to the circumference of the chemise, while with triangular gores, I gain nearly twice the width of the rectangle, as the rectangle is cut diagonally and the other end added to the circumference.
Now I guess some of this is false economy, since wider skirts over the hips would be really useful to me, but since only the calf section of the chemise will be visible under the dress, and extra width at the hem should help me dance better, and well I just can't fit in the size of trapezoids I want, I'll make a non-shirred chemise now, and aim to make a shirred one later in the year.
How the styles look and hang under the same dress, cut to the same plan except the gores should be a great comparison to see.
So here's my planned layout for the chemise:
And here's the pieces I will require: And how they fit on my fabric:
 I'm quite happy with the efficiency of this. The only portion not used is a scrap in the corner next to a piece that had been cut off. If there hadn't been a piece cut off, I would have used this to make my sleeves longer.