Showing posts with label cote. Show all posts

Wednesday, 13 February 2013

Blue wool cote II: Revenge of the fabric


I've written about the plans I had for constructing my blue wool cote earlier. And just as I had written, I constructed the garment. And it was a good fit, and comfortable. And the wool was flowier than the linen. And the wool was warmer than the linen when it was cold, and not much warmer when it was hot. And I forgot to take any photos of it. From my memory, the only difficulty I had was the seams were a little more difficult to sew than regular seams because I was always working in the middle of the fabric, and because the fabric was so thin.

But alas very quickly my choice of fabric let me down. I had chosen a thin wool suiting, and the fabric manufacturer had decided to make the fabric modern by doing something to stop it fulling (making it machine washable). I don't know if it was  treatment or if they chose worsted wool or something else, but the wool frayed, and refuse to full (felt) even with warm water and soap. And it frayed more, and I was in deathly fear that all my seams would fray out and my dress fall to pieces.  Possibly in embarrassing ways. So with tears in my eyes for all the effort I'd spent constructing the dress, I set about systematically resewing each and every seam on the garment (well maybe not the entirety of all hems). I tried to maintain the effect of the original stitching, by tucking in the edge of the fabric and then sewing both seams together in the same manner as the original seams, but now with no exposed edges.

Here's how the seams looked after resewing::


 This worked well, the seams years later are still not fraying, and I still maintain the original magnificent effect of the white thread on dark blue fabric, but without the fraying. And I only had to resew the entire garment (I'm not bitter :-) ).

I still forgot to take photos of the entire garment at this stage, but I do have some photos of details which have not changed, so let's take a closer look at some of the features of the garment:

neckline detail - this was bound with a piece of straight grain tape made from the same fabric


 gusset detail - see how interesting the white linen on blue dress looks


arm detail - see how the extra length ruches (gathers) up about the wrist


front of centre gore -I decided to play with the gore insertion, gathering the gores into the body pieces slightly. This was inspired by the gathering seen in side seams of 12th C garments and a half remembered reenactor's late period gathered garment. I have little evidence for centre gores at all, let alone gathered in ones, so this was mostly an excuse to explore garment cut than a serious conjecture about how centre gores might be finished (side gores are a different matter).

back of the seam showing the reinforcing piece I sewed on to strengthen the pleating. This piece doesn't really support the garment, but it protects the back of the pleats from rubbing, and the edges of the pleats from fraying. I have only half garbled inspiration for such a construction, but I did need to protect the frayable edges of my fabric.

You might be wondering why I don't have any photos of the garment at this stage- wasn't it finished this time? Alas no, the seams were working great, but there was one problem with resewing the entire garment (other than having to resew it), which was my seam allowances were now much larger than they were before, and consequently the width of my pieces became narrower. What was once a casual comfortable garment was now tight across the chest and upper body. But it wasn't tight like my side laced garments, it was too tight for a loose garment, but not as tight as a tight garment - the worst of both worlds. So more changes were afoot, which I'll write about in the next episode of the saga.

Sunday, 26 August 2012

Red linen cote redux and musings on handsewing your first garment

I've written about my first completely handsewn garment before, a linen cote I made. but I find I have a few more things to say about the garment.

The first thing I'd like to talk about is my motivation for handsewing the garment. I can remember it because I was going to pennsic in 2003 and wanted to sew the dress on the 24 hour plane ride. I don't think I finished the garment in time to wear it at pennsic (although I got plenty of sewing done on the plane), but I think it was probably finished before the start of 2004. It really helped to have a lot of time set aside for sewing the garment and a reason to be handsewing it, as otherwise i probably would never have finished it by hand.  These days my sewing is much quicker and I can sew without a lot of concentration, so sewing is a nice braindead way of keeping my hands busy, so I easily complete garments rapidly, but I remember this first garment took a lot longer, more concentration and a lot more effort to finish.

The garment also almost caused more tears than my subsequent handsewn garments. When constructing the garment, I had finished nearly all the seams on the garment when I discovered the gores were inserted too low in the garment to comfortably expand over my hips. It was a moment of much despair, for handsewing was a very long and slow process at that stage still. Eventually I decided if I undid the shoulder seams and removed the sleeves and reinserted them lover and shortened the shoulders in order to avoid undoing the very long seams on the gores. This made the dress a tweak shorter than I'd planned (I had cut it to floor length so I could choose any length I'd wanted), but actually was a very practical length. So my first advice to anyone wanting to handsew a garment - make a (wearable) mockup by machine first.

Another piece of advice for the would be first time sewwer is to invest in the best quality fabric you can buy. At the time I couldn't find affordable wool (I was a poor uni student, and I didn't know where the best bargains on wool were to be found), and I wanted something thinner for hot days. However the fabric choice has been the garment's weakest point - as well as being unable to clearly document coloured linen for the 12th Century, the fabric is quite weak after repeated washings (it can't be beaten clean or effectively spot cleaned like wool) and the fabric is quite literally falling to pieces in many places. This dress is soon to be for the rag pile.  But more significantly, the fabric wasn't as easy to sew as my later constructions in thicker ramie and wool. Thinner more loosely woven weaker fabric means the fabric doesn't grip the thread as well, is more likely to get holes when you make mistakes or unpick too often and just to not feel as good to sew.  It's a subjective thing, but I've sewn this fabric since, and it wasn't just my novice sewing skills that made this difficult.

The garment is intended to be a 12th C cote - a day garment, practical to wear but with still some stylish features like very tight sleeves and fairly tight torso. I'm very happy with the cut of this garment. It's a nice conjecturally period cut and very comfortable to wear. The only debatable feature is the highly sloped shoulder seams. Many medieval garments have no shoulder seam at all, and thus are of course not slanted at all. My shoulders are quite slanted though, so this does improve the fit (the slant was fitted to my shoulders).

One of the things I like about this garment is the neckline. It's a nice tight neckline, allowing minimal sunburn, sitting nicely, just like in the manuscripts. To achieve this I shaped the neckline to my neck rather than predrawing a larger neckhole. I'll write about my neckline method someday soon. I also shaped the sleeves in a similar manner - fitting them from a basic rectangular shape to my arms, rather than a measured out shape. I think both of these worked very well indeed, and continue to use these methods.

This dress has served me well, and will be replaced by a very similar garment very soon now. In fact the blue lightweight wool cote was planned to be a replacement for this dress, but circumstance is dictating otherwise.

Monday, 27 April 2009

Past constructions I: red linen cote

This series of posts exists to record some of the cutting plans I have used for tunics in the past, and to save their dimensions for future use. It's mainly for me so I don't have to keep remeasuring and guessing, but you may find this useful to work out your own cutting plans, especially if you are a local who has tried on any of my tunics and can compare the fit.

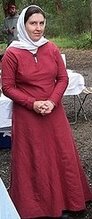
My dark red (maybe even burgandy) linen cote was my first completely handsewn garment. The fabric was a thin (shirtweight) fairly evenly, but not very tightly woven fabric, which all my tests diagnosed as linen. As it was a bargain buy without labels, I'll never be able to be quite sure if my identification was correct. The fabric was a little thin for a dress, but it was cheap, available and not cotton. And I was having to wear garb on 40C days occasionally.


The thread was ordinary sewing thread - gutterman's polycotton machine thread. In retrospect this wasn't a good choice. The thread slips easily through the linen, possibly even cutting into it a little. Seams in running stitch on this garment form gaps easily, and even backstitch forms gaps easily. I don't think this was a problem with my sewing, as this happens on all the seams on the garment, but was instantly fixed when I made the next garment with linen thread that grips the fabric just a little. I also regret the choice to use black thread. It would have been difficult to dye any thread this black, and most linen thread would have been undyed I believe.

Seams were constructed by sewing running or backstitch and then flattening the seam allowance (with cut edge folded under) to both sides of the seam and sewing it down with running stitch . I didn't know that stronger and more period methods such as flat-felling to the same side existed when I did this. Again I'd fallen for the myth that this seam style, known from the back of a pair of London hose, was a common style.

The cutting plan used for this garment used simple rectangles and triangles as are seen in various period tunics. This garment was tighter on the body to follow the fashion for tightly fitted garments in the 12th C.


The garment ended up a little shorter than I had planned, because after sewing everything together, I discovered the gores started too low down the body. I ended up unpicking the sleeves and taking up the shoulders (by about 5cm?) to fix this, because I couldn't face unpicking and resewing all those long skirt seams. Originally the whole body (front and back) was one long piece, and the shoulder seams were flat.

The centre gore was not very easy to insert neatly, and I'm still not very fond of the look of centre gores. This was the last time I bothered inserting center gores for several garments, as side gores are so much simpler.

Originally I inserted fichets in the side seams of this dress so I could conceal a pouch beneath my skirts. I'd noticed very few pouches shown in pictures, and posited that a concealed pouch could explain this. Unlike the later garments I'd copied the fichets from, my fichets were very much to the side of the garment as they were placed in a seam rather than cut holes in the fabric (something I'm still scared of), and there were very few seams to choose from in my garment. My fichets were thus a little less practical than they might have been, but still worked fine.

However, having a pouch tangling in my skirts was a bother when dancing, and having a
gap through which my chemise showed was most improper.
That's not me acting strangely, the photographer has caught me mid galliard, and you can see my fichet quite clearly. Here's a photo showing that the fichet showed even when posed quite sedately:
Eventually I sewed up the fichets because I wasn't really using them anymore. I think having a fichet on the main dress layer, rather than an extra (overcoat equivalent) layer worn outdoors was silly, as my chemise showed, and a medieval lady would be more likely to carry a pouch outdoor than indoors when dancing. Unfortunately my mild climate seldom allows me the chance to wear an extra layer outdoors in summer.

Here's a shot with the simple yet elegant keyhole neckline showing clearly:
I normally fasten the neckline with a penannular or disc broach, but it sits quite happily and decently without one.

And a photo of the tunic laid flat - see how there really are no cures in the design, yet it does curve to the body. I really like the cut of this garment for an everyday garment.

Overall, this garment has served it's purpose very well indeed. This garment is so practical and comfortable that it has had 3 times the wear of any of my other dresses. It packs up small, washes easily, is cool in summer and hides wine stains quite well. (I don't drink wine that often, but I seem to always manage to spill some on me, even if it's only the sauce on the pears)

The only thing that I regret on this garment is the fabric and the seam finishing treatments. The linen is a bit more drab than wool or silk, not easily doccumentable (as a coloured fabric), a little cold when wet, it just doesn't have good drape, and the fabric is so weak that it will tear into rags soon. And thus was hatched my plan to make a really thin woolen dress cut to this pattern to replace this garment.


Monday, 12 January 2009

Blue Wool Cote I: cutting plans

The most frequently worn item in my wardrobe is my red linen cote. It's very practical, easy to move about in, quick to slip on, and I can even slip it over modern clothes. It's also quite cool, which helps on our hot days, and is easily worn under my thicker wool garments on the colder days. In fact it makes life easier to have a dress under garments such as my thick burgandy wool dress, since if I get warm I can remove the wool dress and still be respectably dressed.

I have two main problems with this dress. Firstly it's made from coloured linen, and I'm fairly confident that coloured linen was not at all common in the era I try to portray, especially not in garment which would need more cleaning. There are references to the white chainse, a form of linen dress in the 12th C, but the very fact that this linen garment is synonymus with the colour white makes me think coloured linens were unusual, and generally not worth the effort for clothing. The linen doesn't flow on the body like my wool dresses do (the aforementioned chainse incorporates pleats for a non-flowing look), and the colour is fading, and when the day cools down, or the garment gets wet, it's so much colder than wool.

The second problem is simply that the garment is getting old and wearing out. I made it in 2003, and wear it at least one day a month, often more. It gets washed at least 4 times a year. Servants were given one new set of clothing per year, so I guess this is a guide to how long a garment might be expected to last. My garment hasn't but it is getting laundered more than I'm sure most medieval garments do, and it is made from a noticeably thinner and weaker weight of linen than I would expect most medieval people to have had access to. The garment is pulling out fabric around stitches, developing wear patches and similar. While the points that are wearing out first do reflect weaknesses in my sewing a tailoring technique, the cloth of the whole garment is on the verge of unravelling.

Well the solution has been at hand for a while, I've had a nice bargain buy piece of navy wool suiting waiting in my stash for me to be ready to cut it up. It's a lovely thin suiting, so It should be nearly as cool as the linen on the hot days. (Well the navy colour may be a mistake if I'm in the sun, but as long as I stay in the shade it should be good). My inspiration to make this the time to cut up the fabric was two-fold - I'm going to canterbury faire, and want to look my best (and have clothing that reflects the state of my knowledge today, not 5 years ago) when I meet a lot of new people, and I'd just read a lovely ladies description of a 13th C dress, and detailed answers to my questions regarding seam treatments and this seemed the perfect place to try them out.

So this is the general shape I decided on:


It's a general shape that seems to be in line with what we know of 12th C tailoring. It doesn't incorporate any of the fancy features of bliauts, and it is very tight about the body, unlike the 13th Century fashions. In fact I may have made it a little too tight in the body compared to historical reality (although with so little in the way of extant female garments you'll find it difficult to prove me right or wrong), but let's just call me a fashionable young girl. I'm not going to try and explore proto set-in sleeves in this garment - being a cote, it is more likely to have been of a simpler older-fashioned cut with less technological innovations than the bliauts.

It's basically the same lines I used on my red linen and burgandy wool tunics, but with the following alterations:

  • the seam allowances will be smaller in line with the different sewing technique
  • the dress will be a little longer than the red linen dress - the dress was always intended to be longer, but I made an error in placement of the gores and was too heartbroken to resew everthing, so I moved the sleeves down and resewed the shoulder seam lower, thus reducing the whole height
  • the dress will have slightly longer sleeves. I would like to play with the concept of rucked up sleeves on an ovegarment, and if I don't like them, I can easily shorten the sleeves.
  • the dress will be slightly narrower in the body. I want to see how tight I can make the garment (in line with 12th C fashion), before lacing is required. If I can't pull this on easily then I will lace the sides.
And here are the pieces I need to cut out with measurements incorporating those changes:
And here's the way it fitted on the fabric (wastage/scrap in pale blue):

The exact length of the sleeves and width of the gores was determined by the fabric width. Likewise the choice to have a shoulder seam or continuous fabric was make by the fabric (too short, but wide).