This series of posts exists to record some of the cutting plans I have used for tunics in the past, and to save their dimensions for future use. It's mainly for me so I don't have to keep remeasuring and guessing, but you may find this useful to work out your own cutting plans, especially if you are a local who has tried on any of my tunics and can compare the fit.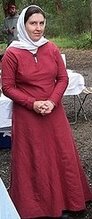
Seams were constructed by sewing running or backstitch and then flattening the seam allowance (with cut edge folded under) to both sides of the seam and sewing it down with running stitch . I didn't know that stronger and more period methods such as flat-felling to the same side existed when I did this. Again I'd fallen for the myth that this seam style, known from the back of a pair of London hose, was a common style.
The cutting plan used for this garment used simple rectangles and triangles as are seen in various period tunics. This garment was tighter on the body to follow the fashion for tightly fitted garments in the 12th C.

The centre gore was not very easy to insert neatly, and I'm still not very fond of the look of centre gores. This was the last time I bothered inserting center gores for several garments, as side gores are so much simpler.
Originally I inserted fichets in the side seams of this dress so I could conceal a pouch beneath my skirts. I'd noticed very few pouches shown in pictures, and posited that a concealed pouch could explain this. Unlike the later garments I'd copied the fichets from, my fichets were very much to the side of the garment as they were placed in a seam rather than cut holes in the fabric (something I'm still scared of), and there were very few seams to choose from in my garment. My fichets were thus a little less practical than they might have been, but still worked fine.
However, having a pouch tangling in my skirts was a bother when dancing, and having a
gap through which my chemise showed was most improper. That's not me acting strangely, the photographer has caught me mid galliard, and you can see my fichet quite clearly. Here's a photo showing that the fichet showed even when posed quite sedately:
 Eventually I sewed up the fichets because I wasn't really using them anymore. I think having a fichet on the main dress layer, rather than an extra (overcoat equivalent) layer worn outdoors was silly, as my chemise showed, and a medieval lady would be more likely to carry a pouch outdoor than indoors when dancing. Unfortunately my mild climate seldom allows me the chance to wear an extra layer outdoors in summer.
Here's a shot with the simple yet elegant keyhole neckline showing clearly: I normally fasten the neckline with a penannular or disc broach, but it sits quite happily and decently without one.
And a photo of the tunic laid flat - see how there really are no cures in the design, yet it does curve to the body. I really like the cut of this garment for an everyday garment.
Overall, this garment has served it's purpose very well indeed. This garment is so practical and comfortable that it has had 3 times the wear of any of my other dresses. It packs up small, washes easily, is cool in summer and hides wine stains quite well. (I don't drink wine that often, but I seem to always manage to spill some on me, even if it's only the sauce on the pears)
The only thing that I regret on this garment is the fabric and the seam finishing treatments. The linen is a bit more drab than wool or silk, not easily doccumentable (as a coloured fabric), a little cold when wet, it just doesn't have good drape, and the fabric is so weak that it will tear into rags soon. And thus was hatched my plan to make a really thin woolen dress cut to this pattern to replace this garment.
Monday, 27 April 2009
Past constructions I: red linen cote

Monday, 12 January 2009
Blue Wool Cote I: cutting plans
The most frequently worn item in my wardrobe is my red linen cote. It's very practical, easy to move about in, quick to slip on, and I can even slip it over modern clothes. It's also quite cool, which helps on our hot days, and is easily worn under my thicker wool garments on the colder days. In fact it makes life easier to have a dress under garments such as my thick burgandy wool dress, since if I get warm I can remove the wool dress and still be respectably dressed.
I have two main problems with this dress. Firstly it's made from coloured linen, and I'm fairly confident that coloured linen was not at all common in the era I try to portray, especially not in garment which would need more cleaning. There are references to the white chainse, a form of linen dress in the 12th C, but the very fact that this linen garment is synonymus with the colour white makes me think coloured linens were unusual, and generally not worth the effort for clothing. The linen doesn't flow on the body like my wool dresses do (the aforementioned chainse incorporates pleats for a non-flowing look), and the colour is fading, and when the day cools down, or the garment gets wet, it's so much colder than wool.
The second problem is simply that the garment is getting old and wearing out. I made it in 2003, and wear it at least one day a month, often more. It gets washed at least 4 times a year. Servants were given one new set of clothing per year, so I guess this is a guide to how long a garment might be expected to last. My garment hasn't but it is getting laundered more than I'm sure most medieval garments do, and it is made from a noticeably thinner and weaker weight of linen than I would expect most medieval people to have had access to. The garment is pulling out fabric around stitches, developing wear patches and similar. While the points that are wearing out first do reflect weaknesses in my sewing a tailoring technique, the cloth of the whole garment is on the verge of unravelling.
Well the solution has been at hand for a while, I've had a nice bargain buy piece of navy wool suiting waiting in my stash for me to be ready to cut it up. It's a lovely thin suiting, so It should be nearly as cool as the linen on the hot days. (Well the navy colour may be a mistake if I'm in the sun, but as long as I stay in the shade it should be good). My inspiration to make this the time to cut up the fabric was two-fold - I'm going to canterbury faire, and want to look my best (and have clothing that reflects the state of my knowledge today, not 5 years ago) when I meet a lot of new people, and I'd just read a lovely ladies description of a 13th C dress, and detailed answers to my questions regarding seam treatments and this seemed the perfect place to try them out.
So this is the general shape I decided on:
It's a general shape that seems to be in line with what we know of 12th C tailoring. It doesn't incorporate any of the fancy features of bliauts, and it is very tight about the body, unlike the 13th Century fashions. In fact I may have made it a little too tight in the body compared to historical reality (although with so little in the way of extant female garments you'll find it difficult to prove me right or wrong), but let's just call me a fashionable young girl. I'm not going to try and explore proto set-in sleeves in this garment - being a cote, it is more likely to have been of a simpler older-fashioned cut with less technological innovations than the bliauts.
It's basically the same lines I used on my red linen and burgandy wool tunics, but with the following alterations:
- the seam allowances will be smaller in line with the different sewing technique
- the dress will be a little longer than the red linen dress - the dress was always intended to be longer, but I made an error in placement of the gores and was too heartbroken to resew everthing, so I moved the sleeves down and resewed the shoulder seam lower, thus reducing the whole height
- the dress will have slightly longer sleeves. I would like to play with the concept of rucked up sleeves on an ovegarment, and if I don't like them, I can easily shorten the sleeves.
- the dress will be slightly narrower in the body. I want to see how tight I can make the garment (in line with 12th C fashion), before lacing is required. If I can't pull this on easily then I will lace the sides.
 And here's the way it fitted on the fabric (wastage/scrap in pale blue):

The exact length of the sleeves and width of the gores was determined by the fabric width. Likewise the choice to have a shoulder seam or continuous fabric was make by the fabric (too short, but wide).
Sunday, 11 January 2009
A Chemise for the Austrian Dresses - initial planning
The calf length Austrian dresses have revealed a deficiency in my wardrobe - all my chemises have hems that are well above the ankle, but the style requires a floor length chemise. So it's time to make a new chemise.
First I guess I need to analyse the style. Browsing through my posts on Germanic dress, and particularly Austrian dress, and looked at what was visible of the garment below the dress.
All were white or other pale colours likely to be meant to represent undyed or bleached linen. This could be a layer between the chemise (body layer) and the dress, but to me this seems superfluous - chemises were generally linen because this could be washed and bleached more often, with the chemise absorbing sweat and thus protecting the more expensive dress - why would an intermediate layer recreate these characteristics of the chemise? It could be a fashion that evolved out of visible chemises, making them more elaborate mock chemises, and adding areal chemise underneath, but I'm going to use Occam's razor and assume the visible layer is just a chemise.
So the chemise is visible in two places only - the hemline and the sleeves. The sleeves that are visible are quite tight to the forearm, ending at the wrist. Some are smooth, some wrinkled, and a few have a band of trim at the wrist. The hemlines are floor length or just a whisker above, and fall in many folds. No decoration is visible on the hem of the chemise.
My construction plans
This doesn't give many clues to go by, but if we assume that chemises followed the general lines of other garments of the day, particularly albs (which are a kind of clerical undergarment), then we have a couple of cuts that could be used. There is the version with a square body and gussets or there is the body that is slanted to allow sleeves to make self gussets. I choose the earlier version as I'm more accustomed to it.
Sleeves in this model are a long tube from the end of the gusset down. I'll fit the end to the forearm as I have done for earlier versions. I think I may make a modest wrinkle in the sleeves. A long wrinkly sleeve like on my old court chemise can be a little awkward to get in and out of, but I'd like to have a little wrinkling. So perhaps 1m long - halfway between an unwrinkled sleeve and the extent of wrinkles on my previous court chemise. Initially I'll leave the cuff untrimmed, but I may add trim later, especially to reinforce the stress point of the cuff - but I don't want to delay making the chemise to wait for appropriate trim to be made/acquired.
Several albs use methods of pleating in side gores into the body of the garment which creates sudden flaring at the hip. I think this will probably be needed to create enough fullness of the skirts to create the required number of folds. A couple of these albs use a technique called Italian shirring (I am told) to pleat gores into side seams. this creates a lovely pattern with the very small pleats, which should sit fairly flat. "The art of manipulating fabric" says that Italian shirring (shirred Italian smocking) shirring encourages the fabric to fall in very full folds - which is precisely the look I wish to achieve - the skirts on these Austrian chemises are actually quite tight to the body when you look closely, and the closer the chemise sits, the less fabric I require to make lots of folds. I would like to use Italian shirring to pleat in my gores if i have time to do so. I'm still not sure exactly what shape gores that are Italian shirred should be, but I plan to experiment and find out. I'm guessing a trapezoid.
If the side gores don't provide enough folds in the front, then I will add some front gores as well.
Here's how I envision it looking:
And a cutting plan for that: I'm not yet sure what hte top width of the trapezoid should be - I need to try some test pleating.
From what material should the garment be made? That's an easy answer - linen. That's what overwhelmingly all the high class undergarments are made of. I've got some mystery fabric that I think is linen, and I've had such trouble finding assured linen cheap that I'm desperate enough to use the "probably linen" fabric.
Thread? Again linen, for the same reasons, as well as practical one - wool is too weak and will snap, and silk too strong and will often snap the threads in the linen fabric (no the same does not apply to embroidery, where the fabric isn't under stress). I've some lace making thread, in 60/2 size, which has done nicely on previous chemises, and will do nicely on this one.
Finally seams. There is one technique which is used very commonly on linen textiles in the medieval period - the run and fell seam. It is much more common than other techniques, and for good reason - it is tough, easy, requires a smaller seam allowance, and is quick to sew by hand. Why would I want to use anything else?
So I guess it's time to wash and cut some fabric!
Tuesday, 23 January 2007
Costume acessories from Cod. lat. 15903 Bayerische Staatsbibliothek
While I was browsing the rather lushly illustrated in the last post, I noticed lots of features not related to women's costume. Several of them are ones I haven't seen in visual sources before.
Remember, the manuscript was Periscope book of St Erentrud, Nonberg Abbey, Salzburg around 1140 (München, Bayerische Staatsbibliothek, Cod. lat. 15903) Garters
Fol . 68 Healing of the sick
That holy grail of pictures, a depiction of hose gartered at the knee. Not you can see what we know from extant examples. The extant examples have their garters sewn to the back of the hose at the top (eg Roger's pair - but you can't see that in this photo). The pair I've made so far I use a separate piece of cord and fold the top of the hose over. It works quite nicely, but I'll have to try the other way with my next pair.
The depiction is of gartered long hose, or at least it shows no tops of the hose, so I presume these are separate garters of necessity. Hose
Their are lots of depictions of people wearing hose in most manuscripts, but most don't give many clues to their construction. There are quite a few pairs of hose depicted in this manuscript that have diagonal stripes checks or diamond patterns. [1] , [2], [3], are just a few examples. These may be indications of the cut of the hose - extant hose are known to be generally bias cut (the later ones are definitely so, I don't have any info on 12th C ones), such that the hose are slightly stretchy. Plain woven stripes and checks become diagonal stripes and checks when cut on the bias. I think this tendency to show diagonal patterns on hose (which I've also seen on other artwork) represents this. This manuscript also contains the first example I've seen contrary to the rule - a pair of hose with horizontal stripes. Mind you, I think only a couple of stripes is unlikely to be a woven in pattern, so this could represent post-construction decoration. Or just an artist on a funny day.
Just for variety, there is also one pair with trios of dots on them. This manuscript also has a depiction of what I think are pairs of hose when not on the body.
folio 11v stoning of st Stephen
This site says stoners "were laying down their garments at the feet of Saul, that they might be more ready for the task devolved upon them" so the object should be clothing, unspecified variety. They look like hose to me, but I see no reason why they should remove only their hose and not their other garments. The feet of the hose are not visible, making this identification uncertain, but the string at the top point of this pair is just what we expect from 14th C hose. The pattern on the reverse side reminds me of the buskins of archbishop Walter Hubert (c1200), pictured on right. I presume showing one side patterned and the other not is artistic license for showing the folds more clearly. Sandals?
Fol 93, Martin divides his cloak with a beggar
This pilgrim/beggar (the caption and story say beggar, his bag and staff say pilgrim) looks like he might be wearing sandals. I've seen biblical figures with thonging around their feet, but they might just be romanticising the past. A pilgrim might wear rather humble footwear than average, so this might be realism. The drawing of his legs makes him look barelegged. Hoods?
If you look at the object around his shoulders, you'll see an object that sits above his tunic. Quite a few other guys have these , but on the others you couldn't tell if it was part of the tunic (although in several cases it was a different colour) for example the trim or neck facing. This example clearly shows the object on top of the trim on the tunic. I can think of few objects that are wrapped around necks other than hoods and scarfs (and it looks to structured for a scarf). This is quite different (shorter) from any other 12th C hoods I've seen, but compare it to this 13th C hood (caption on this post), which is quite tight on the neck and doesn't extend far down the torso. I think it's a hood, but I can't prove it conclusively, since not one of the following examples from this manuscript wears one over his head: [1], [2], [3], [4], [5], [6], [7], [8], [9]. Bags
Fol 93, Martin divides his cloak with a beggar
The pilgrim has a nice example of pilgrim satchel in fairly typical shape (rectangular or square with a flap, and pilgrimage symbol eg cross or shell) and size (look how small they are!). fol14, The flight to Egypt
This is another scene I've seen a few times (caption on this post)- poorer male travellers carrying their goods over a stick. The goods appear to be contained in some kind of saddlebag or roll. I've heard of a later period bag style where you make a roll like a long pillowcase, sew the ends closed and create a slit across the width of one side only of the middle. I think this has a similar construction, but not being a rich man's object we are unlikely to find out.