I was explaining this to a friend, and then I thought this is something a lot of people could use knowing. A big thank you to the charming Estienne for acting as model (in his own creations no less).
Stuff beginner sewers will need to know first
The first thing you need to know if you are a beginner sewer is a few fabric terms. (If you are not a beginner sewer, skip ahead to the next section). The selvage is the bit at the edge when weaving that strengthens the whole piece - it's a bit firmer and stiffer than the rest and may occasionally have words or other colours woven into it to tell you about the fabric. When you pick up fabric on a roll, the selvages are at the sides (ends) of the roll, and run along all of the fabric. Selvages won't fray like normal edges will, something used to great advantage in garb.
Now the grainline is an imaginary line that runs parallel to the selvages. (It also represents the warp when weaving, and is the strongest thread.) If you try and stretch fabric in this direction it won't stretch much (except knit fabrics eg t-shirts and stretch fabrics, which are both pretty much modern inventions). The direction perpendicular (at 90°) to the warp/grainline/selvages is the weft and it doesn't stretch either. (Being the weft the thread may be a bit weaker too - that's why we generally cut out pieces with the longest dimension being along the grainline - called cutting on the straight grain).
The bias is either of the two directions at 45° to the grainline/warp/selvages/weft. It's quite stretchy in comparison to the other directions. In modern sewing this is used to great effect in bias cut dresses which cling to the body without using stretch fabric. It's also quite wasteful of fabric, and really tricky to do if you have narrow fabric widths. Medieval Tailors in general don't seem to have figured out that they could do this, but they didn't really need to - linen and wool shape to the body better than most cotton & synthetics do. Another way that the bias is used modernly is to create 'bias binding' which is used to bind edges of garments and can be used to make neat machine hems. Medieval tailors used straight grain tape to bind the edges of garments (eg collar, cuff edges, and even the seam allowances in the St Louis shirt) and it worked quite well for them because they used better materials and finer seams than we generally do today. I find bias binding looks almost the same as straight grain tape, so I thoroughly recommend it as a good substitute to the intermediate sewer.
While the true bias is at 45° to the grainline, that is the greatest stretch, there is still quite a fair bit of stretch at 30° to the grainline, so this partial bias can be used too. For example a full circle skirt will hang in lots of folds because much of the circle hangs on some kind of bias. A narrow A-line skirt will hang quite stiffly because most of the skirt hangs on the straight grain.
Now how this relates to gores:
Now fairly early medieval tailors did work out how to use bias to their advantage, in the form of gores. When you cut a triangle out of fabric, at least one edge is on a partial bias cut. How you situate this determines how the shirt of the dress or shirt falls.
straight edge to straight edge, bias to bias edge When you sew a straight grain edge to a straight grain edge the two sit flat in relation to each other. They also sit a little more stiffly than they would if there was no seam there, because of the seam. This is even more accentuated when using seam finishes which sew the edges of the seam down (which is the majority of medieval examples). A modern example of this is the outside of the leg seam on jeans. This is great if you are making a piece you want to sit very flat, but the side seam of the skirt section of a shirt or dress is normally a place where you want the fabric to fall in graceful folds.
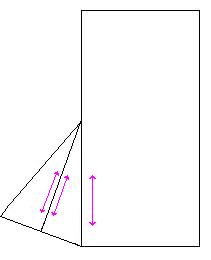
In contrast, when you sew a bias seam to a bias seam, the last thing it wants to do it sit flat. Both sides of the seam want to stretch, and you often end up with a seam that puckers and refuses to sit flat for even the width needed to sew seam allowances down. It makes your sewing look poor after a few washes with puckers and mini-gathers that you didn't sew in. Such seams also tend to curve up on themselves in a messy way. I guess I'm overstating the case here, the effects are quite minor, but do exist, and are not due to your lack of skill, but to the bias-bias seam. One of the most common ways people utilise bias-bias and straight grain-straight grain seams is shown in diagram A. This makes skirts that stick out at the sides. (it's much less apparent on shirts). Take a look at the shirt in the photo on the right. It doesn't look like the majority of the medieval examples, and I find it rather unflattering. This is also one of the (more minor) problems I have with the trace around you quick and dirty t- tunic method - it generally also sticks out at the sides like this, unless the skirts are quite wide.
I don't have any period examples of this usage, but given that nearly everything was tried at some stage in history, I expect there are a handful. It's harder to prove something uses this pattern unless you have a detailed archaeological report that shows grainlines on the pieces. But the examples I have gathered do point to bias to straight edges being more common (as I expected).
bias edge to straight edge
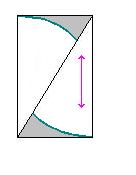
 When you sew a bias edge to a straight edge you get the best of both worlds for a skirt. The straight edge remains stiff and firm, but the bias edge stretchy and curvy. As you sew it, or as it washes, the bias edge may stretch a little, but the firmness of the straight edge, stops the overall shape from distorting badly. The bias edge might fall in a few more folds as a consequence of stretching, but that's just what you want a flowy skirt to do.
- The bockstein tunic (14thC) has two pairs of gores - each has a 1 piece gore and one with a vertical seam. (note the back gore has a fake seam for symmetry, but is actually one piece)
- similarly the Moselund tunic (early middle ages, maybe 12th C)
- the st louis shirt (13th C France) uses an unusual cutting plan, but has gores with straight grain to partial bias.
- the Moy bog gown has a center gore in this method. I'm not sure about the side gores.
How to cut gores, Method 1:

When used to put only two gores in the side of a garment, this cutting plan wastes quite a bit of fabric unless you want a tunic that with a gores that dip at the bottom. Gores that have a dip in the seamline are quite rare in medieval pictures.
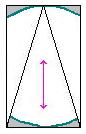
This shape of gore can be used to good effect to produce a train . This is not the standard straight edge to straight edge arrangement, but a bias to straight edge arrangement that pushes the longer corner to the back edge of each gore.
 This generally works better with 3 or more gores on each side seam.
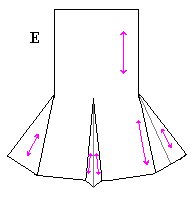
Two arrangements are probable - the first has many gores arranged in pairs to add fullness to the back of the skirt. Each pair of triangles has to be slightly longer than the preceding one if you don't want to cut a lot of fabric off your hemline.
Second just adds one of these triangles to the standard arrangement
possible period example:
- the Gown of St Claire of Assisi (mid 13th C) has 3 pairs of gores of differing sizes. Marc Carlson's cutting diagram shows all as right angled triangles, and thus likely produced by method 1. This cutting diagram shows the largest gores as isoceles triangles, thus likely produced by method 2, however rearmost (2nd largest) gores still seem likely to have been produced by method 1. The slight train on this garment corresponds well with the rearmost gores being potentially cut by this method.

 While geometrically appears to have about the same fabric wastage, the different distribution means that less actually is chopped off to get a panel that appears straight across the bottom. An octagon is a suitably good approximation of a circle that most people don't notice if the panels aren't trimmed at all.
This also has another advantage - it produces it produces two isosceles triangles - one for each side- of approximately equal size. Method 1 produces two right triangles, but right triangles don't sit neatly like isosceles ones do (honest!). If you have lots of fabric, you can cut two pairs of the right triangles from method one and sew them together, but if fabric is scarce, it may be difficult to get them the same width. And if they aren't approximately the same width you could end up with a lopsided garment. With method 2, you automatically produce pairs of isosceles triangles and if you cut an extra pair of gores of a different width, you can still put one of each width in each side of the tunic.
Period examples:
- The Kragelund Tunic (probably 1045-1155AD Denmark - based on radiocarbon dates) appears to be cut in this way - it has a front gore which although slit is not seamed, but side gores which have seams. Which direction the grain runs in is not apparent from the diagrams.
- Several of the greenland garments feature side gores to the armpits. These gores feature false seams to imply a larger number of gores. On one side a real seam runs along the centre of the gore, on the other a false seam.
- The Moselund gown features two pairs of gores - front gore of two pieces and back gore of one split piece. Side gore ssimilarly have one large gore on one side and a pair of pieces on the other.
 Manuscript possible example:
- Maciejowski Bible c1250 example and another. The centre front line (presumably gore) points downwards and sits rather stiffly - may be using this method. I suggest that this might combine methods- with bias-to-straight grain seams at the sides and straight to straight grain seams at front (note I've drawn that closed, but the center front seam shouldn't be sewn.)
Conclusions:
Did I make sense? Which bits did I get wrong? Do you have any examples I haven't listed?

7 comments:
This is really useful information, thank you! I found it easy to follow. Of course, I may post again with questions once I've had a chance to reflect, but I really think it's well presented and clearly described.
I've reflected, and the only suggestion I can think to make is that it would be an excellent page for a site about garb basics to link to. Where's suitable, I wonder?
I'm greatly flattered!
I don't know any garb basics site - it's been ages since I needed them.
Spanish textile,
lot of links, you can find it at our forum (although forum is Russian, we have collected links to English articles):
http://www.13c.ru/forum/viewtopic.php?t=177&start=0
If it's difficult to search - I can arrange links and copy-paste them here.
Thanks, I knew generally about these textiles, but you've got some nice links about them I hadn't seen before. Also (and I'm guessing the main reason why you linked), one of those pages has details about the grainline of the gores, which is so rare. (thankyou) I should update this article if I get a chance.
Which reminds me to dig out the article I have with a diagram of the brial of don garcia (12th C spanish garment!!!) and check if it has grainlines on the gores.
Thank you for this great reference resource! One critique: In the image gore6.jpg, the top arc of the gores should be swapped side to side, curving downward toward the point, like a W.
Well spotted anonymous! That diagram definitely should be the other way around. Unfortunately I don't have the energy or setup to change it at the moment, so everyone reading, please change the diagram in your head.
Post a Comment