Sunday, 26 August 2012

Red linen cote redux and musings on handsewing your first garment

I've written about my first completely handsewn garment before, a linen cote I made. but I find I have a few more things to say about the garment.

The first thing I'd like to talk about is my motivation for handsewing the garment. I can remember it because I was going to pennsic in 2003 and wanted to sew the dress on the 24 hour plane ride. I don't think I finished the garment in time to wear it at pennsic (although I got plenty of sewing done on the plane), but I think it was probably finished before the start of 2004. It really helped to have a lot of time set aside for sewing the garment and a reason to be handsewing it, as otherwise i probably would never have finished it by hand.  These days my sewing is much quicker and I can sew without a lot of concentration, so sewing is a nice braindead way of keeping my hands busy, so I easily complete garments rapidly, but I remember this first garment took a lot longer, more concentration and a lot more effort to finish.

The garment also almost caused more tears than my subsequent handsewn garments. When constructing the garment, I had finished nearly all the seams on the garment when I discovered the gores were inserted too low in the garment to comfortably expand over my hips. It was a moment of much despair, for handsewing was a very long and slow process at that stage still. Eventually I decided if I undid the shoulder seams and removed the sleeves and reinserted them lover and shortened the shoulders in order to avoid undoing the very long seams on the gores. This made the dress a tweak shorter than I'd planned (I had cut it to floor length so I could choose any length I'd wanted), but actually was a very practical length. So my first advice to anyone wanting to handsew a garment - make a (wearable) mockup by machine first.

Another piece of advice for the would be first time sewwer is to invest in the best quality fabric you can buy. At the time I couldn't find affordable wool (I was a poor uni student, and I didn't know where the best bargains on wool were to be found), and I wanted something thinner for hot days. However the fabric choice has been the garment's weakest point - as well as being unable to clearly document coloured linen for the 12th Century, the fabric is quite weak after repeated washings (it can't be beaten clean or effectively spot cleaned like wool) and the fabric is quite literally falling to pieces in many places. This dress is soon to be for the rag pile.  But more significantly, the fabric wasn't as easy to sew as my later constructions in thicker ramie and wool. Thinner more loosely woven weaker fabric means the fabric doesn't grip the thread as well, is more likely to get holes when you make mistakes or unpick too often and just to not feel as good to sew.  It's a subjective thing, but I've sewn this fabric since, and it wasn't just my novice sewing skills that made this difficult.

The garment is intended to be a 12th C cote - a day garment, practical to wear but with still some stylish features like very tight sleeves and fairly tight torso. I'm very happy with the cut of this garment. It's a nice conjecturally period cut and very comfortable to wear. The only debatable feature is the highly sloped shoulder seams. Many medieval garments have no shoulder seam at all, and thus are of course not slanted at all. My shoulders are quite slanted though, so this does improve the fit (the slant was fitted to my shoulders).

One of the things I like about this garment is the neckline. It's a nice tight neckline, allowing minimal sunburn, sitting nicely, just like in the manuscripts. To achieve this I shaped the neckline to my neck rather than predrawing a larger neckhole. I'll write about my neckline method someday soon. I also shaped the sleeves in a similar manner - fitting them from a basic rectangular shape to my arms, rather than a measured out shape. I think both of these worked very well indeed, and continue to use these methods.

This dress has served me well, and will be replaced by a very similar garment very soon now. In fact the blue lightweight wool cote was planned to be a replacement for this dress, but circumstance is dictating otherwise.

Wednesday, 15 August 2012

Hairstyles and veils

Today, an intorduction to veils.  Yes, I know others have posted similar descriptions, but most use a band under the chin (which doesn't suit  a number of 12th Century styles) or aim at a different style, so here's how I make my simplest style of veil. Of course many variants exist, and I'll attempt to explain some of the ones I use later, but don't be afraid to experiment - If it's giving you the look you see in the illustrations, you are probably heading in the right direction.


The fillet
Veils don't just stay on by magic. And if you just jam a crown or circlet on your head on top of your veil, you run the risk of getting the dreaded muffin head effect. In fact, there are plenty of veils in manuscripts that don't have a circlet on top of them, so something else must be holding them up. My favourite way to do so is a fillet.

A fillet is a strip of fabric a bit bigger than the size of your head. Good fillets are made from fabric that will grip a little. For example a shiny satin ribbon works badly, slipping off easily. A velvet ribbon works a bit better because its pile grips the veil better. But those are both modern examples of materials. Period examples are likely to be linen bands or strips of tabletweaving or similar woven narrowwares. I have both and both work quite well.

Here's pictures of attaching the fillet:

The tabletwoven strip I prefer to tie behind my head, while the linen bands don't tie very comfortably or securely - I prefer to pin those tightly to itself at the back of my head.


Once the fillet is sitting on your head, you can now attach the veil. I'm using a simple oval veil today, but this method should work for most other vaugely cirular shapes of veils. Drape the veil over the fillet in the position you want it to be in.

Pop in a pin in the centre, that is above your nose

Add a pin on each temple.
And so the final product which drapes, but doesn't fall off your head when you dance. You can place a another fillet over top of this again, be it a simple metal circlet, a wreath of flowers, a cloth band or a crown. I'm told the underneath fillet will support the weight of a crown a bit, although I can't speak from personal experience.

Tuesday, 31 July 2012

A fingerloop braiding lesson plan - and more importantly the pedogogy of my selections


Occasionally people ask for lesson notes from my standard beginner fingerloop braiding workshop. Which is silly really because it's a workshop - it's about doing, and any notes I produce are just to remind people of what they have done. But it occurs to me that the way I've ended up formulating the format and material covered by the workshop is very much based on specific thinking and facts, and it might be useful to share this with others. If you can fingerloop braid, and want to run a workshop to teach others, but aren't sure what format to use, feel free to use this plan wholesale or just use my reasoning to help clarify your own reasons for running a completely different format, or any degree in between. And I really don't mind if others run this class format at an event I'm at - this would free me up to run an intermediate fingerloop braiding class or talk about my other obsessions.

So let's begin with the class description and the reasons behind it:


For absolute beginner to intermediate fingerloop braiders 

I aim this class at absolute beginners, but there are an amazing number of people who have learnt only one braid, or attended the class last year and forgot what they did in between, and the rest of the class will be at their level after the first half hour. There are also a number of intermediate people who might benefit from the formalisation of their thinking - this class sets people up for a mechanical view of fingerloop braiding patterns, while many sample book methods teach a whole different view of braiding. Intermediate people also can be really helpful to help reteach what you've just explained to an absolute beginner. And if numbers are low, you get a chance to do some one-on-one extension activities for your intermediate people at the end. If advanced fingerloop braiders turn up, see if you can rope them into becoming permanent teachers assistants.

Length: 2 hours

I run this as a "drop out when your fingers are tired or your brain is full" class. So at the beginning, everything will be very busy, but later on, you'll generally be left with the people who are learning very slowly or the people who are learning very well and are looking for more advanced or additional material. By the end of the class, you should have more time to teach new methods, or sit by a person as they painfully step by step manage to produce a braid. Some people are quite happy to learn a single braid - more is just confusing them. One-on-one I can generally teach most people to fingerloop braid one pattern in 5-20 minutes, and to do 3 more patterns in under an hour if they are happy to learn this much - but generally with times when I am sitting being bored half the time. So doubling this time to teach a larger number of people the same amount of material is quite feasible, so long as some people drop out when they've learnt enough.
It is important to tell people they don't have to stay for the whole 2 hours and they can leave when they want to at the start of the lesson too - otherwise a whole 2 hours of class can seem quite daunting.

I often get people asking if they can attend the class starting at the halfway point. I use my discretion - people known to be adept at other fibrearts with dexterous fingers will generally pick this up quickly enough to be no bother. People who already know a little but have half forgotten it will also be fine starting an hour in. Unknown people, I generally point out that I might be a bit busy to explain much when they turn up, but will probably have time to show them more in the last half hour.

It's a good idea to arrange your class so that at the end of the class, if you run overtime, or someone still wants something explained you can be around to help, so I try not to have any activities immediately after my class, and where possible to have a space that will sit empty following the class.

Class size 5-15

Start small, limit your class to 5. I was lucky to have such a small class the first time, and really needed it to pay enough attention to everyone. If you like, allow extras to be spectators, and if you find the class is more manageable than you thought, you can invite them to join the class. The next time I invited a friend who also fingerlooped along and had twice the size. By the time I had a full 15 people, I was getting quite practised (and had the odd helper again), but still found it quite intense and draining - supreme organisation, practise and understanding was needed. If you have too many people turn up feel free to offer to run another class later for half the class. Or explain to the class that because of there being so many people, it'll take a bit longer to get to everyone and ask them to be patient. Teach a few people one-on-one first before you even try a 5 person class.

I've had a class with 8 people but where half the class were not very dexterous or used to other braiding styles, and found I struggled to get around to visit everybody in a timely manner.  One slow student can really limit your ability to help the rest of the class.  Also don't forget to anticipate how you will feel on the day - are you likely to be overtired, hungover, hungry, or racing from one appointment to another? If so, reduce your class size as these will all reduce your ability to teach larger classes.

For: Adults, teenagers and accompanied children over 8

I read someone explaining about children and craft that on average finger dexterity gets significantly better by age 8. I'm not sure if this is due to some biological cause or that children have been doing a range of dexterity and fine motor control training exercises in pre-school and school by then (writing is a dexterity exercise if you've never done it before). Feel free to make exceptions if you know a particular younger child has above average motor control and concentration, (although you might wish to consider if you will be being fair to the rest of their friends).

The aim is to not have a child who requires more attention than your average adult. Having an adult accompany the child means they are highly likely to have a personalised reteacher, who can comment upon and encourage every step of the process, while your run around to other groups (there are adults like this too, but generally only 1 in 20, and you can't work out who they are beforehand). This requires having one adult per child and also an adult who is genuinely interested in learning how to braid themselves, even if only for the ability to reteach to their children. If you suspect the adult might not be able to act in this capacity (for example they might also have a 3 year old with them), you might offer to give them a personal lesson later, or even suggest they come back an hour into the class when the rest of the class is quieter.

The children I've had in my classes have required a bit more repetition of having someone reminding them of the steps of weaving, and more reassurance, but generally produce a better result than the average adult, because they are more worried about details and getting it wrong. Generally children are happy to make only one kind of braid, but like to repeat this several times over - let them do this, ask if they want to learn another pattern, but don't discourage their learning by complicating things more. Trying the same braid in different colours, especially those of the child's choice, tends to be pleasing to preteens.


Beginning the Class

Below are some notes on how I carry out the class.

Introduction

As this is a workshop, the aim being to get people braiding, I try to keep the introduction short. I talk for only 10 minutes on what fingerloop braiding is and when and where it was used, and where to find more information. I don't have a fixed speech for this - I generally talk off the top of my head, adjusting it each time, but it is a good idea to have some pieces of paper with a list of links for people to look up later. This also allows for late comers to join in without missing much braiding.

As I talk, I ask people to to cut their own pieces of string - 2 in one colour and 3 in another. (This confuses people a little, if you have several balls of string in 2 colours, it might be better to say "2 red and 3 blue" so that everyone has a common frame of reference).  You might wish to use precut strings, but I don't because as well as being fundamentally disorganised, it also shows people the very first steps they need to take to make their own braid at home.

I also pass around a few samples of fingerloop, especially as we are waiting for everyone to file into the room and sit down at the start. Don't have too many samples or people will insist on seeing every one, instead of making some themselves. You can make a set of samples available on a table and say that anyone who has time or wants a break during the lesson can see them then.

Then I demonstrate how to knot their string and tie it off to a immobile object with a lark's head knot. (possibly accompanied by a ramble about there being special ways to manage longer strings, but we aren't going to learn them today). I show them a bit of fingerloop so they can see the general motions, then point out the specific motions involved as 3 steps (walk the threads down, swap the loops, tension the piece, repeat) and repeat it several times then a few more. You may need to keep doing this for a few minutes so that different people can move to the front of the crowd to see what you are doing.

Now is a good time to remind everyone that this is a drop out when your brain is full or fingers is sore class. I've had a student who kept braiding until she had blisters on every finger that got huge and all popped, and was still braiding. So it really is important to point out that people need to stop when they are at the pre-blister stage. It's also good to remind people to practise this again within the next 2 days or they will forget how to do it. (this really does seem to hold true - I forgot how to braid after my first time). You may wish to offer to remind people and teach them a few extra tips later whenever they catch up to you.

Materials

I use fat crochet cotton. Silk was the main material used in period for braids, but this is expensive, difficult to obtain in thicker widths and cuts into the fingers more than cotton. Crochet cotton is smooth, non stretchy, non-slubby, readily available, relatively inexpensive and tough. All of these are great attributes in fingerloop braiding, and lack of these attributes can make learning more difficult than it needs to be for your students.

Don't let your students use their own materials (even if they are ones your more advanced skills can use) as you and they will have trouble distinguishing between flaws in their technique and flaws in the material. Using a readily available material makes it easy for your students to obtain more to practise with later. Thick crochet cotton makes individual strands easier to see, makes the braid work up quicker (leading to prouder students) and is less likely to snap.

I'm a bit of a scrooge. I find that asking for a silver coin donation for thread helps me overcome my miserly tendencies when people ask for extra thread - it helps me happily smile and offer them some to take home to practise on later. (And given how important that first practise is on this skill retention, this can be crucial)

Keep the threads fairly short - length from elbow to fingers or slightly shorter. Longer threads make it much harder for students to maintain tension, and lead to more mistakes, and more cases of loops falling off fingers. If a student cuts a longer string, make a knot at the desired starting length and thus discard the excess length. Cutting extra threads just means that students get more practice in tying up a new string. Let them know they can do a longer string later, but it really is important that they have optimal conditions so they have the highest likelihood of a successful positive outcome of their braiding.

I learnt a nifty trick from Mistress Rhiannon y Bwa, author of the fingerloop CA - don't try untangling your threads, just knot them, and begin above the tangles in class. People end up trying to untangle impossible tangles and waste a lot of class time (really, like 20 minutes!). Let people know not to detangle, just to chop that portion off, and they will get neater later, but meanwhile they can make the most of their tuition time.

Getting the students started

I like to simply let the students discover the 3 patterns that they can make with 5 loops by themselves. I get them to setup with 2 loops of one colour on one hand and 3 loops of the other colour on the other hand - this lets them track the first colour and loop change more easily, and makes sure everyone is doing the same set of coloured patterns. I show them a hand motion to make, and let them see which braid they make, then later when they are feeling confident I show them a variation on their hand motion, and they can see which other braids this makes. This gives the students the ability to repeat this process later to rediscover the braids. I find it is generally easier to teach through one finger braids before through two finger braids.

There are 3 easily obtained braids that can be made:
  • half circular braid - Through middle finger/loop reversed or unreversed (there might be subtle differences between these two at very high tension and high skill, but I can't reliably pick them)
  • square/circular braid - through two fingers/loops reversed
  • two small plaits - through two fingers/loops unreversed (this is structurally identical to a 5 strand plait like you'd do in your hair)

Here they are in a table:

reversed unreversed
through 1 loop half circular half circular
through 2 loops square 2 plaits


It's important to tell students that some of them will get different results using apparently the same hand motions - otherwise they can get quite concerned when their braid is not the same as their neighbours. In fact the first time I came across this in a student I was quite confused myself, which isn't very confidence inspiring in a teacher. It's also important to tell them that 2 plaits is one of the possibilities as otherwise more than half the students will assume they are doing something wrong. And generally won't want to bother the teacher until they've gotten frustrated that they can't 'fix' it. If you have the choice, I believe the order half circle, square, 2 plaits is the easiest order for most people to learn the braids in, but for people with a strong bias to reversed or unversed pickups a different order is likely easier.

Another question students will commonly ask is if it is important which of the two fingers the loop passes through. The conventional answer is the top finger, and this is much easier for the students to manipulate their fingers around, so I'd recommend it, but you might like to try the other so that you know the answer to this question.

As these are all 5 loop braids, student can learn new patterns on the same piece of string, and can switch as soon as they are confident and you can suggest a new variation. It is best however, to do at least 5cm of a pattern type, so there is a nice sample size of the braid type on the finished braid. Some students will require to braid a whole piece of string to simply understand the basic moves and learn how to adjust their tension. Others will be bored after 3cm of a pattern. Look at the student's work and judge how they are for yourself as well as asking how confident and adventurous they are feeling. Even if the student is confident and adventurous, if their tension or technique are so poor that you won't be able to tell a circular braid from a half circular braid, then they probably need a little more practise on a single braid and maybe a little more guidance or support.

Thoughts on choice of braids and teaching method

The fingerloop CA and several other fingerloop instruction sites generally give only one method of obtaining an unreversed or reversed loop. I've found about 1 in 15 people naturally use a different method. And I have no reason for thinking this method less correct, so instead I try to teach the different methods, and how they affect the band. I'll write about this separately soon, and think it's quite important to know this if you are teaching others, so those who use the different method can quickly adjust what they do. This is why I don't teach reversed or unreversed, but let students experiment with their results themselves.

While the 3 loop braid is the simplest fingerloop braid to teach (and one I'd recommend to teach to children and adults who are afraid fingerloop might be too difficult for them), I teach the 5 loop braids because I believe it is a good foundation to learn skills for the more complex braids. With a 5 loop braid, it is possible to go through two loops or one loop, while with a 3 loop braid only the simple through one loop reversed or unreversed combinations are possible (which increases the odds of starting with the more complex and confusing 2 plaits braid). With a 5 loop braid the student needs to learn to dexterously manipulate their fingers around the non active loops, to walk down the loops (not required in 3 loop), and to manage keeping the loops at the same length despite fingers of variable length. If the aim is to only produce a braid, a 3 loop braid is probably a good choice, by my aim is to produce a student who has enough fundamental skills that they can go away and learn a lot more from a book.

Exchange loops can be fairly simple to learn too, but they are less common in fingerloop - a person who knows exchange moves knows only how to do exchange moves, while a person who knows how to do regular fingerloop knows how to do everything except exchange moves. Also I believe the actual exchange move can be slightly trickier to teach to the majority of people. So I teach conventional fingerloop braids, but I think they win over exchange moves by only a small margin.

One thing I think I should be doing, which I am not yet, is providing a handout with track plans and recipes for the braids people produce so they can compare what they produce with how it looks in written instructions. This hopefully would give the students more of a foundation in reading how to do a braid from written instructions, enabling them to more easily learn other patterns from written instructions.

extension work

Forthose who are braiding very ably, the flat string offers a very good choice to test those skills at reliably discerning reversed from unreversed. If the student has been making a good version of the 2 plaits, then they are able to reliably select the same finger movement, but most students will have a preferred movement of reversed or unreversed, so the flat string really tests their ability to do both, to keep track and to learn a two step braid.
Alternately, a 4 loop braid with exchange moves makes a very pleasing pattern and is very simple to braid, for those students who take to fingerloop braiding well. (Encourage students to try both possible starting arrangements of 2 colours to get a spiral and a stripe).

For all students, braiding again before they've forgotten what they do with their fingers (generally 1-3 days) is very important.

Be sure to give students links to sources of more information.

Conclusions

I don't think I have a lot more to say, in fact I'm surprised I've talked as long as I have.  You've seen what I do any hopefully why.  Now decide how to teach your fingerloop class in your own way. You'll have a different personal style and different students with different needs, but perhaps the above will help you avoid some of the possible pitfalls of teaching fingerloop braiding.

Tuesday, 13 March 2012

10 medieval ways to stay warm with an old woolen blanket

So today's article is derived from years of telling collegians that they can be warm, dry and medieval cheaply and in a medieval way.  But I think these tips are of far wider usefulness, so I share them here today.

Why wool?
Wool is a good insulator, keeping you warmer than other plant based materials (cotton, linen, ramie) or synthetic materials.  Wool will also keep you warmer even when wet, and as a bonus it is also fire retardant.  More of the wonderful properties of wool and the reasons behind them are explained in an article by Ásfríðr Ulfvíðardóttir in the newest edition of the Known World Handbook. Wool was the medieval fabric of choice for outerwear for good reason because of all of these properties.

If you are allergic to wool, it may be worth investigating other protein based fibres, as these are likely to be warm for similar reasons - cashmere from goat or rabbit (beware many things labelled cashmere may actually be wool), alpaca fibre, or more exotic fibres such as camel or dog. Silk as a sort of protein fibre (moth cocoons) is definitely warmer than plant fibres. If it was spinnable and collectable, it generally was spun and used for something in medieval times - there are a few examples of exotic fibres such as camel and goat in extant artifacts.


Why an old blanket?
Blankets are a cheap source of sufficient quantities of thick wool to keep you warm. Blankets are generally sturdy, thick, warm, large, and often prepared in ways that resist fraying, all of which are great attributes in medieval outerwear. Single bed and double bed blankets are large enough to make a wide variety of covering garments. Old blankets are great because they are relatively cheap and you won't be worried about dragging it on the ground, poking holes in it, having sparks burn small holes in it, or chopping it up. Old wool blankets are also relatively easily to obtain:  See your local op/thrift/secondhand shop for cheap blankets - look for plain colours that aren't fluorescent.  In Melbourne, expect to pay $10-$20 per blanket (expect to work around some holes at the cheapest end of the range), and we aware that the salvos have a better range, but rarely have the best bargains.


What are the 10 ways you speak of?
These methods of using an old blanket are presented in rough order of increasing sewing skills required to utilise them.

1) Put it on your bed
Medieval peasants weren't silly. Going to bed when it gets dark also means you are in your bed in the coldest part of the night, conserving your warmth in a cocoon of bedding rather than expending energy to stay warm.  Wool blankets are good bedding for all the reasons presented above. Down is too, but synthetics seldom are as good.  It's important to note that wool takes a few moments to warm up - your body heat warms it up - use a heated object to heat your bed (brick in a towel or hot water bottle, or another person) or go to bed before you get cold to best utilise the insulating properties of your wool.

This trick can also be used after you turn your woolen blanket into garments - they can be piled on your bed to keep you warm too.  This also saves a lot of storage space for bulky garments. 

2) Put it over your bed
Old 4 poster beds were a very sensible invention - even as you breathe or lie still you loose a lot of heat. Enclosing the space around your bed not only prevents drafts, but will eventually warm up as you breathe into it. Using an good insulator such a wool to enclose the space will mean you loose less of the heat than you would with other materials.  Bed hangings don't have to be elaborate - they can just be cloth draped from a point (think mosquito net) or a blanket draped over a rail.

3) Pop it on your lap
I get coldest when sitting still. Keep a small blanket on your chair to drape over your lap when immobile, and leaving it on your chair when doing things allows a method of quick and easy temperature regulation. I find a draped blanket much easier to deploy than putting on and off extra layers of clothing.

4) Wrap it around you
I'm not joking,  I utilise this often when I am doing fairly sedentary activities.  

My favourite way to wrap my wool blanket (for me a right hander) is thuswise: start by tucking an end under your lowered left arm, and hold it in place my clamping upper arm tightly to your side. Wrap the rest of the blanket across your front, under your right arm, across the back. Gradually slant the blanket upwards as you cross the back, and end by draping the remaining blanket over your left shoulder and sort of gather any excess fabric up draped over your left arm. Your blanket needs to be cut to a width of armpit to above floor and length I'd say less than twice you hip measurement.  A wider blanket can have the top edge folded inwards to the deired dimension before you start wrapping, and a much longer blanket might wrap around the body twice.
This wrapping leaves my left arm fairly immobile (with practise you can do simple tasks with the lower arm without moving the upper arm), but your dominant right arm free to do stuff. It's not suited to active pursuits, but you can do a surprising number of things that you might do at night in this wrap - walk talk, drink, sing, etc. 
  
Other ways of wrapping a blanket also exist, but I can't personally attest to them. There are many pictures of medieval people wearing draperies, however it's difficult to tell how many are simply archaic images of biblical figures and how many are realistic depictions, but this can work.

If it drizzles or gets colder, reach behind your neck and pull the fabric over your head, and you will have a rudimentary hood. It's better than nothing, but it does tend to fall down.

 5) Pin it closed as a cloak
It is generally stated that anglo-saxon cloaks were rectangular.  personally I think many of the artwork examples people use from late in the period actually show semi circular cloaks, but I think something as useful and simple as the rectangular cloak would have existed earlier in the period. Anyway, its a really simple way to fasten a cloak.

Simply pin two corners of the cloak together and then put your head through the hole created.  rearrange the pin to over your right shoulder if you are fighting or doing a lot of stuff with your right arm only, or to centre front otherwise so you can use both arms.

If you are a early period Scandinavian noblewoman, you might consider wearing your rectangular or square piece of fabric as a shawl too.

6) Poncho
One quite conjectural methods of making a cloak is to start with a square and cut a hole in the centre of it and wear it as a poncho.  This comes quite close to some period illustrations in all but the finer details. It's so beautifully simple with so little sewing, I just had to mention this as an option.

7) Half circle cloak
One of the most popular varieties of shaped cloaks was  the half circle cloak. Versions of this cloak exist from pre-medieval to post Renaissance periods.  As the name suggests, the cloak is simply the shape of half a circle, occasionally adding some difference in cutting at the collar, and varying greatly in length depending upon time, place, gender, rank and use.

To make a simple half circle cloak, simply cut out the shape of a half circle to your desired length. I suggest looking at pictures of your desired time period to determine this, although you could choose based on warmth vs practicality or based on the length of your fabric. If you are lucky, or your blanket very large (or you very small), your half circle may fit within your blanket.  Otherwise you may be able to cut two 1/4 circles from diagonally opposite corners of the blanket and sew them together to make a half circle. For even narrower but long fabric, a cutting pattern method based on strips of fabric may be used, but this tends to be more useful for fabric on the bolt than blankets.

Pin or fasten with clips or strings your half circle cloak over the right should or at the bust, and it should work well for you.


8) A hood
You loose a lot of heat through your head. Once you have a cloak, often a second cloak will not make a big difference to warmth, but a hood will keep those bits of you which aren't covered by the cloak warm.  And what better than nice warm water resistant blanket fabric to make your hood from. Many patterns are available to assist with this. 

9) A chape
A chape is a 12th century term for a hooded cloak. My interpretation of a 12th century version of this is to make a hood which instead of stopping at your shoulders, continues flaring outwards until it's desired length.  I find this a very practical garment, great at keeping the rain off me.

10) A nice thick tunic
Most medieval tunics would have been made of wool. However big bulky woolen tunics can be awkward for everyday life.  But I find them invaluable to slip on over another woolen tunic when it gets cold.  Bulky a tunic made from a blanket may be, but it can be a lot less awkward than a cloak which drops in your food, slips into your water and makes it awkward to carry things, as well as slipping open and letting a breeze in.

I can make a simple small women's dress from a single bed blanket, a short men's tunic, no matter how broad, should also be achievable. I expect very few people would be unable to make a simple tunic garment from a double bed blanket.

In some time periods tunics can also be hooded and/or  have removable sleeves (see for example gardecorps) or can have sleeves that drape over your hands, all of which are great ways of keeping you even warmer than a standard tunic.

11) Hose
 Just because you kept reading, I've added a bonus 11th use.  If you find a particularly thin blanket, you can chop it up to make hose (medieval stockings). You loose heat from all over your body, so hose can be more useful in keeping you warm than a third cloak as they cover a part of you that wasn't well insulated. Many patterns for various medieval hose are available. Similarly, fabric mittens, hoods and a variety of other accessories should be achievable with scraps of your woolen fabric.

Wednesday, 27 July 2011

Teffania was born on January 6th


This post was written about a year ago.... but I think it still bears publishing.

A number of years ago I realised that my SCA persona was younger than me. I think what cemented this was reading of Constance of Sicily, who married at 28. 28 was considered rather old for marrying, but as an heiress of a kingdom, she was too powerful a political piece to marry off earlier. And indeed Constance had a difficult pregnancy because of this late marriage. I wanted to portray someone young enough still be unmarried, as the only choices I could find for your typical 12th C English minor nobleman's daughter was to marry or enter the church. And I didn't want a fantastical story to explain why Teffania was atypical. So realising that at the time my age was rapidly approaching Constance's, and that I commonly passed for younger, I decided that Teffania was younger than Tiffany. She was young enough to hope for a husband because as a wife she would have some power and position (and likely more power later as a widow) while as a daughter she was her father's property. But she is old enough that her father despairs of finding a match for her - he isn't rich enough to lure a fortune seeker, she isn't a great beauty, and he doesn't have enough connections to get her to court or to have people seeking political alliances with him cemented by marriage. 

Teffania practises her skills with needle and weaving in the hope they might win her a position in court and to make her clothing seem richer than the small budget devoted to it. If she doesn't marry soon, her father might pay her way into a convent, but he cannot afford to pay much (nor would he gain much influence from this move), so she would have to live in a quite modest manner. The convent would appreciate her needlework skills though.

A more recent realisation is that my SCA persona Teffania, was born on a different day to Tiffany. Teffania is derived from the Greek Theophania, via the french Tephanie. The -ia ending is how the name would be spelt in official Latin documents, but in anglo-french it would probably be Teffanie or Tephanie. I believe it should be pronounced T(h)ephanie, although I must admit I actually prefer the sound of the way people naturally pronounce Teffania, but feel I try and pronounce it properly for authenticity's sake. Anyway, aside from the diversion, all these versions of the name are derived from the name of the feast now called Epithany, the day after 12th Night (epithany eve), and people named such until recently were usually born on this day. Why would Teffania be any different? 

January 6th is epithany, in the middle of winter in the northern hemisphere, and this has a certain link to Tiffany, for her birthday is just after winter solstice and it often hails on her birthday, so some of her southern hemisphere experiences can resonate with Teffania's birthday experiences.


Since this has been written, I have been granted a court barony in the SCA.  While I don't want to  incorporate every detail of the modern SCA fantasy into my SCA persona, I think this is one that might be best to incorporate.  And so I muse on how Teffania might become a baroness?  The most likely route seems marriage. But how might she suddenly become a desirable asset and be quickly married?  Well, should her remaining brothers (the ones who haven't died of childhood illnesses, riding or hunting accidents) die on the crusades (for her father was not rich enough to pay for extra knights to spare them from going personally, and besides they sought the adventure), she might become her father's heir. Of course her father was older than her mother (who has already died in childbirth), and is becoming frail, which is probably why has hasn't borne his new wife any children yet.  A nasty ague might be the end of him, leaving Teffania a heiress.  The daughter's portion of a property wasn't much (especially as her mother's marriage portion was small), but ownership of the whole estate is a tidier sum, for laws worked toward keeping the estate together as a larger property rather than dividing it.  While it doesn't bring huge sums of money each year, is a solid investment in the future, a medieval interest bearing bank account. With no brothers to equip with expensive knightly chargers, she can afford to spend a little more on some nice clothes.


Of course the peace won't last long....the king has the right to marry off heiresses (and widows of marriageable age with holdings) if they don't marry by themselves within a year, for property management needs the guidance of a male. (not to mention a will to stamp out any old matrimonial ideas). Teffania might not think a political marriage is on her horizon, but once the king consults her holdings in the Domesday book, she might have an unexpected surprise in store. Let's hope her future husband at least carries a rank like baron that she can keep even after he dies, and that he prefers the company of his knightly companions and the pursuit of war, and is often away leaving her in charge of his holdings. If he's one of those new nobility that the king has been rewarding recently for their efforts in winning new lands, she might actually be in luck. 

And as a married woman she might not be so constantly watched, and might be able to have a courtly lover that she's been reading so much about. (although the realities of her husband may rather dissuade her from anything but wistful looks and poems). But more importantly, she'll be actually able to make decisions, which being an heiress she has rather decided she quite likes.  Of course she'll have to make decisions her husband would like, but that only makes sense, for he is a man and trained to govern, while she is a mere woman.

Tuesday, 5 July 2011

It's been a long time

My goodness, It's been a long time since I posted anything.  Appologies to any faithfull readers I still have left. Some of my writing efforts have been channelled towards essays for my current course in foresight - there is nothing like a course which is only essays and written or oral projects to make you rediscover how little you like writing. (even if you didn't dislike it before).

It also hasn't seemed like that long becuase I've still been writing blog posts when I feel inspired, but they have stayed in my draft folder because I needed to add just one picture, or to proofread the post or to post this other post first which explained the terms I used....

I'm going to try to do better, and turn my backlog of drafts into finished products and add a few new posts as well. Although, expect a dip in production around August-September when the next subject in my course happens.  And  I promise, it wont just be Seal tags and more seal tags, there is stuff about fingerloop braiding, pouches, turk's head knots, austrian dresses, german dresses, new chemises and old garments and even the odd person musing in that very large drafts folder. (have I teased you enough?)

Wednesday, 1 September 2010

great string controversies

With all the posts about seal tags lately, I haven't been talking about my other two favourite things (after research) - string and 12th C clothing. Well let's fix the former (even though eventually I'll get to fibre seal tags), by talking about a few of the great controversies of narrowwares and string crafts. Sorry, this is a musing, not at informational article, just warning those who hope to find facts and figures today.

Is knitting medieval?
If you look at old books on knitting, you'll find a lot of objects identified as knitting in the medieval period. And then if you look at more recent investigations of these objects, you'll learn many of them are naalbinding. Or occasionally sprang. The writers of the old books did the best they could - they knew it wasn't sewing of even crochet, but never having knitted themselves nor having heard of naalbinding, they didn't think to see if it was a very similar technique.

There is some medieval knitting, in fact in the coptic areas there is even some pre-medieval knitting. But the vast majority of western European medieval items that look like knitting so far that I've heard of are naalbinding. New techniques like knitting take time to permeate to craftspeople, so both coexisted for a while. And even though knitting has a definite speed advantage over naalbinding, naalbinding doesn't unravel, so both have reasons for their use. To make things more complicated, the word knitting in English is not only used for the technique of making a fabric from string using 2 or more eyeless needles, it is also rarely (and increasingly less so over time) used for the process of making things sit together eg a wound knits together, knit fabric. In languages other than English, this happens even more so, so if a translation has occurred, the word knitted may simply mean anything which is in this family of construction via meshing strings together (eg crochet, knitting, naalbinding, sprang).

By the Renaissance, knitting had taken off, and there are a lot more examples. I'm really talking about the early days of knitting - the 11th to 13th Centuries.

Anyway, if I see an article identifying a piece as knitting in the medieval period, I can't be sure it truly is knitting unless it discusses the possibility that it could be in other similar techniques. (like this one) If I want to make something quickly, and wasn't aiming for museum replica quality, then knitting might be a good choice, but being a research person I'd probably be researchin a naalbinded article and trying to understand how I'd have to adjust for the difference in technique, and how that has minor effects on the finished result.


Was crochet used in the Renaissance?
No. probably not.

But surely someone would have thought up something so easy? All the things needed to do crochet were about (string + hooks).

There were already a number of techniques about that did this. Crochet takes more valuable thread than these. Why try inventing new things when what you want to do can be done with existing techniques? What piece of imagination sparks people to develop a new technique? The above articles suggest that crochet develops from tambor (chiefly used post Renaissance), crochet becoming fabric-less tambor.

If you wanted to make a good recreation, then without more evidence, you wouldn't be using crochet, except as discussed above as a quick way to mimic another technique.


Are lucet's used before the Renaissance?

Well, the most well known controversy of them all. And one that has had lots written about it. Were lucets used before the Renaissance, especially in "viking" times? The evidence I've heard cited consists of many objects which can successfully be used as lucets, but could also have some other use, and a single piece of string. Unfortunately for the advocates, the article concerning the piece of string doesn't consider the possibility that other braiding techniques might have been used and discount them. For me this isn't good evidence, so we can't prove pre-Renaissance usage of the lucet. And with a limited number of braided cords being found in securely dated contexts and even less of them analysed by braiding experts, I don't think it likely we will get the evidence needed anytime soon. Only a handful of positively identified examples of fingerloop braiding, finger weaving and plaiting exist from these eras.

The use of the lucet in the Renaissance is fairly well doccumentable in linguistic terms although I haven't heard of extant lucets, although again I've heard of no conclusively identified braids in the technique. The quantity of evidence for fingerloop braiding suggests to me that fingerloop braiding was more common, although the greater possible complexity of fingerloop braiding is likely to bias this sampling.

Structurally the internal structure of lucet is quite different to fingerloop braiding, plaiting and fingerweaving, but the external appearance is quite similar to these techniques. I have no problem substituting lucet cord for other techniques, only with those who firmly assert facts ("the vikings used lucets") that really aren't that firm.


Is Kumihimo period?

It seems to be taken for granted by people that Kumihimo is period, because modern craftbooks says it is (just like all the knitting ones did). "Everybody knows" samari armour was held together with kumihimo. By now we should know better than to make such assumptions, but perhaps the problem is that this is a japanese technique, so I expect there is a lot of scholarly research in Japanese, and not in English which we can research ourselves. This isn't a great controversy yet because very few people know of it, but I think it should be, and will be in times to come.

LMBRIC investigates a few fragments of braid from Xth Century Samari armour, and comes to an interesting conclusion - that they are loop manipulation not kumihimo (see n5, n7, n10, n9). The Japanese version of loop manipulation (fingerloop braiding) holds the loops on the hands/arms, producing some end results that are nearly indistinguishable from kumihimo. The authour of the article finds a few moves, however that are only possible by loop manipulation and not kumihimo. This to me throws all existing claims of ancient kumihimo open to suspicion. Just as for knitting, now all claims that an object is very old kumihimo now need to substantiate why they aren't loop manipulation.

As with knitting and lucet, this isn't about what you should and shouldn't do - to me if the desired result of recreation is the finished product, then the method only matters for the utmost highest levels of obsessive authenticity, and I'm very happy to make compromises and use structurally identical results. It's about not making historical claims that haven't been substantiated.


Was there really such a thing as viking whipcording?
Asfridr provides a nice run down of the evidence, or more accurately, general lack of evidence for this art form. Basically strings using this structure have been found, but no evidence they were made in this manner, rather than simple plaiting is shown.

It's a cool way to get people doing braiding, and the result is structurally identical, but I really regret that it's not actually provable because I've found it a cool way to get people to braid at demos, so I end up having to decide between authenticity and entusiasm, instead of being able to have both.


How old is macrame?
The problem with this question is that you have to define what is macrame. When does something cross the line from a few knots to being macrame? There are decorative fringes like this one that utilise decorative knotting, nets that use repeated knots, turk's head knots on pouches and various other usages. But I these don't necessarily constitute a structured art of knotting. I think they might be more like tying your shoelace - they are knots used, but fall into the category of something else (eg "what you need to know to get dressed", or the knot you put on the top of a tassel).

One of the origins of macrame is in sailor's knots being used for non-sailing decorative purposes. I suspect this practise increased greatly with the late Renaissance and later numbers of sailors away from shore for long periods stuck on a ship with nothing to do and a knowledge of knots. But you could mount a good counter argument regarding fishermen stuck in port in bad weather.

At any rate, I'm more comfortable with describing early pieces which have some knots on them as "decorative knotting" than macrame, because to me, the majority of pieces will be in combined techniques, not able to be made from knotting alone. And it's going to be hard work for anyone who wants to search for pre-modern examples of decorative knotting, because it'll be listed in the museum catalog as something else (pouch, tassel, cingulum, etc). Looking at he concept of pasimentarie might be useful though.


inkle looms
If you tabletweave, you probably know this one. An inkle is a Renaissance English term for a narrow woven band. The modern "inkleloom" is probably a 1930's invention, maybe up to 50 years earlier, so named because it can be used to make inkles.

All the evidence points to the common looms for making inkles in medieval and Renaissance times being band looms or box looms using either cards or a rigid heddle.

A modern inkle loom will produce structurally identical results, but please don't try and contort logic and linguistics to justify bringing it to a high authenticity demo.

Tuesday, 24 August 2010

Slit patterns on dependant parchement seal tags

Having seen a few dependant or separate parchment seal tags, it's probably time to analyse the variety of slit patterns through which the seal tag was inserted. There are a number of variations, but while searching for these examples, I actually found that just two patterns of slits accounted for nearly all of the documents, and the few other slit patterns are rare differences.

One slit
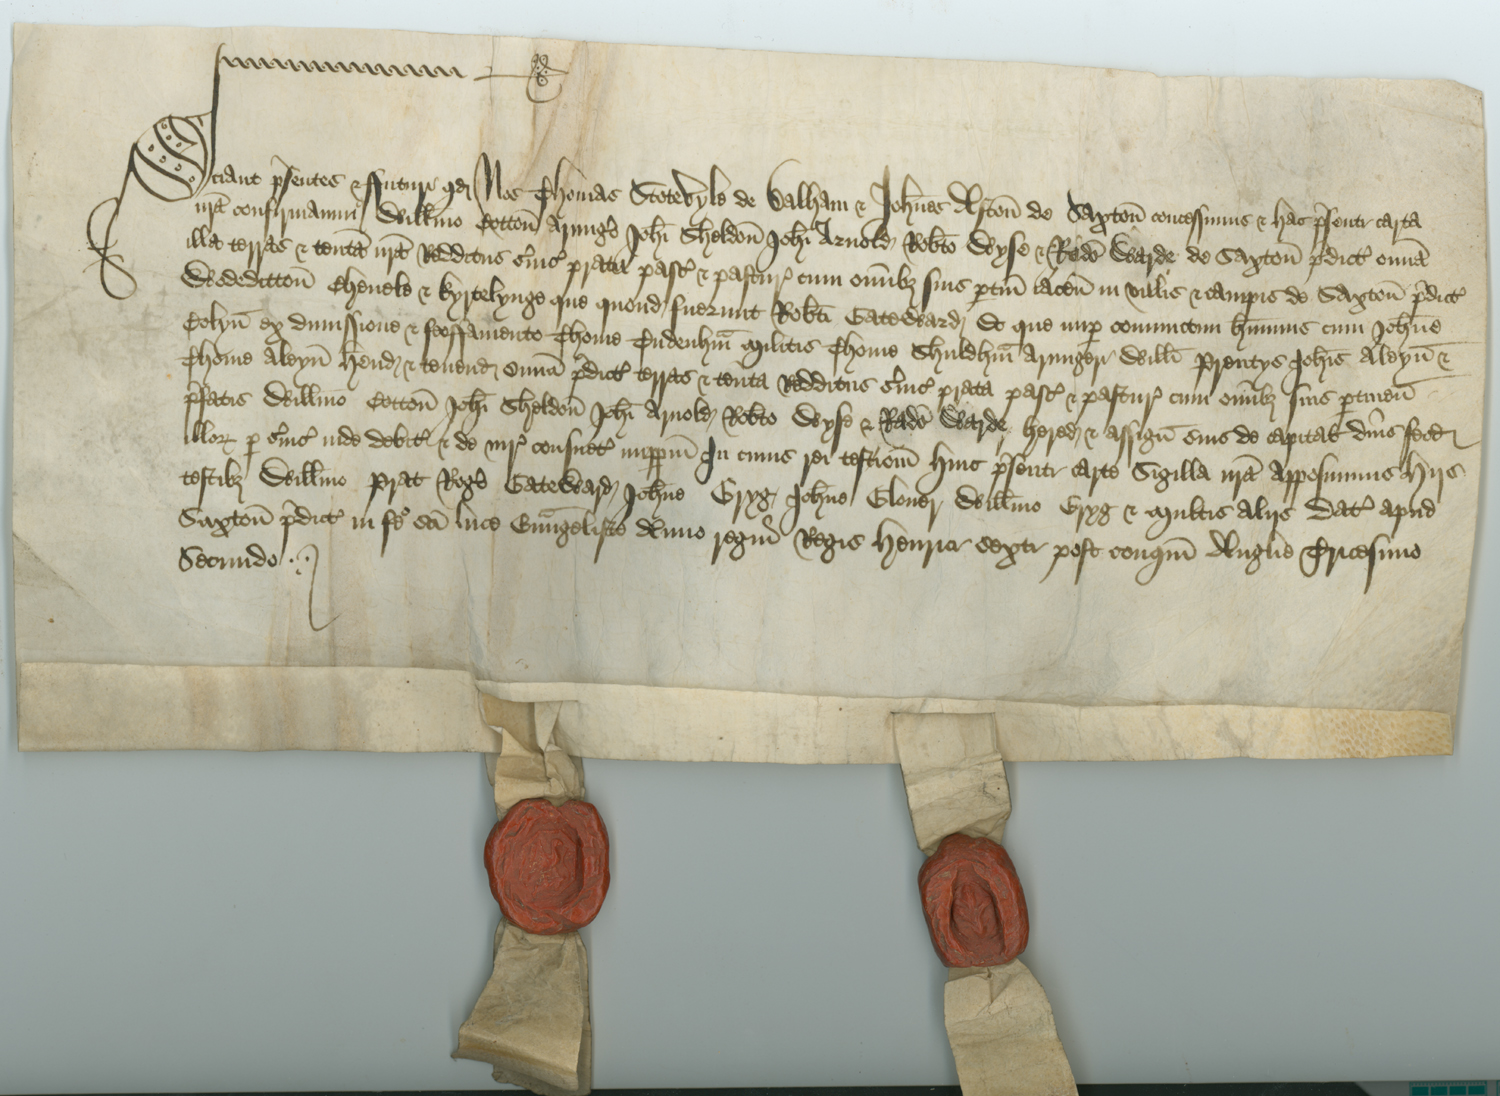
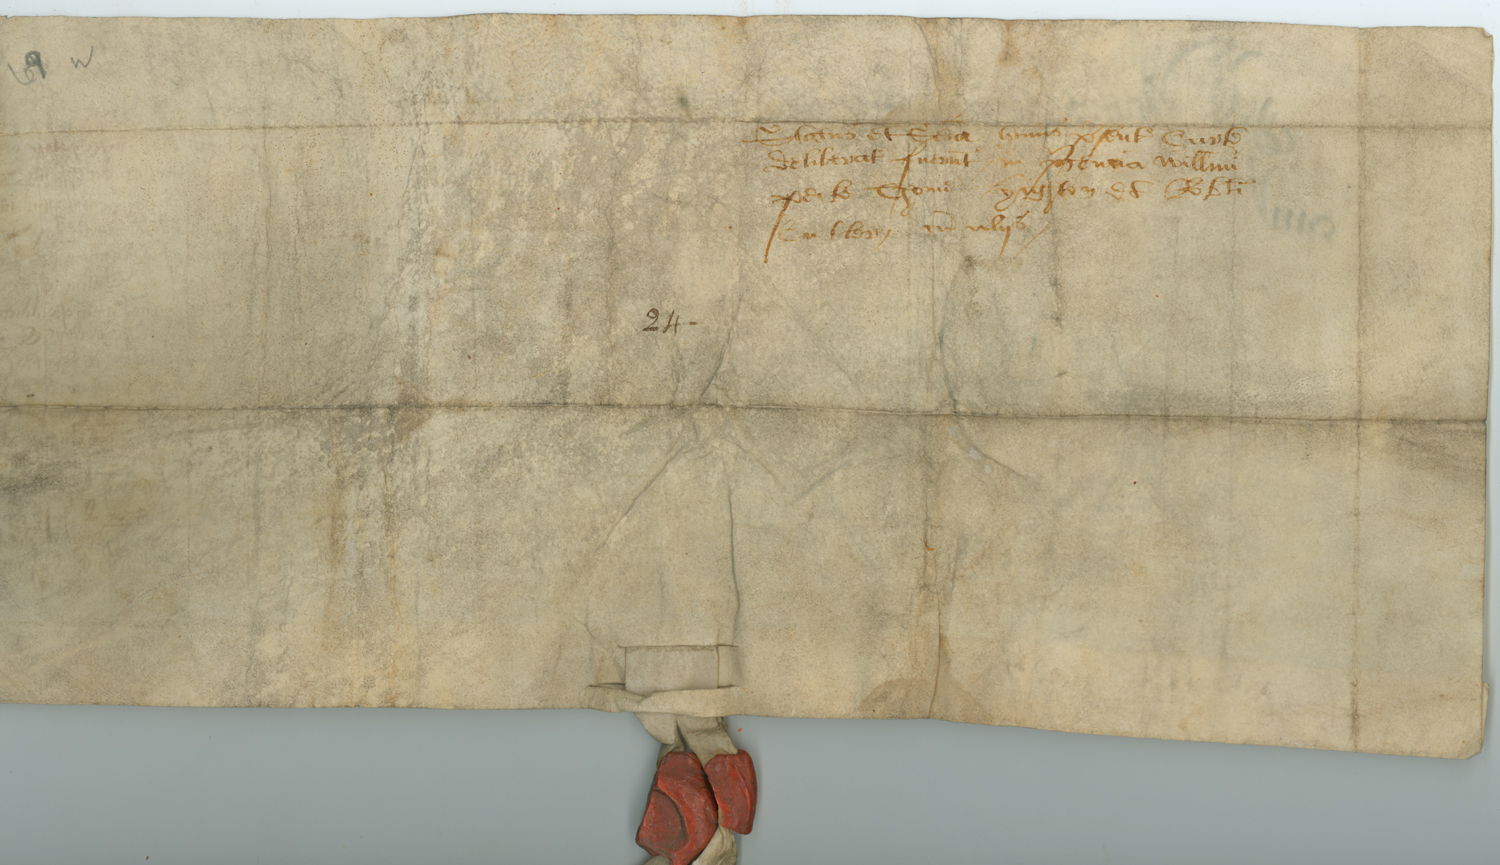
The simplest slit pattern is to create a single slit in the parchment. The slit is standardly made in the folded up section (where the parchment is doubled), near the top of the folded section. That is the knife runs across the parchment once, but cuts both pieces of doubled parchment, ie one pair of slits. This is likely to be the strongest location for the slit, giving the most wear resistance. The example below shows both front and rear of a document, showing how simple the single slit is.
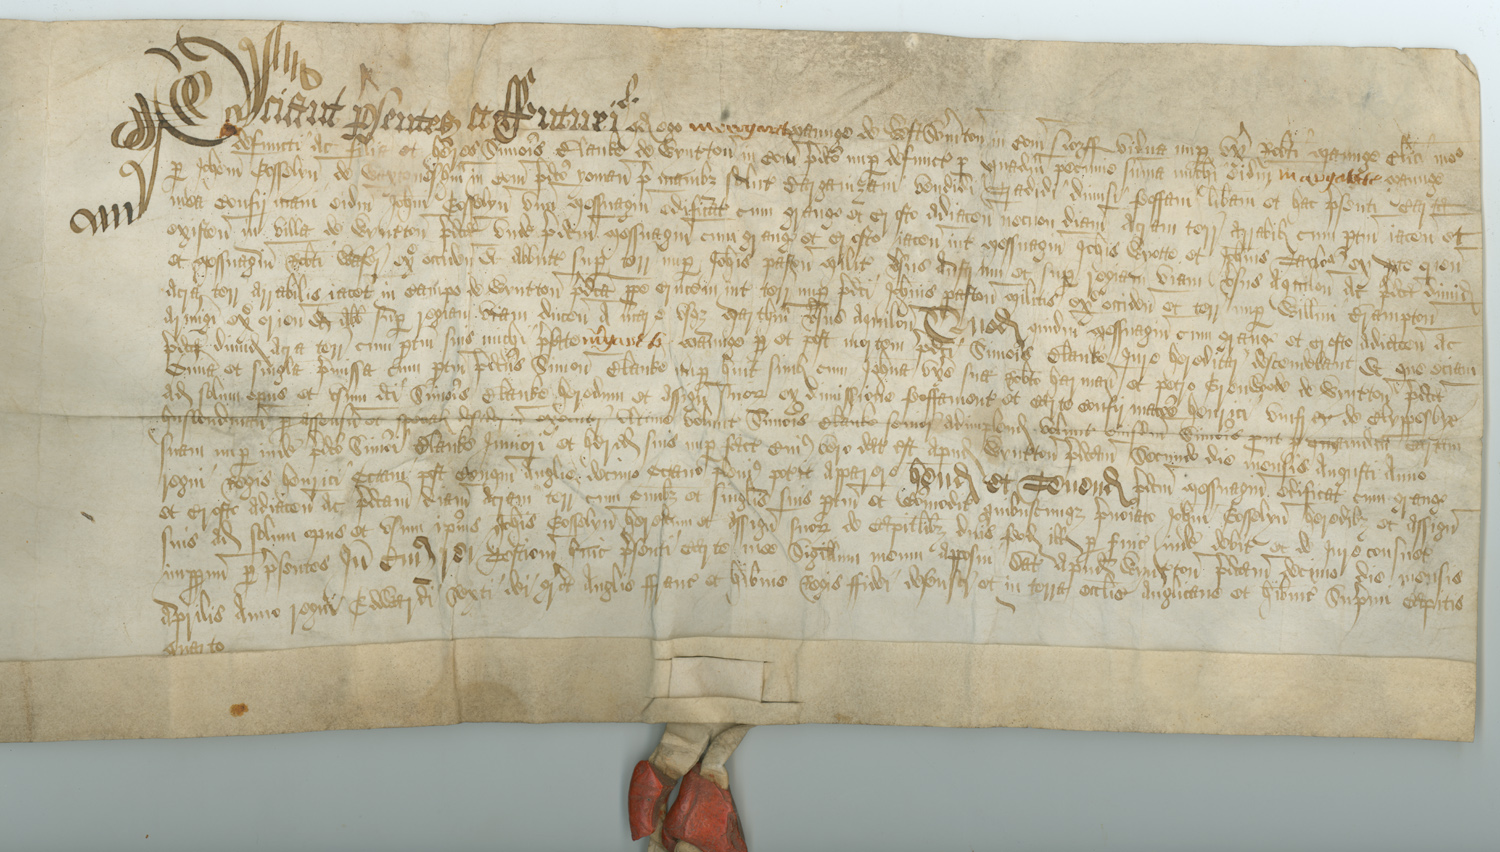
Feoffment by Thomas Stoteville and John Aston to William Cotton and others of lands in Saxton, Wood Ditton and elsewhere in Cambridgeshire.
Saxton, Wood Ditton, 1453
Seals: Red wax impression on front only
Tags: single piece of parchment passed through one pair of slits in doubled parchment
(McMaster University British Legal Instruments Collection No. 16)

Here's another example of the same slit pattern, this time with the tag removed and the paper unfolded, and laid flat. We see two slits as this single slit was made through two layers of parchment at once.


Quitclaim by John Judd to John Knight of the property of Motynnescroft in Tonbridge, Kent.
1449/50
Seal & Tag: missing
(McMaster University British Legal Instruments Collection No. 3)

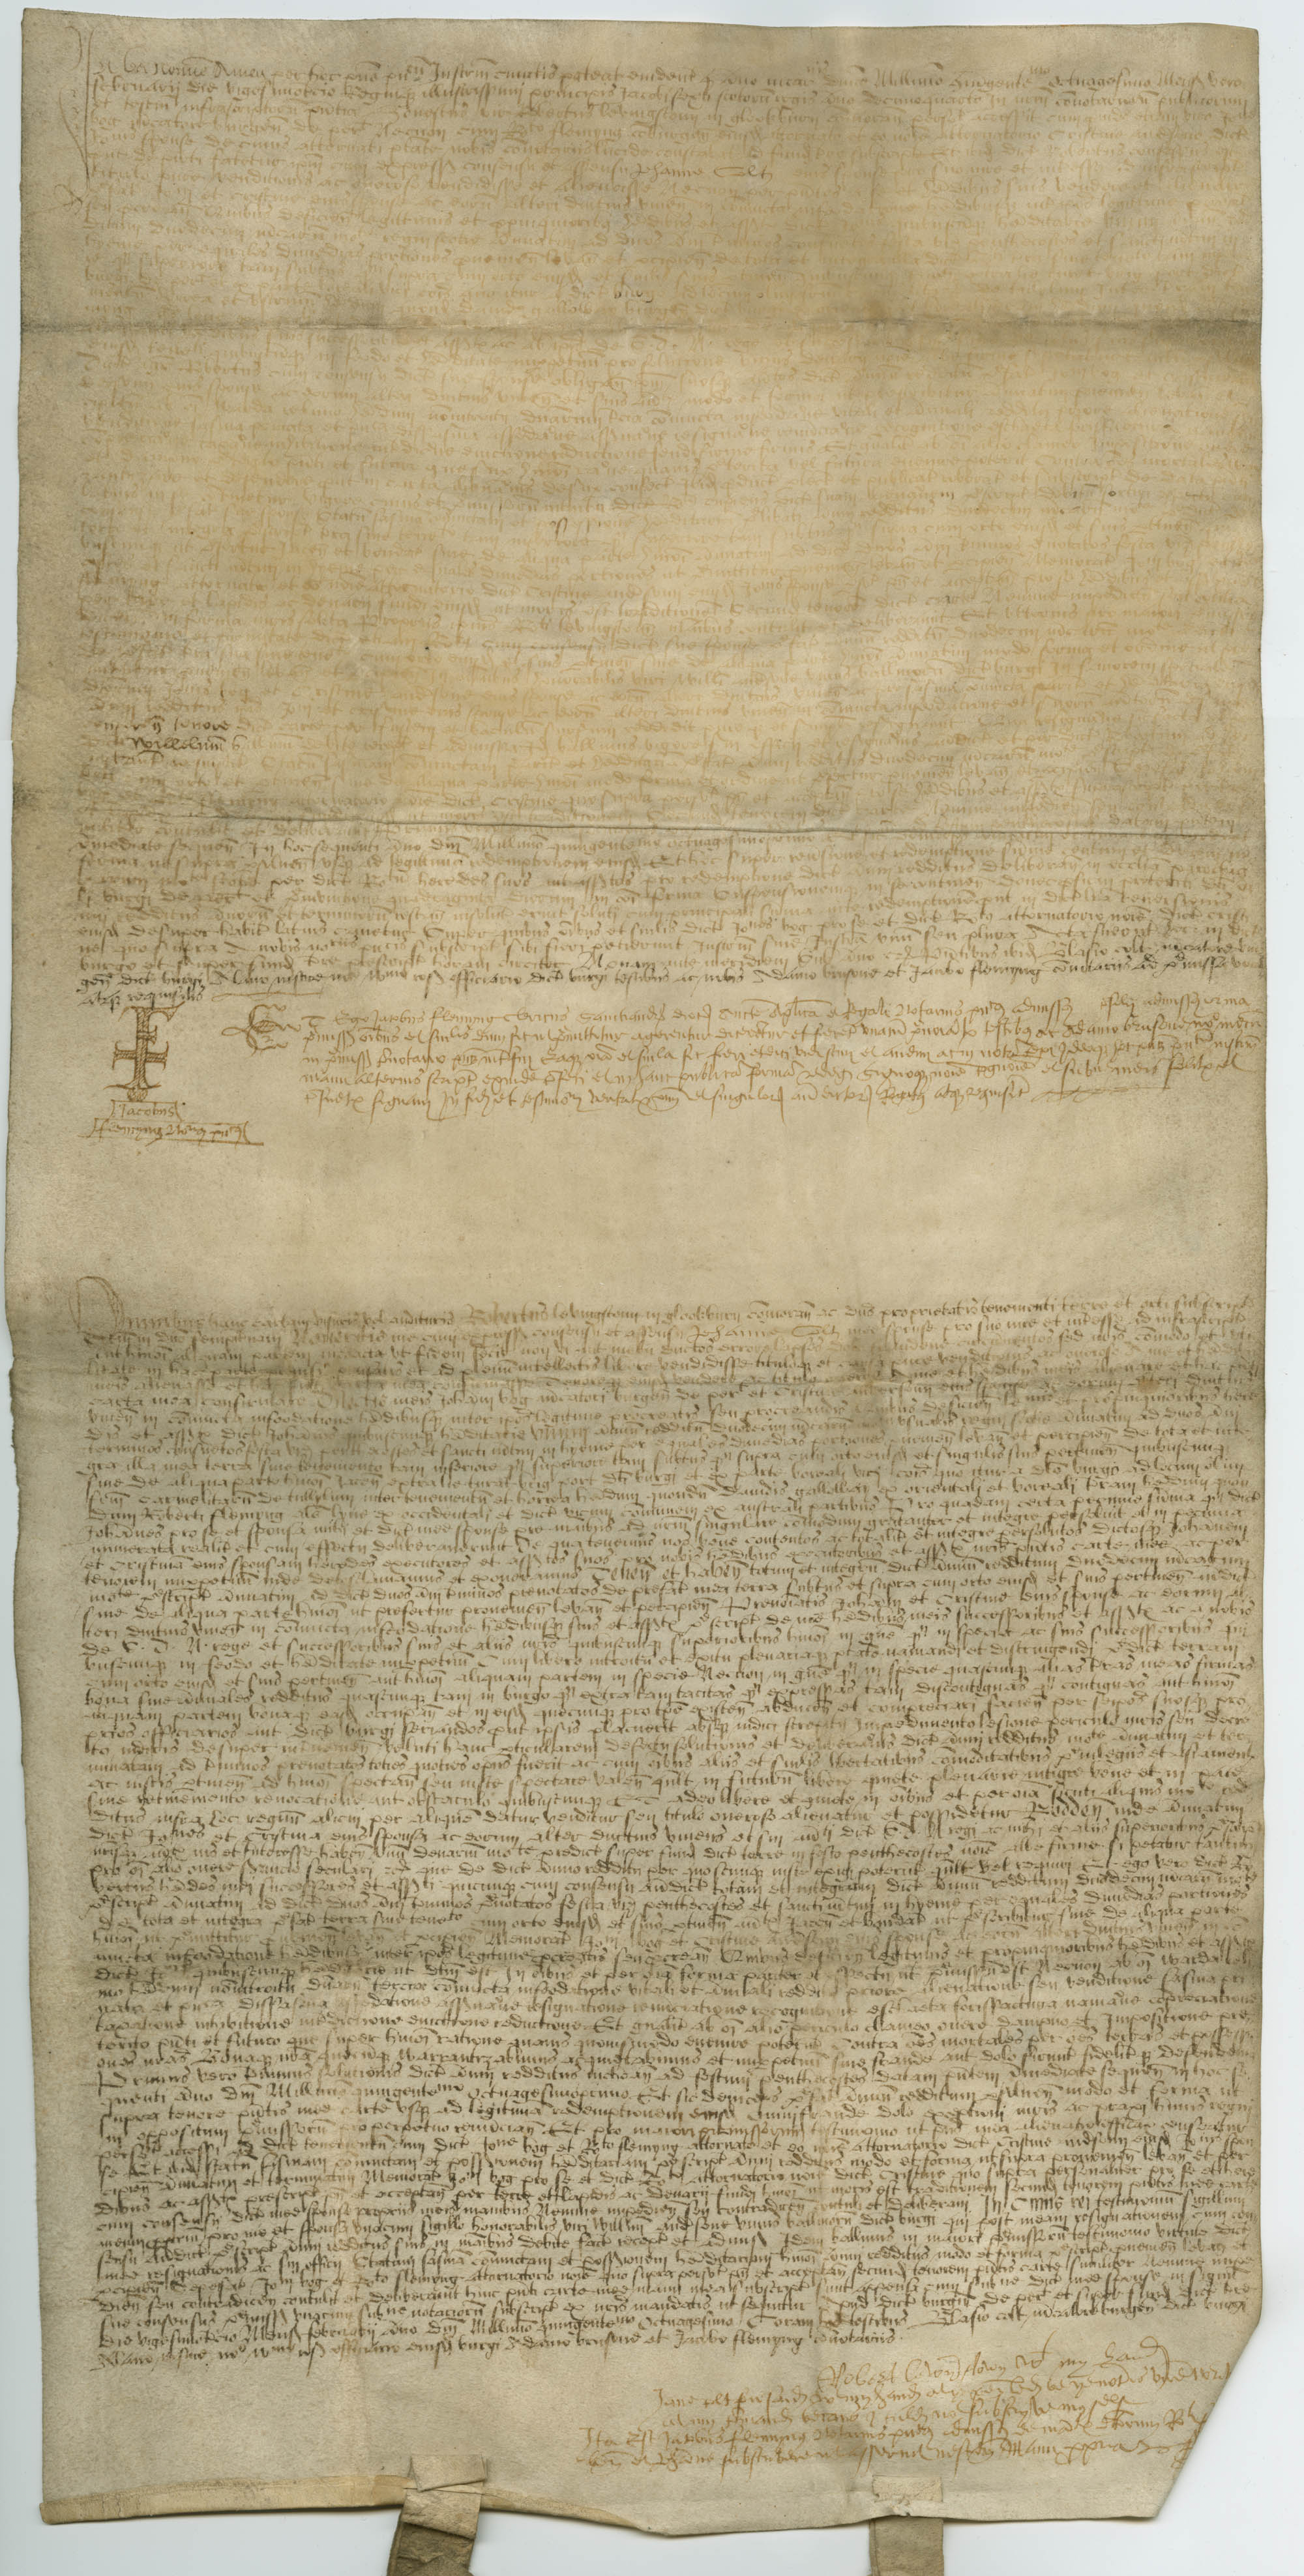
In the final example of this pattern, the folded parchment has unfolded under the tag on the right (front - left on the back), and can be compared to the other tag which is threaded through the folded parchment. This shows the simple arrangement of tag and parchment and that there is no fixative or other fancy folding happening.

Instrument of sasine with charter by Robert Levingstoune to John Bog and Cristine Anderson of an annual rent of 12 merks. 1580/81.
Seals: Red wax impression on front only
Tags: single piece of parchment passed through one pair of slits in doubled parchment
McMaster University British Legal Instruments Collection No. 43)


You may have noticed in the previous example, the tag on the left (front left) was not pulled down as low as it could be, but rather had been pushed up like a pop up book. Both this and the unfolding of the parchment might have been encouragement for high class scribes to develop more complex slit patterns that would better hold all portions of the document in place, as discussed in the next section.


Three slits
A pattern of 3 slits (3 sets when folded) is the other most commonly used way of threading a dependant parchment seal. The example below shows the near ubiquitous arrangement - as in the one slit, the first slit is made in the folded section, as close to the top of it as possible, cutting through both layers of parchment. The second slit is made in the centre of the folded section, also through both layers. The final slit is made through one layer, located on the fold of the document.

Confirmation of grant
Before 1204
Richard II du Hommet confirms the grant at Langrune-sur-Mer made by his father William du Hommet, the constable of the king of England, to the monks of Aunay.
Slits: 3 slits, 2 through doubled parchment and one through fold
Tag: single piece of parchment
(Caen, AD Calvados, H 912)


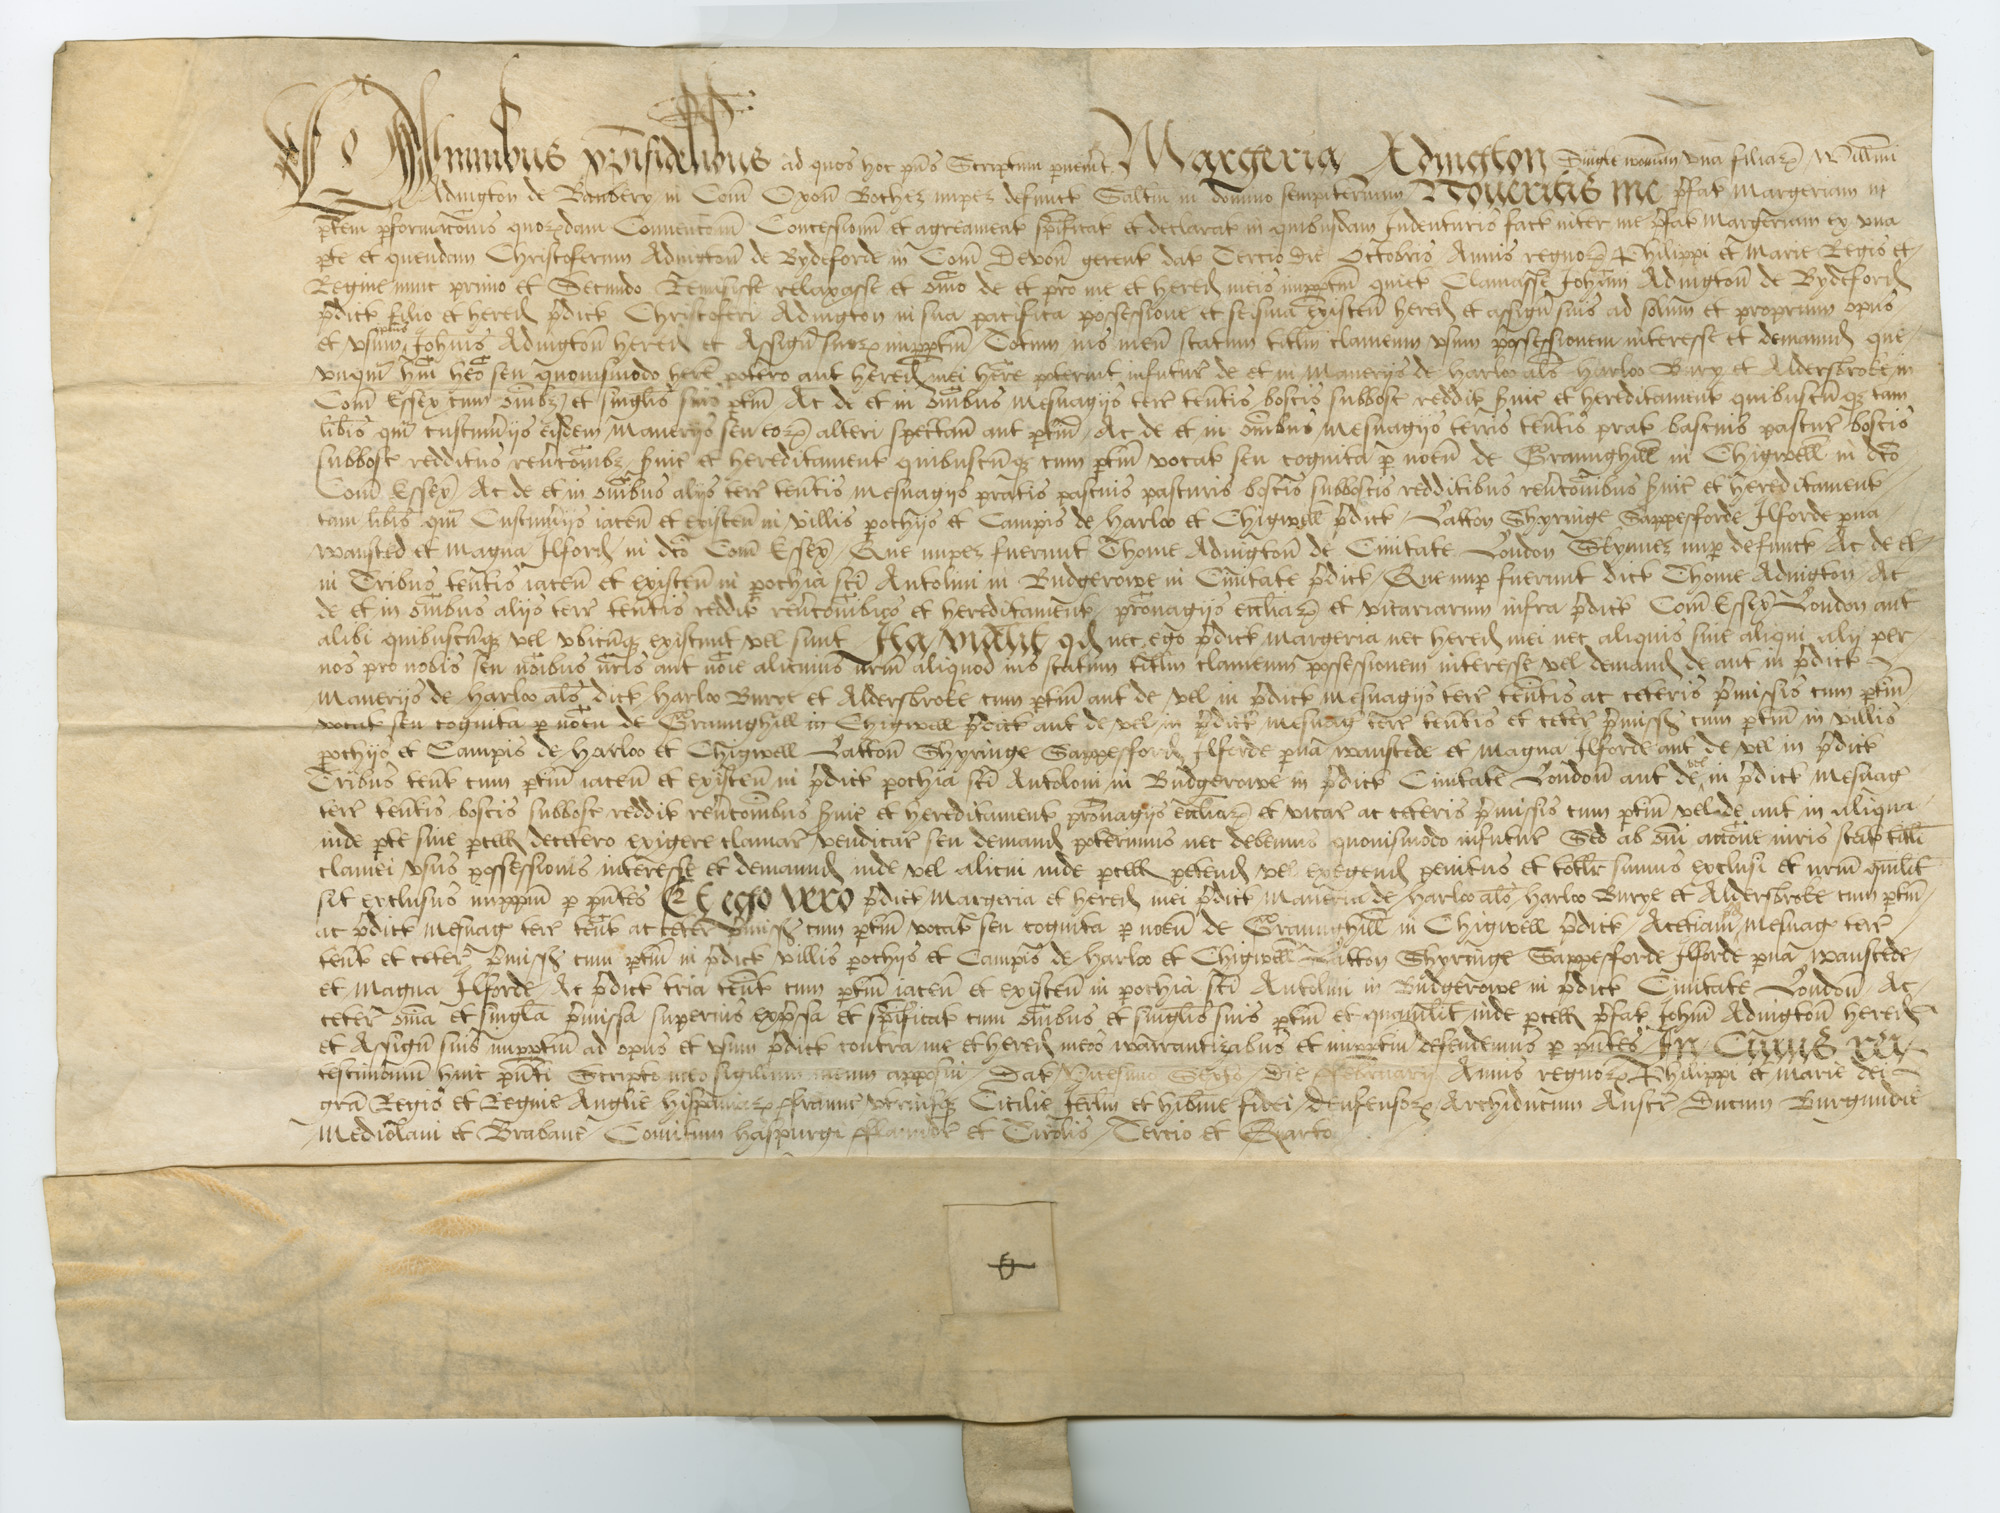
While different threading patterns could be constructed with these slits, where the backs of the document can be seen, or details of where the rear portion of the tag emerges from the slits, the evidence I've seen all points to one pattern being in use. The tag begins inside the document at the top, threads out through both front and rear holes, then back in through the middle holes in front and rear, then emerges from the document through the slit on the fold. This sounds rather complicated, so I'll post a set of photos of how to do this soon. An example showing front and rear of a document in this folding pattern is below.

Quitclaim by Margery Addington to John Addington of the manors of Harlow and Alderbrook, Essex and other lands in Essex and London.
Essex, 1557/58
Tag: Folded tag passes through two slits in folded portion and one slit on fold of parchment
Seal: red wax seal, depicting a (woman's?) portrait, facing to the right.
(McMaster University British Legal Instruments Collection No. 49)

While this isn't as easy to construct as other possible patterns, this is much more resistant to tag movement, holding the tag more firmly in place, with the two sides of the document providing double reinforcement for the document.


3 slit variants
I mentioned at the start that a few variations on the slit patterns exist. The first is to move the top slit to above the fold in the parchment. This can be done with a single slit or a 3 slit pattern, examples of both below. I expect this to be weaker than passing through both layers of parchment, which probably accounts for the rarity of this variation.

Document
July1374 - 1375
Tags: two remnants of tags passing through a slit above the fold in parchment, a slit in the middle of the folded section of the parchment and a slit in the fold of the parchment.
(Swedish Archives DS8799)

Another stranger variation to the 3 slits is shown below - the top slit is made above the fold and two slits are made in the folded section - none on the fold. It seems to have worked fine as an attachment method.

Confirmation of cathedral chapter of episcopal grant,
1149 ?-1154
(DCM, 1.6.Spec.20)


Finally an example where the back is not symmetrical with the front - the back of the tag was not passed through either slits -right hand side of first picture (front), left hand side of second picture (back):

Document
July1374 - 1375
Tags: three seal tags on the front of parchment pass through 2 slits in the doubled parchment and one on the fold of the parchment and on hte back 2 pass through 3 slits while on passes through only one slit
Seals: 2 seals green or dark wax front and natural wax backing, one seal obscured by a seal bag
(Swedish archives DS8829)

Given that this is just one of 3 tags done this way on this document, lets assume it was a mistake, and the tag was intended to pass through all the slits.


The mythical 2 slit pattern
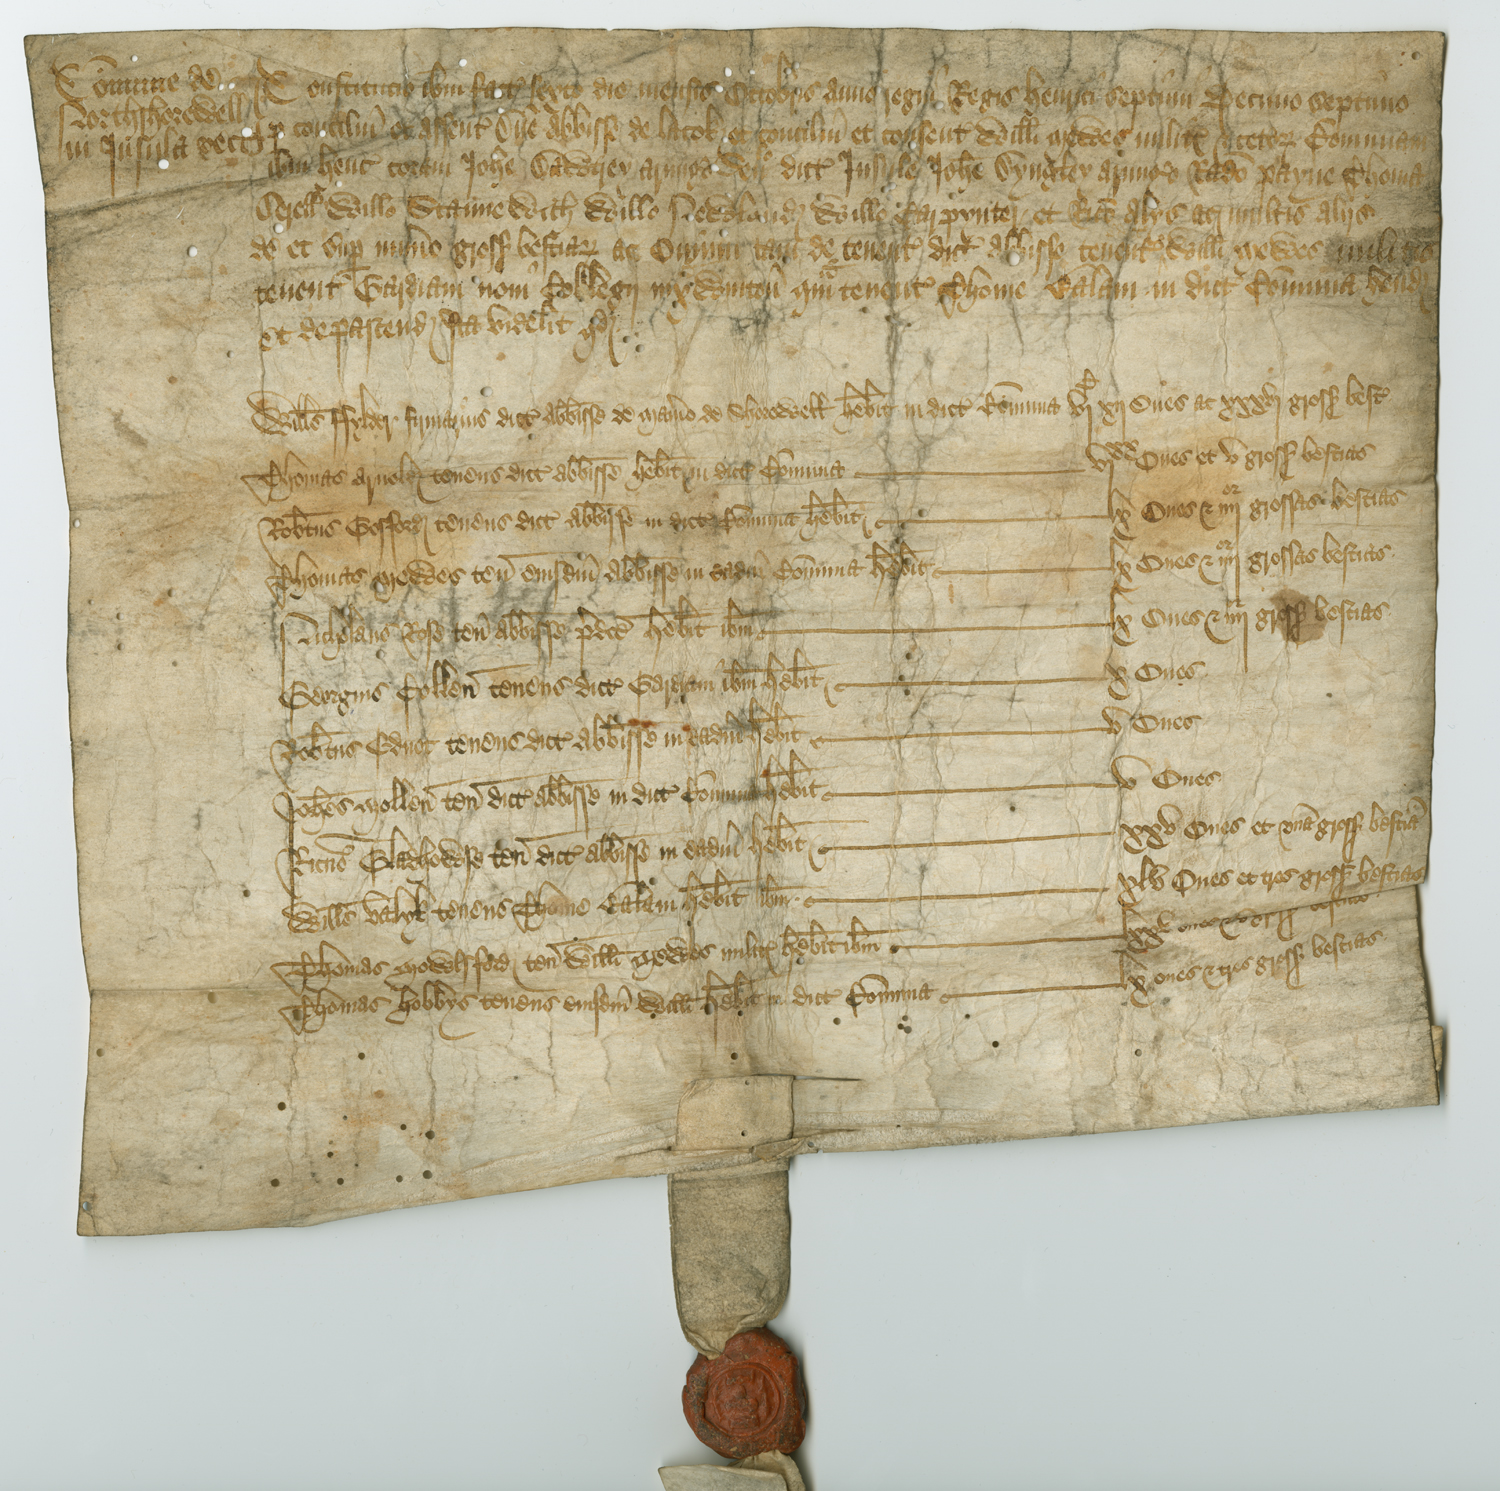
In theory various combinations with two pairs of slits (or simply two slits in an un-doubled parchment) ought to be possible. The example below at first looks like 2 slits , but look carefully - the doubled parchment has been smoothed down. Turn it back up again, in such a way that it ends just a nice distance below the words and this example is actually a single slit pattern.

Account of the commons of North Shorwell, Isle of Wight.
North Shorwell, Isle of Wight, 6 Oct. 1501
Manuscript: In Latin
Tag: passes through two slits
Seal: red wax seal, depicting a crown?
(McMaster University British Legal Instruments Collection No. 18)

Another 13th C example of this phenomenon can be found on the 13th century private charter of Alan de Witcherche (British Library, add. charter 20592) on the medieval writing site.

While I think a pattern with 2 pairs of slits should be possible, I still haven't found any examples yet, so I wouldn't be sealing any documents this way.

Other slit patterns
I'm yet to find any good evidence for any slit patterns not mentioned above. I'm sure if I find enough examples of sealed documents, something out of the ordinary, or some regional variant like the clever variations the Swedish made on integral tags will turn up, but the above certainly seems to cover the majority of examples. If you spot anything you think might be different, please let me know.

Saturday, 7 August 2010

Examples of separate parchment seal tags

As discussed a couple of posts ago, integral seal tags were a thoroughly useful tool, but the slit vellum, had a built in weakness - the small unslit portion could tear, as can be seen from a number of damaged period items. So new types of seal tags were developed, such as the separate seal tag. I've previously outlined the differences between integral seal tags and separate seal tags, today's post is to provide some examples of this type of sealing.

Examples are again, roughly chronological, with links to the full size image available by clicking the picture and links to the source by clicking the text. My (sparse) comments upon the tags are in italics. A few conclusions drawn about this type of seal tag are given at the end.


examples of separate parchment seal tags


Roger, Margery and Milo de Bray giving land to Priory of Haliwell.
Haliwell Priory, Middlesex, ca. 1181-1188
Manuscript: In Latin on vellum, 13x14 cm (including 3cm fold)
Seals: red wax, diameter 5 cm (Roger), 6x4 cm (Margery).
(Schoyen MS 1648)


Sealed charter of 'Count Robert son of Count John' (Count Robert of Alençon, d.1217) for the abbey of St-André-en-Gouffern
Caen, c1191-1200.
(AD Calvados H 6512, no. 4)


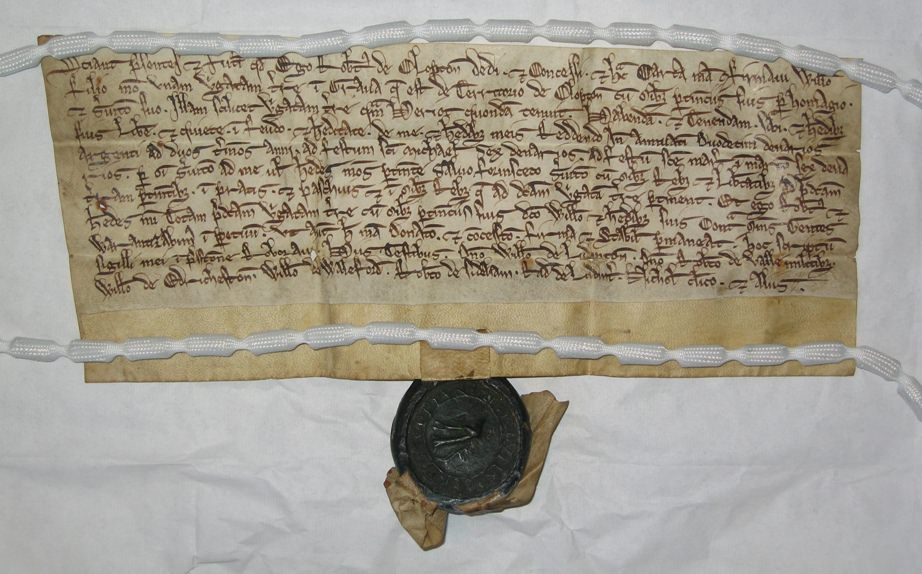
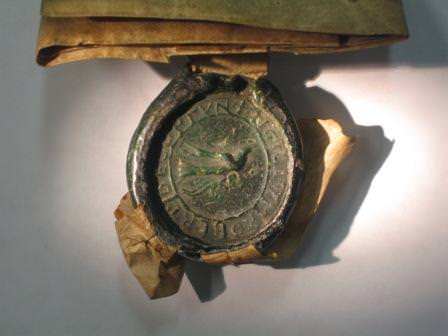
The "Clopton Charter"
13th C
Manuscript: Vellum, approx 11cm by 25 cm.
Text:Latin, records a grant of land by Robert de Clopton to his son, William.
Seal: image of a bird, approx 4cm diameter.

Letter patent of Henry III in favour of his half-brother William de Valence
13th C


Doccument
mid-late 13th C
Seals: Henry of Bishopthorpe and his wife Matilda, probably manufactured as a matched pair
(British Public Record Office DL 25/3089)


Inspeximus by Bishops of Durham, Ely & Coventry witnessing Edward I ending alliance with Guy of Flanders against Philip I of France.
Wasingham, England, 6 February 1297,
Manuscript: French and Latin on vellum, 36x51 cm (unfolded),
Seal: red wax seal bishop of Durham,
Tags: partial seal tag and slit for 3rd seal tag.
(Schoyen MS590/26)

An inspeximus is apparently essentially the medieval equivalent of a statutory declaration - these bishops of good standing bear witness that they saw the original document.


Deed of gift from John Morel to his son, William Morel, of an assart of land
Stafforshire, c1300
Manuscript: 175x145mm with elaborated initial.
Tag: original seal tag
Seal: loose fragment of a brittle white wax seal


Doccument
July1374 - 1375
(Swedish archives DS8682)


Document
Torun, Poland, 1364
Signatories: Earl of Northampton & four English knights
Seals: Central seal in English style, others manufactured in Poland in Polish style
(London Public Record Office DL 25/1639)


Document
1392
(British Public record Office E 329/228)


Robert Stewart, Governor of Scotland confirms land grant held by William de Crawfurde
Falkland, Scotland, 24 April 1417.
Manuscript: Vellum, 21x33 cm (unfolded)
Seal: Great Seal of Scotland, white wax, diam. 10 cm.
(Schoyen MS 1656)


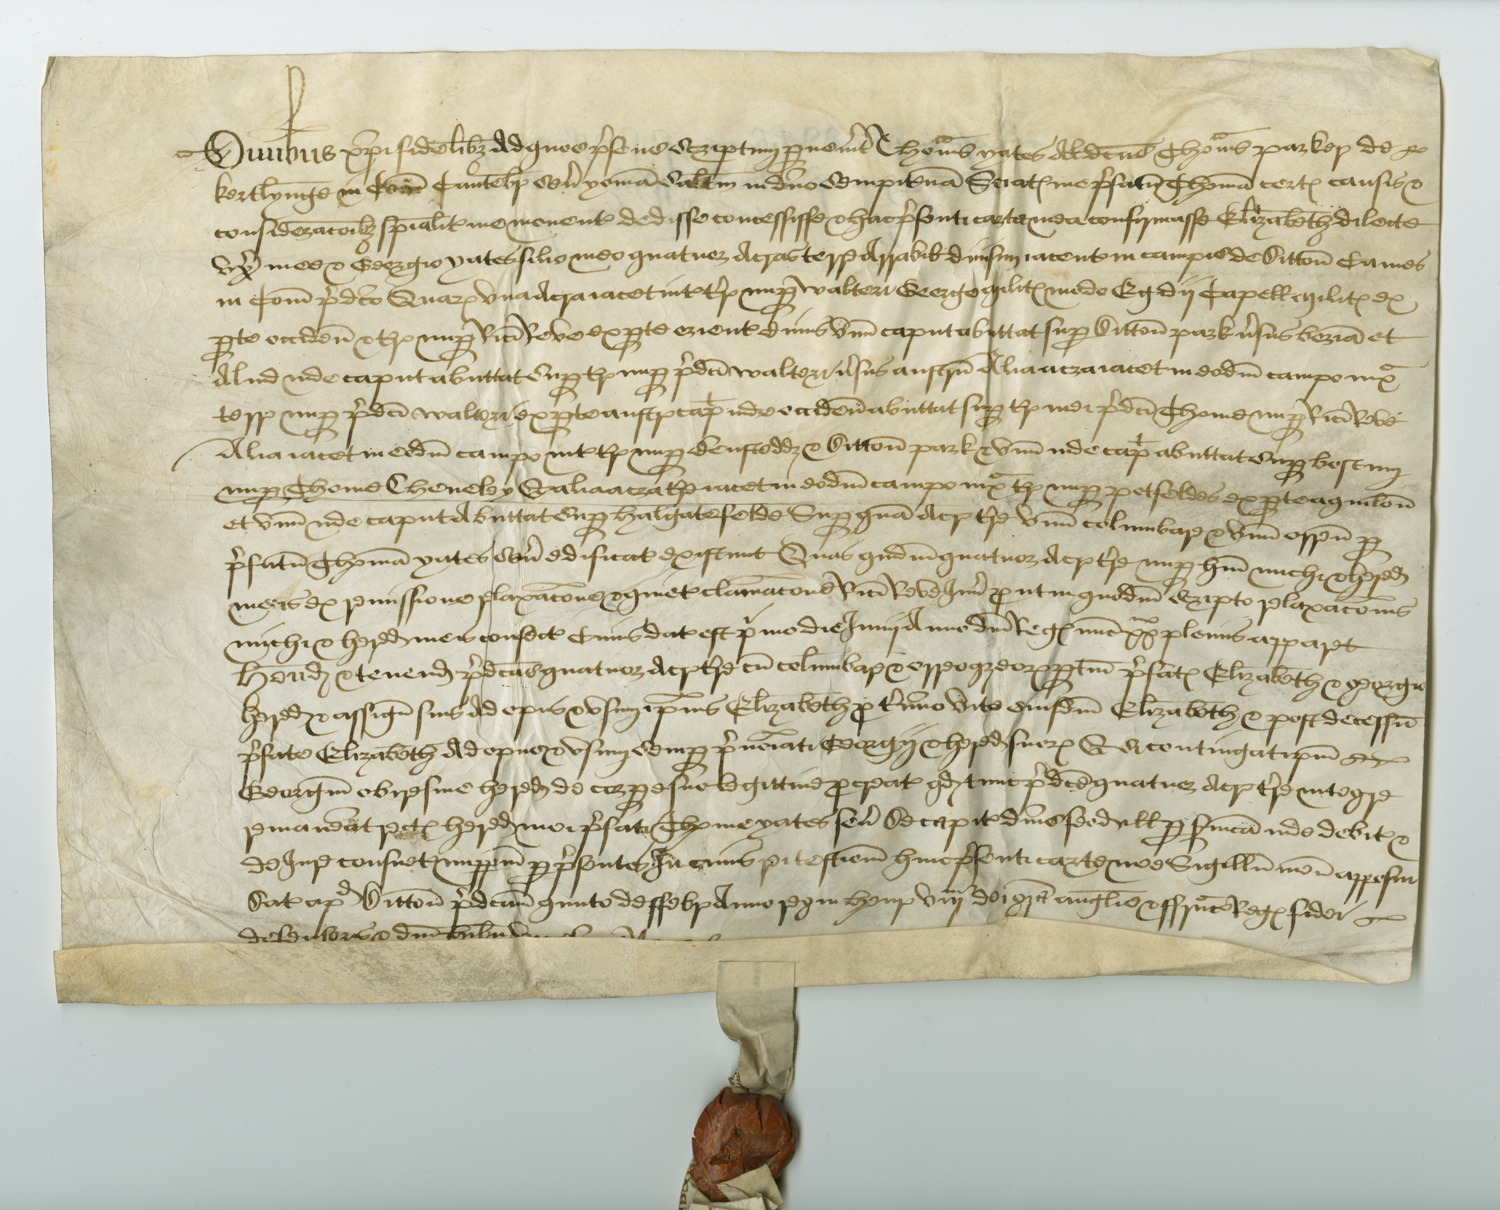
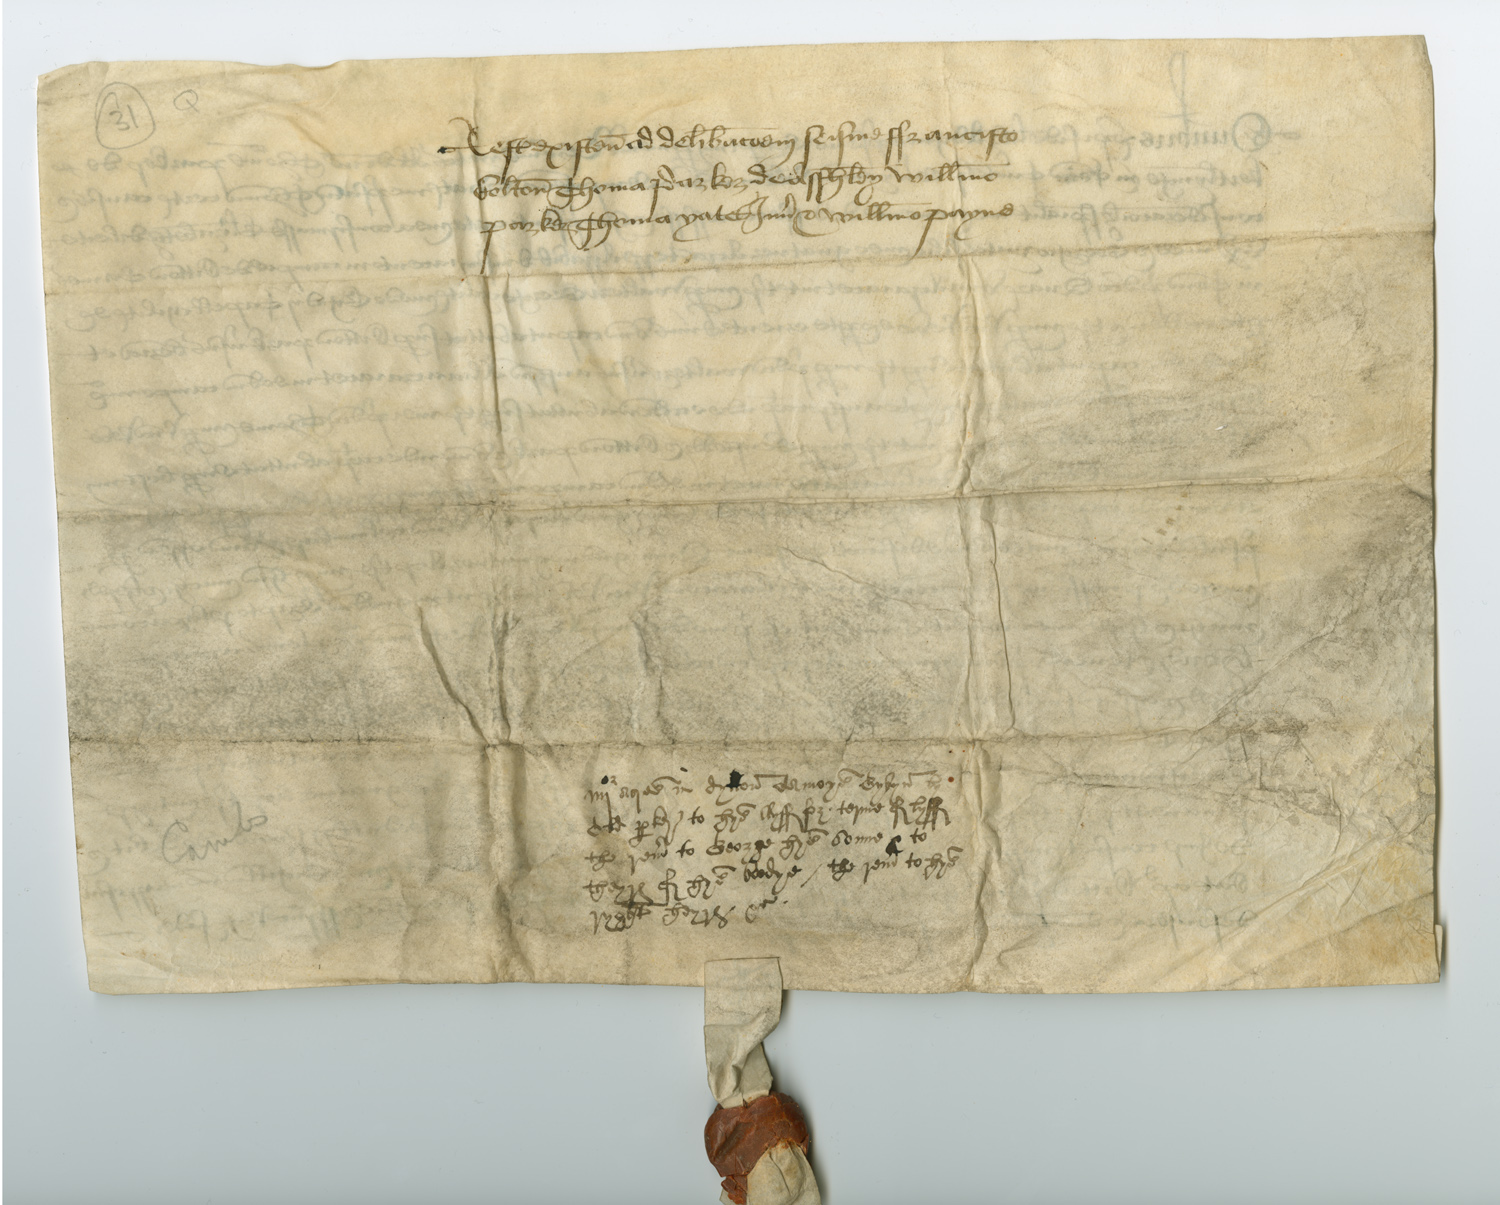
Feoffment by Thomas Yates alias Parker to Elizabeth, his wife, and George, his son, of lands in Ditton Camoys, Cambridgeshire.
Ditton Camoys, Cambridgeshire 5 Feb. 1537/38
Manuscript: Deed poll.
Seal:
red wax seal, cracked, depicting coat-of-arms
Tag: made from waste parchment, reading: “[...] del[..] ad qua[...] Gilbertus Randolph de [...] Gilbertus [...] relaxasse ac [...].”
(McMaster University British Legal Instruments Collection No. 31)

Note the tag made from waste parchment
, with the writing mostly hidden on the inside - a fairly common practise. You can fairly clearly see the folding pattern of this document, and writing on the back, presumably an address or summary.

Feoffment by Margaret Maunge to John Gosling of a messuage and lands in [Winterton?,] Norfolk.
1550
Manuscript: Deed poll.
Seal: red wax, cracked, half missing.
(McMaster University British Legal Instruments Collection No. 65)

Adam Bothwell, Bishop of Orkney appoints Francis Bothwell to Chaplaincy of St Lawrence.
Kirkwall, Orkney, 3 April 1565
MS in Latin on vellum, 18x45 cm, (unfolded), episcopal seal of Adam Bothwell, (red wax diam. 6 cm)
(Schoyen MS 1676/1)

Who said nepotism was a new thing?

Indenture (title deed) to lands in Tenterden, Kent.
3rd of April 1574.
Vellum 14.5x30.2 cm. Mostly undamaged wax seal on original vellum tag.
(Griffin Manuscripts sale catalogue Number 24103)


Devise of land by John and Mabell Huntley to Hugh Huntley, their son
1 January 1577/8
Manuscript: Vellum, 15 5/8” x 10 3/4”.
Seals: Two pendant seals, one fragmentary.


King James VI of Scotland grants property to John Anderson.
1599
Manuscript: Ink on parchment, 45 cms. X 18.8 cms.
Seal tag: Parchment 21cm in total length.
Seal: Tan-colored wax double sided royal seal, approx 14cm original diameter, only upper right quarter remains.


Some conclusions on the style
From this very small sample we can see that this form of tag started to become common during the 12th C and continues throughout the medieval and Renaissance periods. The development of separate parchment tags was to quickly become the most common type of seal tag. As well as being stronger and more secure than the integral seal tag, this style also had the advantage of multiple seals being easier to add, a practise which reached ridiculous heights by the 13-14th C. This little slip of paper is the most common style of tag of all styles found - it has by far the most examples extant, far more than integral tags or all the styles of fibre seal tags put together.