Friday, 26 February 2010

Introduction to seal tag varieties

I recently spoke about medieval sealing practises. I'm now going to begin a series of posts that focus on seal tags. Seals on letters intended to be broken off as a simple security measure, but also acted as authentication of the sender. Seals affixed to the surface of a page of a public document as authentication of the writer had a tendency to fall off, which was a problem when the seal was the a major means used to prove a document was genuine, which was a concern in a rapidly bureaucratising society making the transition from verbal to written agreements.

Seal tags were a way to attach a seal to documents in a more secure way. That required that the seal was still firmly attached to the document (so that seals couldn't be swapped between documents), but would not be subjected to as bad a stresses as seals attached directly to the page were.

Today's aim is to introduce different varieties of seal tags. In later posts I'll give more examples of these, show you how to construct your own, and explore intricacies of construction.

In earliest form of seal tag, the spare parchment at base of the document was slit to form a long thin strip (like tearing up a minties wrapper), which the wax and seal was applied to. An example is shown below (click on the image to see it large, the links in the text for more provenance details). Like many other examples, there is a second strip of parchment, cut just like the seal tag, with which to tie the document closed when folded up. (which does suggest a possible origin for this method if it can be dated to before seal tags)


Charter with Seal of King Edward the Confessor
Seal in use 1042-1066, charter c1050. Diameter 70mm.
(London British Library, Campbell charter XXI.5)

Of course a long thin strip of parchment wasn’t very durable, and a seal didn’t authenticate a document it was no longer attached to, new ways of sealing were soon developed. This type of sealing was primarily used in the 11th Century, or on documents only expected to need to last a short time.

The most common form of seal tag by the 12th C is a strip of parchment which is a separate piece from the document. Any remaining parchment on the charter is folded up towards the writing so the edge of the parchment sits just below the end of the writing, permitting no space for additional words to be added. This turn-up is generally only a couple of cm wide - If large amounts of parchment remain at the end of writing a scribe could be expected to cut this off for other documents, and smaller portions for use as seal tags. One or three horizontal slits were cut in this doubled parchment, the width of the strip of parchment used as a seal tag. The seal tag was inserted through the slits with ends dangling below the parchment for the seal to attach to. The example below shows both front and rear of the document.


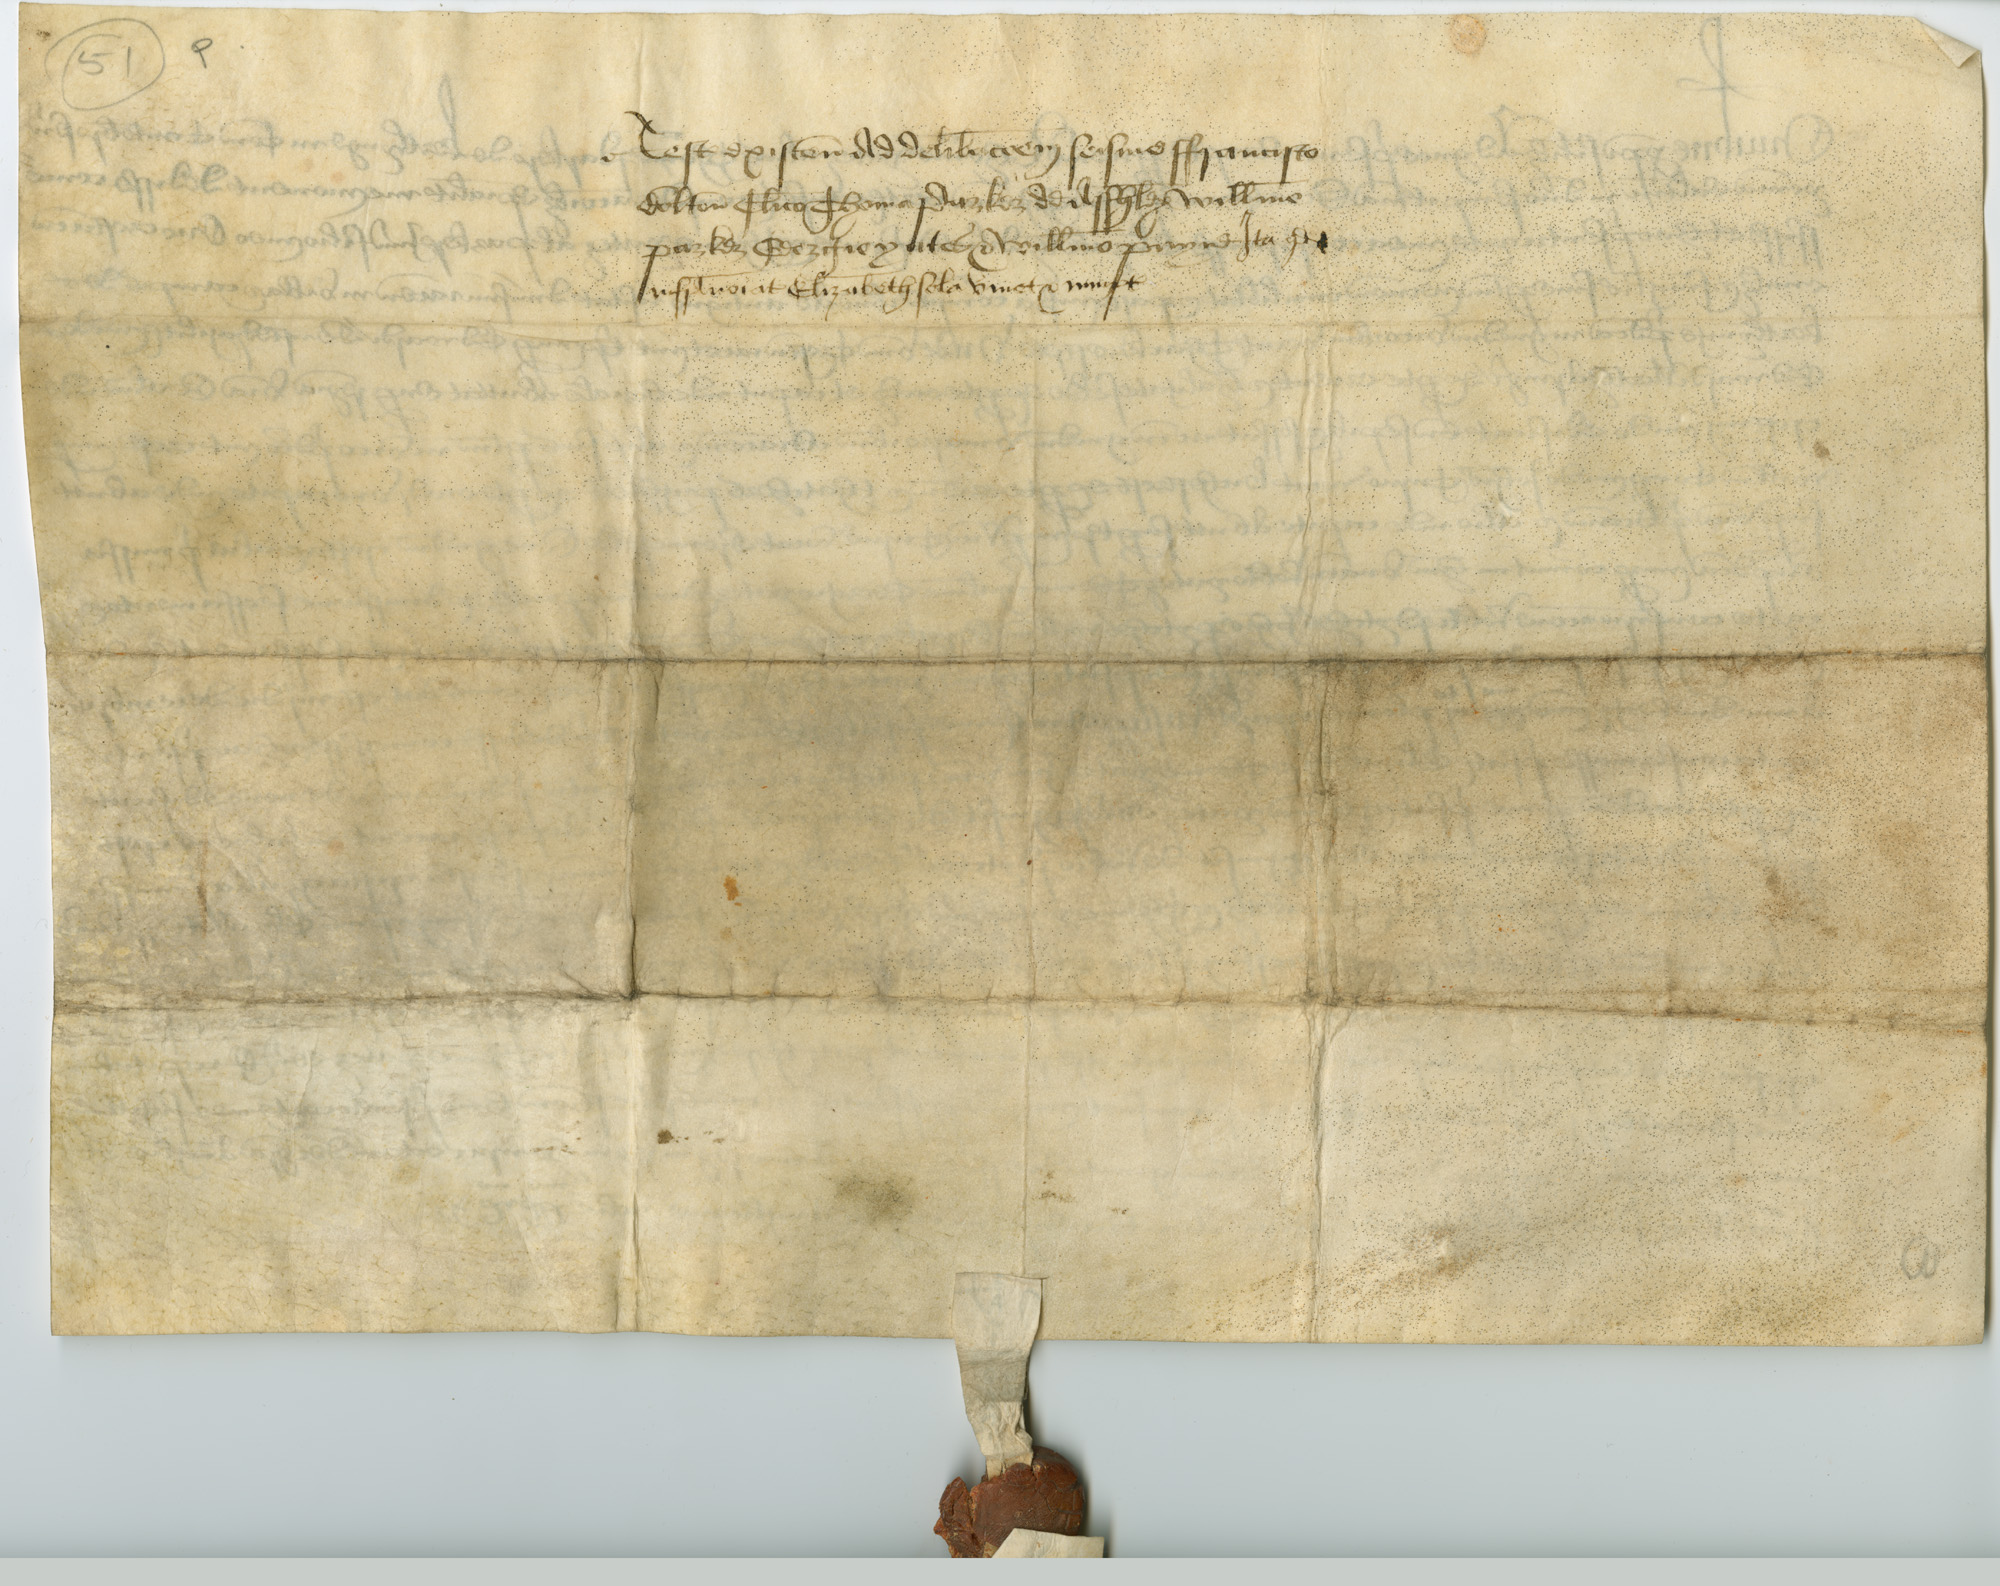
Feoffment by Thomas Yates alias Parker to Elizabeth, his wife, and Thomas Yates, Jr., his son, of a croft in Kirtling, Cambridgeshire.
1538/39
Tag with red wax seal, depicting a coat-of-arms (cracked, lacking portions).
Tag made from waste material, bearing inscription on inward side.
(McMaster University, British Legal Instruments Collection Ms. 51)

This parchment seal tag remained the most common variety of seal tag throughout the medieval and Renaissance periods. However, for some applications, a fancier document was desired. Just as fancier fonts and illuminated first letters could be used in the text, so could fancy seal tags be used. Such seal tags were normally made of fibres, braided or woven narrow strings. The earliest fibre seal tags I know of date from the late 12th Century, showing this technology developed quickly, although most documents stick with the utilitarian parchment seal tag.

The conceptually simplest forms of fibre seal tags (although often most decorated) are woven strips which replace the parchment seal tag in the same manner. Although the simplest seal tag to attach, these wider tags provide more space for more elaborate textile techniques, as seen in the example below.


William de Brus to Durham cathedral priory
c1194x1215. Double faced tabletweaving.
(Durham Dean and Chapter Muniments 4.8 Spec 2)


A form of fibre seal tag which uses a much simpler to make seal tag, but develops it's own method of attachment is the simple "twist" pattern. At it's simplest form the seal tag is a coarse piece of string (as exhibited on the papal bull below), at it's most complicated a narrow piece of braiding or weaving.


Mandate of Pope Martin IV for a case to be heard
1284
(DCM, 4.2.Pap.4)


One of the most complex forms of seal attachment is the "diamond" seal tag attachment. 2 braids or narrow cords are combined with a plait to make a pretty result, often with contrasting colours. The example below doesn't clearly show details, but you can see the diagnostic diamond pattern. This example appears to be a single coloured braid, but I'll explore the intricacies of the diamond pattern seal tag later.


Charter of Richard I, confirming to Alexander de Barentin, butler to Henry II, all his property fairly purchased or confirmed to him by Henry II.
12th Century
(London, Westminster Abbey Muniments no. 657).

A few much rarer fibre seal tag attachment patterns also exist, and I'll get to a discussion of these much later, when I've gathered more examples. (Please feel free to send me more, good photos of the tags rather than the seal or charter are hard to obtain, and with parchment seal tags the majority of tags, fibre tags are hard to find.)

Monday, 22 February 2010

Medeival Sealing Practises - An overview

Seals were an early security measure, used much like a signature to verify the authenticity of a document. A blob of wax was applied to a document and a small carved object impressed into the wax, leaving an imprint. Confusingly, the word seal refers to both the seal die/matrix (for example a ring) used to create the impression as well as the wax seal impression placed on the document.

As a security measure seals functioned quite well - they were harder to forge than a simple written document, although some medieval forgeries definitely did occur. The pictorial nature of the seal was tailored to a semi-literate society who would have been unlikely to be able to spot differences in a signature. The pictures carved into the seals also allowed an individual to express themselves, and make strong statements about personality, rank and power through small alterations to standard depictions.

By the high medieval period in western Europe, two types of seal existed, the personal seal and the official seal. Personal seals were used to close rolled up letters to prove the letter is still private and unread upon arrival. This functions similar to the way modern envelopes do - it takes a lot of effort to open a letter undetected, and deters all but the most persistent intruder. Personal seals also began to be used like a signature on small business and credit transactions - probably similar to using a credit card or signing an interest free sale today.

Official seals developed out of the personal seal, but were used on documents intended to be consulted multiple times, where the aim was not to prevent the document being read but to authenticate it as genuinely from you, like a signature on a modern legal document. Seals used to seal a letter closed are designed to break upon opening the letter, so a change in technology to preserve the seal was developed. Various forms of attaching the seal to the parchment were tried, developing into the seal tag - a strip of parchment or braid that attached the seal to the document in a way that could not easily be tampered with.

Personal seals tended to be small objects that could be easily carried around, such as a ring or pendant. Official seals were larger, sometimes double sided, and used only on official documents. Official seals were more formulaic and represented a persons rank, role and sometimes allegiances. Like a modern business logo (and motto), they could tell you a certain amount about the person's business aims if you knew the art of interpreting them.

Lower ranked people might only have a personal seal to use on all documents, personal or official, the official seal was a marker of status and position. Surviving seals matrices and seal impressions are mostly of the official kind, as the kinds of uses of personal seals are rather ephemeral.

My favourite period, the 12th Century marks the genesis of widespread sealing in England, when conventions were being formed, and experiments with the practises and material objects of sealing common. It also marks a rapid increase in the formalisation of legal documents into charters and agreements - a transition that began in the 11th C to a culture which records increasing amounts of information in writing, flourishes in the 12th C. Seals represent an important part of that transition because they provided an authentication for documents, and a form of authentication that was not a written word for those who were still suspicious of the new literacy. Adding your seal to a document added a degree of ceremony to an agreement, just as signing a document in front of witnesses does today. Such a ceremony was necessary to give this proposed replacement for old ceremonial practises associated with verbal agreements the same weight of ceremony.

By 1200 almost every man (or independent woman) who owned property or was in business in England would have had a seal, although many would have only a small multipurpose private seal rather than separate private and official ones. Seals were used in everyday transactions like agreements with moneylenders or pawnbrokers, and transactions involving small amounts of money, however few documents of this kind of transaction have survived. This is a big contrast to earlier periods - in the 10th C official sealing seems to have mostly been the province of the king, while in the 11th it has extended to the upper nobles, and in the early 12th C it seems to have been a noble only activity. Before these times, in Anglo-Saxon England, agreements were largely verbal ("my word is my bond"), and did not require writing down.

I believe continental western European practises mirror this fairly well, although possibly with a slight time lag. Sealing practises appears to be one of these practises that actually did have major innovations in England that spread elsewhere, namely the heightened use of seals and the development of the seal tag. This doesn't appear to be a solely Anglo Saxon or Norman thing, but rather a development that stretched across the transition between cultures. One can only speculate that perhaps the mixing of cultures was a catalyst for this development.

However, while the official sealing culture and seal tags may be an English innovation, there was a continental tradition of sealing official documents directly onto parchment, which can be seen on some documents of Charlemagne and early Papal Bulls. And the tradition of sealing letters close, I've heard dates back to roman times. However as a textile enthusiast, and 12th C western European reenactor, my research focus is on the wonderful invention of the seal tag, and the social traditions of sealing in the 12th Century.

This is my introductory talk for a series of posts about seals and seal tags. I've been looking into this for a while, but have only escalated my research and writing up lately, prompted by the scribes guild of Lochac developing new writs for presentation of AOA's (the SCA's lowest ranking award). Due to the rapidity with which I'm writing this up there will be details which I will get wrong or make inferences that are misleading. I'm afraid I may sound more authoritative than I really am, and my referencing will not be all I wish it could be. Please forgive me, I hope that having this information more widely available will outweigh my small errors. I also encourage you dear readers to point out my errors, discuss anything you think I might be a little shortsighted on, and ask questions, etc. I really appreciate having people do so as a quality check on my work, and so that I can have an interesting discussion on these matters. I always love the chance to discuss research, and have discovered the most interesting things because someone asked a simple question.

If you wish to find more posts in this series, but not to hear about my other textile exploits, look for the overlapping tags of "seals" (about seal dies, imprints and extant examples), "seal tag" (about seal tags including extant examples and how to's), and "sealing practises" (why people used seals - the sociological aspect).

Tuesday, 26 January 2010

I also cook medieval/renaisance food...

...and write about my results.

(the blog is a shared blog of local reenactor cooks in the sca region around me).

Saturday, 16 January 2010

A sort of new broach

I found a charming sketch of a broach in the Museum of London book "dress accesories", and just had to make a copy (following on from my other experiments with twisted wire from this book). There are actually 2 examples listed in the book:

#1339 c1150-c1200 diameter 26mm
gunmetal frame, silver pin
Slightly damaged - some of the fine loops are broken. Frame is a wire ring with ends joined by opposed loops. in has D shaped cross section and was added without a gap in the wound spirals.

#1340 c1150-c1250 or later 24x22.5mm
bronze frame
Spirals wound around frame 35 times, with each circit of the frame taking 7-8 small loops. Pin added at the small gap in the ends of the fine spirals.


A broach from Bedern St in York in this style is also mentioned.

I think the York broach is the broach shown on this page, mentioned as being of twisted wire. This same broach is shown slightly bigger on the york archeology photo library, direct links are not available, but click on 'medieval' and look at the broach at the bottom of the page, ref no 002359.

If anyone knows more about this, or can acess the report please let me know.:

Daniels, M, 1979, 'Bedern Site' in Interim 6/3, York Archeological Trust 19-27

(I keep getting the idea I should be able to acess it from the York archeological trust website, or find it on their gazeteer, but it's thwarted me so far)


How to make this annular

materials:


  • for the decoration: a very thin very flexible wire e.g. 26 gauge wire from my local art shop


  • for the pin: a thick sturdy wire, that will not easily bend under strain e.g. 1mm brass wire, or in desperation I used a hat pin that wasn't too bendy (difficult to bend with bare hands). Preferably of the same material as the decorative wire.


  • for the support: a moderately thick wire, that is at least moderately sturdy. This could be the same wire as the pin, so long as you have the means (eg pliers or hammer and anvil) to bend this into a circle, or a somewhat thinner wire (eg 0.5mm) could be wrapped around multiple times. As this will be hidden inside the broach, this doesn't really have to match the metal of the other wires. I used copper wire stripped from electrical cables, and found this a little weak. For best results it is important that this wire doesn't bend easily in your hands. A premade metal ring of suitable size (eg curtain ring, metal o-ring, cheap plain finger ring) is very likely to be suitable, maybe better, but I haven't tested this yet.
Step 1: Construct a support
Find a circular object the diameter of the desired broach. The archaeological examples are quite small - the size of a large finger ring, but you could make a larger one. The object must have a fixed diameter section, and no lips that protrude at the rim, so you can easily slide the object off. You could use a special jewellers ring form, or just a bottle lid, a fat pen, or any other mostly cylindrical household object, or if desperate you could try doing this step freehand.

Take the moderately thick wire and create a circle by bending it around the object. Grabbing the ends with pliers may help with this step, if it is a bit thick. If the wire is a bit thin (or a bit weak/too bendy), wrap the wire around several times instead of just once.

Finish by crossing the wires over, then sharply pulling the wire back in the opposite direction, creating a U bend which contains the other wire. This will be much easier by grasping the ends with pliers. For thicker wires, you may find it easier to use pliers (or a hammer) to shape the u-bend before you loop the two loops together.

Remove your support ring from your shaping form. It should hold it's shape, now squish the loops down so they don't stick out much more than the surrounding wire.


Step 2: Make a tiny spring
Find a long thin object of approximately 1-2mm diameter, with a nice even diameter, with at least one end (prefereably 2) finishing smoothly without a wider diameter at any point of the edge. I used a large darning needle. The interior ink case of a biro, thin knitting needles, stiff fat wire (like you might have used for your support) are also probably about the right size.

Leaving a few cm of unwound leader, start winding the very thin wire tightly around your object, creating a spring. If you start in the middle, and pull the needle (or other object) towards the end you are winding towards, you can make a spring many times the length of your needle.

Wind until you have a spring approx 5 times (I think - I need to test this more) the circumference of your supporting ring.

Step 3: decorate your support
Wind your leader tightly around the support, approx 3 times, ending at the start of the spring. Chop off the remainder of your leader. You will also need to cut your spring from any reels of wire.

expand slightly the first cm of the spring. Wind this expanded spring around the support, passing through the centre of the supporting ring. Keep expanding and winding until only approx 2mm of the supporting ring is uncovered. If your thickest wire is thicker than 2mm, make this 1mm wider than your thick wire. Tightly fasten the end of your spring in a similar fashion to the way the start was fastened, and clip off any remaining thin wire.

If you run out of spring, tightly fasten the end as above. Then wind a new spring and add this to the support as tightly to the first segment as possible. It should be possible to mostly hide the join, but write down how much extra was needed in case you plan to make another broach with the same materials.

Step 4: add a pin.
starting at the end of your thick wire, bend a U shaped curve, twice the thickness of your support. This is easiest by placing a pair of round nosed pliers where you wish the bend to be, and using another pair of pliers to bend the wire. This will be your pin.

Test that this U bend in your pin will slide onto your support. If it doesn't fit, adjust with pliers. Make sure there will be enough wire to bend and complete a circle around the support, but do not bend this yet. If there is more, cut the excess wire off, if less, unbend (or cut off bend portion) and try again.

With the pin still sitting on the support , mark the point where the pin just lies over the support on the opposite side to the bend. cut the wire at this point. If this is too short, the pin will pass through the decorative wire and fall off your clothes. If it is to long, the pin will be very difficult to fasten or release.

Remove the pin from the support, and sharpen the unbent end. Experiment with whatever objects you have to hand made for sharpening eg nail files, emery board, wood files, whetstones, sandpaper knife sharpening steel, etc, so long as the object is expendable. Don't break or ruin your best tools with this, unless you know this is the job they are designed for. If your file is coarse, it will be best to use a finer file to finish the job. Hold your pin so that it is at an approximately 15 degree angle from your sharpening surface (i.e., just enough space to almost fit a finger between it and the plane of the sharpener, and roll the pin along the sharpener, to create a pointy end.

Clean off your newly sharpened pin point on a rag or offcut of similar tightness of weave and thickness to the garments you will regularly wear the broach on. Test pushing the pin through the fabric, and make sure your pin moves freely through the fabric. If not, file some more, possibly with a finer file. If you plan to use your broach on white or very pale fabric, test your pin on a waste scrap of tightly woven pale fabric, poking it through the fabric to see if a dark mark is left. If so, such corrosion can be cleaned off your broach by rubbing it with a rag and tetsting by continuing to poke holes in your scrap (until it comes away without a mark), but note that if the broach is not used regularly, the corrosion is likely to return.

Attach your sharp pin to your broach support


With the pin still sitting on the support , mark the point where the pin just lies over the support on the opposite side to the bend. cut the wire at this point. If this is too short, the pin will pass through the decorative wire and fall off your clothes. If it is to long, the pin will be very difficult to fasten or release.

Remove the pin from the support, and sharpen the unbent end. Depending upon the composition of your wire, a number of substances may work: a metal file, sandpaper, a whetstone, knife sharpening stick, nailfile, emery board. Test carefully though - the wire may not be friendly to your sharpener, so best not use anything expensive unless you know it is the proper tool for the job. Sharpen by rolling your wire along the file, holding the wire at an approximately 10 degree angle from the file.

If you used a coarse file, be sure to finish the job with a finer file, so there are no sharp grooves or cuts in your metal that might catch on your clothing. Test and clean your point on your pin by pushing it through a rag of a similar weave to the garments you plan to wear it on.

Slip your pin back onto to the support again, as before, then tighten up the bent end so it now completes a circle around the support. This is best achieved by holding the flat portion of the pin with a pair of flat nosed pliers, and

Do not attach it so tightly that the pin cannot rotate freely about the support.

Step 4: Wear the pin

This takes a little practise. Attach your pin by placing the broach against your garment, with the pin's natural closing side on the outside (non garment) side, but open the pin so the circle of the broach is free. with two fingers, pinch a small bit of fabric within the ring of the broach. pull this through the ring, past where the pin normally sits, and to the side opposite the pin's hinge. Insert the pin into the pulled bit of fabric. Move the fabric to the middle of the pin, then release. Your pin should be in place, and ready to proudly show to your friends. Do the reverse to unfasten the pin.


If you still find inserting the pin a bit tricky after a few practises, your pin may be a little long - it needs to be long enough that it cannot fall through the ring, but no longer than this or it is awkward to fasten.

If you find your broach comes undone often, you (like me) may have used too weak/pliable support materials (either ring or pin - whichever bends out of shape). Ultimately this ammounts to a lesson learnt in what materials to use next time, but if your broach bends you can probably bend it back, and try to use it in a lower stress situation 9eg as a decoration rather than to hold a neckline in place) next time.

Note mine is nearly twice the size it should be compared to the historic examples - something to improve later.

Tuesday, 3 November 2009

folding calendars and almanacs

Last year an exhibition of medieval books occurred at my state library. One piece piqued my interest especially, and I kept going back to see it. It was a few leaves of parchment folded and sewn together to form a medical almanac that could be hung from the belt.

I conducted a bit more research on the topic and found that such items were used primarily as medical references, astrological calendars, and more rarely for any other uses requiring a pocket reference (eg psalms, canon lore, etc). They go by various names: Vade Mecum, folding almanac, folding calendar, and a few other rarer descriptions - no single designator for these exists, although Vade Mecum comes closest, and a variety of terms are used, such that sometimes it is not possible to determine without a photo or very detailed description if an item is such a folding book or a simply a very small bound pocket book.

A variety of folding patterns were used. Here is an examples on the Internet (unfortunately not showing how it folds) and another example which is closer to the folding pattern I saw in the state library, and finally an example with multiple views showing how it folds.

I wish to write about these more, but my notes are not in order yet. Meanwhile, I've been experimenting with making quick and simple mockups of these in paper, and I've had a request to share the process of making these.

The aim was not to make a high authenticity copy of these medieval folded reference books, but to make a cheap and easy replacement for the kind of reference materials that people often carry around at events - notebooks, timetables, class descriptions. Made from paper these would not be as durable as from parchment, but they look a lot better than a sheet of white photocopied paper, and do work quite nicely in a pouch, and presumably on your belt. (I don't frequently wear a belt, except with outer garments - often in damp or darkness- so I haven't tested this yet)

A sheet of A4 paper actually makes a nice size for turning into a folding book, although given the diversity of styles used, other sizes would work too (letter is similar enough in dimensions to use in this way). I used A4 sheets of 200gsm fake parchment card - that's about twice the thickness of photocopy paper. But photocopy paper will work fine to test out the shape you want to make. The originals would have been in vellum, which would be much more durable than paper, but as we don't expect to make these last for decades, the paper will last long enough. I advise using a wooden or stiff plastic ruler or paper folding tool to carefully press the edges of your fold below. Use some care in how you fold the paper if you want a nice symmetrical end product.

Fold you sheet of paper in half along the long edge:

Leaving your sheet folded in half (unlike the above picture), now fold the paper in half along the new longest edge (in the opposite direction) and unfold. Then fold the sides in towards this centre line to create two more folds parallel to this centre fold:

Unfold all fold except the first large one. Fold down a line parallel to this 1st fold, approximately 2cm down the page (the exact distance doesn't matter, but it must be the same for all pages so choose a distance and measure it).

Open out your paper and it should look like this:

Now, cut out a section from the center of the page , cutting along your last folded line, and leaving one quarter of the centre section uncut, like this:

Refold your pages into their final arrangement (this should be simply following the already made fold lines), first one side:

then fold the other side too:

You have one completed pair of pages. Make some more:

When you have a number of pages you are happy with (I recommend using less than 5 pairs on your first try - the paper thickness gets a bit tricky), line them up together with the pages all opening in the same direction (bulldog clips help at this stage):

For a quick folding book, I stapled the top sections together at this stage. Medieval books would have been stitched, or I could have glued this, but I was aiming for speed and this section would be covered. I also punched holes in this section at this stage with a hole punch (again, speed over accuracy). (sorry there's only a blurry picture)

Next, I took some of my trimmed off pieces of paper and glued this over the staples on the front side of the book (bulldog clips help):

When the glue was dry I folded in the edges of this snippet, so they enclosed the pile of pages, then folded over the top to hide the seams, and glued all of this. Finally, when this was dry, I punched through the hole in the top in the same place it was in the pages underneath. A finished quick and cheaty folding book:
You can fairly easily setup a word processor to print to these pages, or make a blank one to use as a notebook (not a period usage, but more authentic feeling than a modern notebook if you're not quite ready for a wax tablet). In period examples, sometimes the folds are used as dividing lines for columns, and sometimes they are completely ignored - often in the same document, or even page - so don't feel too confined in your manner of writing.

Tuesday, 7 July 2009

Hortus deleciarum puppets

I wanted something to enter into the local monthly summer picnic competition for toys. And being me, I couldn't help wondering if I could make a documentable 12th C toy.

I did some quick looking at medieval toys, and unearthed the following links:

But somehow none of these really inspired me. And then I was reminded of something I'd seen and been intrigued by several times before:


The Hortus deleciarum was a gloriously illustrated 12th Century german manuscript from Hohenbourg in Alsace, dated 1170-1200. Unfortunately it was destroyed by fire in the 19th Century. Fortunately several handdrawn copies were made before this happened, but unfortunately they were drawn by artists with strong preconceptions about what they would see in the pictures, and so many subtle errors have crept into the redrawings, for example women who look like they are wearing corsets. The above redrawing is by Engelhardt, the complete redrawings by this artist are online. Annother two Victorian era artist's redrawings of this scene can be seen here and here. While we cannot be sure of any fine details on these redrawings, the similarity between the various redrawings gives me confidence that the essentials of these pictures are correct.

This article gives a nice background to this drawing and points out that the people depicted are not children, but adults frivolously wasting time. This makes more sense to me, as the illustrations of this era do make some differentiation between adults and children, at least in terms of size, but often in the more naturalistic high quality german pieces of this era, also begin to show some of the proportion of children too.

At any rate, the picture depicts two people holding two ropes which manipulate two puppets, so I did a little research into medieval puppetry. This article and this article and this article are fascinating, but it looks like this is a very specialised topic, which would be challenging to research in greater detail.

The 1st reference refers to this kind of puppet as a "jiggling puppet", but I could not find any information on the web by searching for this kind of puppet - and my web searching skills are quite good. I briefly considered taking this research a step further and expanding my search to books, mailing lists and more in depth searches, but then decided to keep this a simple project.

Instead, I attempted to build a mock up version of how I believed the puppet might have worked. I was rather free in that all I had to recreate was the end effect, not a specific way of achieving it. It took a couple of pieces of cardboard, a rope, some twist ties and about 12 minutes. I cut the cardboard into a rough shape and used twist ties to attach one piece rope to each piece of cardboard.

Stunned by how simple this was to make something successful, I decided to make a fancy version of this. Wanting the puppet to have greater longevity, and to be able to be played with by rough children (even if the illustration is of adults, my version will go to children, in accordance with competition rules), I needed something sturdier than one sheet of cardboard. Multiple sheets of cardboard might work, but aren't very period. Leather would be harder to paint, and might bend if damp. Metal (thin sheets to keep it light) would be lovely, but metalwork is daunting to me, and I'd have to do a lot of work to finish rough edges. Wood seemed the right material for me.

A visit to my local harware store offered only balsewood (a bit weaker than I'd prefer) as a flat sheet of wood, not containing glue. Not containing glue was important since I had a new pyrography iron I'd like to test (the instructions with it contained instructions on stencil making), and I didn't want to burn glue and create noxious fumes. Also I don't think plywood was very common in medieval times, and I'm pretty sure no equivalent of craftwood and mdf (woodchips in glue) existed.

I did find a way to make the swords more study though - there was some very thin hardwood beading available, while looked quite like a sword from the correct orientation.

I traced out an image of fighting knights onto my balsawood, but I wanted a little more detail than was in the tiny Hortus deleciarum images. I'm fond of an image of knights fighting which is from an similar time and place, so I altered my traced images to look more like this image:

Middle Rhein, Allegorical battle scene, detached from a speculum Virginum, Inv no. 3984, Late 12th C, Hannover, Kestner Museum

The barrel helms also made drawing and cutting out the shapes easier, while the surcoat allows a more colourful image, which i hoped children would enjoy more (and so they could easily tell them apart - the red knight and the blue knight).

I proceeded to cut out my images with my pyrography iron, but that wasn’t working well, since the balsa wood was about 3 times thicker than it could easily burn through. If I had been able to get some hardwood sheets, I would have preferred about 1/3 of the thickness, so I think the pyrography iron would have worked well then.

Since pyrography was working so poorly, so I cut it out with a stanley knife instead. Since it was balsawood, instead of hardwood, it was easy to cut, except a few corners which split off and had to be glued back on again.

I carved/burnt the edges of the beading to form sword shapes, and glued these to he balsawood hands. I used superglue because it was quick. I think medieval people would not have used glue in such a crucial section (perhaps rivets, pins or good socketing), but then I expect the whole piece would have been stronger, so a stronger sword section is unlikely to have been a consideration.

Once I had cut out knights, I glued on strips of cardboard to hold the ropes. Perhaps I should have used strips of leather or shaped metal, and maybe should have pinned or rivetted it on, but I was running late and out of imagination at the time.

I painted the figures with acrylic paints because they were close at hand and non-toxic. I tried to paint in a 12th C manuscript cartoon style by outlining the image in black.

The knights run along their ropes quite well. The system I ended up using was to firmly attach one set of loops to the rope, and then use a loose second set of loops which were just to hold to rope loosely near the knight. The strip of cardboard was not tight enough, so used pins to hold the rope in place on the tight loop.

The toys turned out much better than I expected (especially the rush job of cutting and painting), and looked great. They were a hit with at least one of the boys, which luckily (for him) was the winner of the boffer tourney and had his pick of the toys to take home. I'm happy to see my toy where it will be appreciated, and I hope it won't break too easily.

Monday, 27 April 2009

Past constructions I: red linen cote

This series of posts exists to record some of the cutting plans I have used for tunics in the past, and to save their dimensions for future use. It's mainly for me so I don't have to keep remeasuring and guessing, but you may find this useful to work out your own cutting plans, especially if you are a local who has tried on any of my tunics and can compare the fit.

My dark red (maybe even burgandy) linen cote was my first completely handsewn garment. The fabric was a thin (shirtweight) fairly evenly, but not very tightly woven fabric, which all my tests diagnosed as linen. As it was a bargain buy without labels, I'll never be able to be quite sure if my identification was correct. The fabric was a little thin for a dress, but it was cheap, available and not cotton. And I was having to wear garb on 40C days occasionally.


The thread was ordinary sewing thread - gutterman's polycotton machine thread. In retrospect this wasn't a good choice. The thread slips easily through the linen, possibly even cutting into it a little. Seams in running stitch on this garment form gaps easily, and even backstitch forms gaps easily. I don't think this was a problem with my sewing, as this happens on all the seams on the garment, but was instantly fixed when I made the next garment with linen thread that grips the fabric just a little. I also regret the choice to use black thread. It would have been difficult to dye any thread this black, and most linen thread would have been undyed I believe.

Seams were constructed by sewing running or backstitch and then flattening the seam allowance (with cut edge folded under) to both sides of the seam and sewing it down with running stitch . I didn't know that stronger and more period methods such as flat-felling to the same side existed when I did this. Again I'd fallen for the myth that this seam style, known from the back of a pair of London hose, was a common style.

The cutting plan used for this garment used simple rectangles and triangles as are seen in various period tunics. This garment was tighter on the body to follow the fashion for tightly fitted garments in the 12th C.


The garment ended up a little shorter than I had planned, because after sewing everything together, I discovered the gores started too low down the body. I ended up unpicking the sleeves and taking up the shoulders (by about 5cm?) to fix this, because I couldn't face unpicking and resewing all those long skirt seams. Originally the whole body (front and back) was one long piece, and the shoulder seams were flat.

The centre gore was not very easy to insert neatly, and I'm still not very fond of the look of centre gores. This was the last time I bothered inserting center gores for several garments, as side gores are so much simpler.

Originally I inserted fichets in the side seams of this dress so I could conceal a pouch beneath my skirts. I'd noticed very few pouches shown in pictures, and posited that a concealed pouch could explain this. Unlike the later garments I'd copied the fichets from, my fichets were very much to the side of the garment as they were placed in a seam rather than cut holes in the fabric (something I'm still scared of), and there were very few seams to choose from in my garment. My fichets were thus a little less practical than they might have been, but still worked fine.

However, having a pouch tangling in my skirts was a bother when dancing, and having a
gap through which my chemise showed was most improper.
That's not me acting strangely, the photographer has caught me mid galliard, and you can see my fichet quite clearly. Here's a photo showing that the fichet showed even when posed quite sedately:
Eventually I sewed up the fichets because I wasn't really using them anymore. I think having a fichet on the main dress layer, rather than an extra (overcoat equivalent) layer worn outdoors was silly, as my chemise showed, and a medieval lady would be more likely to carry a pouch outdoor than indoors when dancing. Unfortunately my mild climate seldom allows me the chance to wear an extra layer outdoors in summer.

Here's a shot with the simple yet elegant keyhole neckline showing clearly:
I normally fasten the neckline with a penannular or disc broach, but it sits quite happily and decently without one.

And a photo of the tunic laid flat - see how there really are no cures in the design, yet it does curve to the body. I really like the cut of this garment for an everyday garment.

Overall, this garment has served it's purpose very well indeed. This garment is so practical and comfortable that it has had 3 times the wear of any of my other dresses. It packs up small, washes easily, is cool in summer and hides wine stains quite well. (I don't drink wine that often, but I seem to always manage to spill some on me, even if it's only the sauce on the pears)

The only thing that I regret on this garment is the fabric and the seam finishing treatments. The linen is a bit more drab than wool or silk, not easily doccumentable (as a coloured fabric), a little cold when wet, it just doesn't have good drape, and the fabric is so weak that it will tear into rags soon. And thus was hatched my plan to make a really thin woolen dress cut to this pattern to replace this garment.


Monday, 23 February 2009

Pictures of Beds - 12th Century of course!

Some pictures of 12th C beds, for Amalie, who made almost exactly the tent I want, so I'm hoping she'll make the bed I want and then I can find someone to make a copy of her prototype :-). The other pictures of people sleeping show what may be simple pallets on the ground, people just wrapped in cloaks of blankets, pictures which smudge out the details of what they are lying on, and people lying on beds that look like slabs with no upright features. These depictions of beds are all fairly similar in construction, and look lightweight enough to use for camping, indeed one is shown in a tent below. Notice how these beds often double as couches.


Bede "Life of St. Cuthbert" (British Library Yates Thompson 26)
Durham; last quarter of 12th century
Images online here and there, with lots of beds in it.

f21. The dying Boisil instructs St. Cuthbert, and prophesies things which were to come to him.

f.80 A paralytic is healed by contact with one of St. Cuthbert's shoes


f61. A sick man is healed with bread which St. Cuthbert had blessed


f33v. St. Cuthbert drives out a devil from the wife of Hildmaer, a prefect of King Ecgfrid


f54. After St. Cuthbert's election to the bishopric, an earl's servant is cured by water blessed by the saint


f58v. The wife of an earl is cured, after a monk sprinkles her with holy water sent by St. Cuthbert


Admont Bible (Österreichische Nationalbibliothek, Wien. Cod. ser. nov. 2701)
Salzberg early 12th C

I've rambled about this manuscript before.
f18. The story of Hoshea


Copenhagen Psalter (Kongelige Bibliotek Thott 143 2º)
England, 1175-1200.
f9v Nativity


Aberdeen Bestiary (Aberdeen University Library MS 24)
England around 1200

f57r The Caladrius looks at a sick person, takes the illness upon itself and flies away with the disease to the sun.
I quite like this one - a couch and bed combined, the rails at the back, as well as acting as backrests, could be used to hang clothing over. Although they may limit how close the bed can be placed to sloping tents walls.


Skylitz chonicles (Biblioteca Nacional, Madrid Bibl. Nac. vitr. 26-2)
mid-12th mid-13th century,

Look how large the bed is compared to the tent.


Winchester psalter (British Library MS Cotton Nero C.IV)
c1145-1155
f 29. The Death of the Virgin


Worchester Chronicle (Oxford, Corpus Christi Library, MS 157)
Worchester Cathedral Priory, England, c1130-40

The Visions of Henry I in Normandy
This bed is a different style - we can't see the legs properly, but the bed head is a solid piece, instead of two poles and a crossbar.

Wednesday, 21 January 2009

peasant shoes II - peasant shoes for royals too! part 1

[pushed out early - please check in a week or two for updates]

While I was making the previous two prototypes I noticed this picture:


I have shown this before, but hadn't thought about how they were constructed.

So I tried to make my own copy:

I made these the same as the previous pair of peasant shoes, but with an initial higher cut at the ankle, which I then cut into tabs. There were less gathers at the front, due to the way the tabs pull. It might even be possible to remove the gathers completely for someone with a narrower foot than mine.

It wasn't much harder to make than the last pair, and looks more interesting. I didn't end up with an exact copy because I was working from memory and put too many tabs in.

Here's the pattern laid flat:


This didn't really look like the picture unfortunately. And something was not quite right to my mind about the fit of these too - there were stress lines the at ran along a diagonal over the outside of the heel. I began to wonder if instead of drawing on the curving tabs, I should just be making slashes, and letting them become their own tabs on my foot.

And then I found this, lurking in an article I'd looked at before and put away:

An extant shoe made in one piece! And one that looked quite similar to the ones I'd been making.

The Article: Gall, Günter. "Die Krönungsschule der deutschen Kaiser." Waffen- und Kostümkunde 15 (1973): p1-24

The caption to the above diagram says:
Die Schnittmuster für die Sandalia des 12. Jahrhundert, die aus einem Stück Brokat, wohl mit unterlegtem Leder, geschnitten wurde. Die Konstruktion dieser Sandalia zeigt die Nähte auf dem Rist und an der Ferse, die durch die Goldborte verdeckt wurden.

Roughly translated by me (corrections welcome) that is:
"Cutting diagram for the 12th Century sandals, from one piece of brocade, probably cut in one piece with the underlying leather. The construction of these sandals shows the stitches on the instep and heel, that were concealed with gold bands." (Note- I believe this should read vamp, instead of instep.)

The article talks about these shoes and 2 other existing and many post medieval lost pairs, one of which is the more famous "shoes of ". It notes that on this pair the gold bands are used to conceal the seams, but the other two pairs are made in a different fashion (a 2 piece construction similar to ordinary turnshoes of the day I believe), but still use this decoration placement. The article contains few details of the construction, but talks extensively regarding the historical provenance of the shoes. There are probably many more details I am missing in the translation.

I then enlarged the cutting diagram shown above to the width of my foot at the instep, and made a mock up shoe out of felt from this tracing.

[picture to be added]

Unsurprisingly, the shoe is too long for me - I do have wide toes, a narrow heel and high insteps, that mean few modern shoes fit well.

I decided to make a version that fitted my foot's peculiarities, adapting the above pattern to my measurements.
A few adjustments and I had a shape I was happy with.

[picture to be added]

The next step will be to make a version in leather an brocade fabric, but that will be in the next episode I think. Just a warning - this project is being nudged aside by other projects that are more wearable at the event's I'm attending soon, so it might be a while to wait.