Thursday, 18 October 2007

Austrian Dress - a reality. Itteration 2.

Note: This has been sitting in the drafts folder waiting for me to tidy a few edges on it. Please read it as written about a month ago.

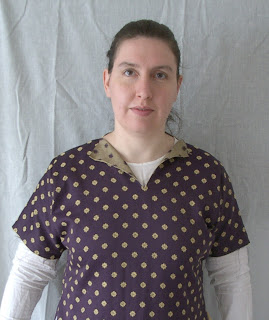
Well I've sewn up all the construction seams on the garment and here's how it looks:
In fact I've worn it to it's first event (with safety pinned hem), and danced in it, so I got a feel for how comfortable it was to move in. Of course then I wore it over a chemise, not my mundane clothes. (please ignore the silly faces, I dislike photos, and haven't the knack of doing poses yet.)

Lessons learnt

fabric stiffness
This fabric is very stiff, much stiffer than anything I've worked with before. (even the pvc, but that's got nothing to do with medieval sewing). But that's good because I expect some of the gold brocades available in period were very stiff, and so this may be more accurate for this style. Maybe. Any readers care to comment?

Skirt width - with two gores was too wide. It was nice to dance in, but sat out quite stiffly, and as you can see in the photo, doesn't much look like the manuscripts.

They might have had flowier fabric, but perhaps they just had narrower skirts - after all it saves fabric that way.

So here two pictures with the skirts pinned in narrower. The first uses only one pair of side gores rather than two. The second uses only half the width of one of those gores.

I think what is portrayed in the manuscripts, while it vary's a bit, falls between these points in general. Except the odd really skinny shirt which does look more like the second photo. At any rate I hate cutting down perfectly good gores, so I'm going to convert the skirts to one gore each side for this weekends bal d'argent (I do want enough width to dance too), and make a final decision about narrower or not later, when I'm ready to put on the hem trim.

skirt length
I estimated skirt length based on the distance above the ground the hems appeared to sit in many illustrations, marked that on an existing garment and cut it that much shorter. And that is about the right length unbelted. But add a belt, flop the dress over the belt a bit, and it's much too high. I've seen one illustration this short, but only one (and I still think that one is a bit strange).

Investigating the manuscripts again, the majority are wearing belts , mostly with the dress flopped over the waist section of he belt, and only dangling ends showing or even just the fold in the dress showing. Look how much shorter the dress is. It's about twice the distance above the ground that I think is an average distance of a hem in this style. So if I had enough fabric to make this floor length, I'd expect the hem to sit where I want it when belted and puffed over the belt. This would be a very practical way of keeping your skirts clean (chemises would be easier to wash), so it's easy to see how this could originate as practical then transfer to fashion.

I do feel justified in using the shorter length dress though - there is at least one example that clearly is unbelted and has a dress that is shorter than the chemise and, annother that is less clear, but suggests no belt. And that was with just a quick check - I'm sure I'd find more in just the examples I've posted to this blog.

Sleeves
I'm not happy with the sleeves. Firstly the bicep seam sits a bit far down the bicep. The photo below shows how the sleeves look hitched up at the shoulder a bit, so the bicep sleeve sits higher up. Compare with the above photos. Actually I can't see the difference in the photos really, so I guess that makes me a perfectionist. No surprises there, but I'll shorten that upper sleeve panel when i get a chance.

The lower sleeves are also being a problem. I think the flare at the top of the sleeve is not working in such a stiff fabric. I experimented with halving the width of the flare, and I like the effect better in this stiff fabric(See photo with narrowest skirt). Maybe I'll play with belled sleeves again next time I use silk or fine wool.


postscript - after bal d'argent:
wear testing
Well the skirt width worked ok. The flared sleeves were occasionally awkward during the English country dances, but then flared sleeves always are - that's what happens when you wear clothing from 400 years earlier than the dances. The dress looked good, I felt more prettified up. I didn't get time to work on the sleeves, so I still have to do that.

Also decoration - others might not be able to see how the dress looks far too plain still without all it's trim, but I can. Compare with this picture, which is one of my main inspirations for decoration locations. It might be time to start sewing on some decoration now that I know the body panels aren't changing, even if the sleeves still need work. At least that is handsewing work - it might get done a lot earlier than macine sewing work with me, because I can just work on it for 10 minutes.

Wednesday, 17 October 2007

Austrian Dress - a reality. Iteration 1

Note: This has been sitting in the drafts folder waiting for me to tidy a few edges on it. Please read it as written about a 5 weeks ago.

It's time to stop musing over what could be and start sewing. My old court dresses are falling apart, and I've had fabric waiting for me for a couple of years now I think. (12th Night Coldstream I won it at). A lovely purple cotton with yellow flower motif at regular intervals. Not bad for a first draft, and purple is my favourite colour, one I regret is rather difficult to obtain cheap fabric for garb in. The fabric is only cm by cm, rather smaller than I usually use for a dress, but it should be enough for the tighter shorter Austrian styles I've been looking at.

I'm going to machine sew this garment because:
  • it's cotton, not some particularly authentic fabric
  • it's very stiff and not easy to pierce
  • I want this finished for the bal d'Argent, which is real soon now.
Cutting plan
After much musing, I produced a layout and cutting plan for my fabric:

The slant of the sleeves is exaggerated a bit here, and my sense of proportion isn't perfect, but the layout is more about making my cutting ideas easily apparent than a realistic representation, where smaller angles may be missed. Where distances haven't been marked on the cutting plan, assume symmetry of distances and angles. The gore width was based on what I could fit from the fabric. I haven't reproduced how to fit this on the fabric as no-one else will have the same size piece of fabric as me anyway. Just for future interest though, my fabric was 136x227cm, and I had about enough for 4 pouches spare (probably would have had less if not for overmeasuring a piece, then correcting.)


Sleeve head - I wanted to try some ideas from many of the albs I've seen - using slanted body panel pieces where the sleeves meet instead of gussets to give freedom of movement.

Having cut out my shapes (and discovered I cut the lower sleeves wrong - the above is the corrected version), I wanted to check how it would work. I machine basted (tacked) together upper sleeves and body piece.

I basted down each side from the top of the shoulder, and by this method the slant of the sleeves (which changes direction at the shoulder) wasn't too hard to sew neatly. Then I basted the sleeves closed with nice straight lines.

I tried this on, and thought it left too much bulk around the underarm. So I then turned the garment inside out and pinned on my body (then basted) a curving section out on the front of the vertical seam attaching sleeve to body panel. I didn't do the same on the back, to allow more room to move my arms.

Below is a comparison of the modified (left) and unmodified (right) sleeve heads. Yes, the difference is rather slight, but the modified sleeve feels less bulky too.


I like the more fitted version better, so that's what I'll use on the final product. There should be a little less bulk when I finish all the seams and trim the excess fabric and sewn the seams down flat.

Bicep
I also narrowed the width at the bicep - I want this relatively tight.

This resulted in a more rapidly curving profile rather more like those on the Alb of St Benhard of Utterecht (note the subtle slant of the sleeve inset), and a little like those of the famous blue dalmatic of Roger II. (The fabric is rucking up a little and not making a graceful curve because I haven't trimmed all the seams inside yet.)

Now, only one easy way to test the dress - wear it.

Tuesday, 21 August 2007

Parma Tarts

What do you do when friends get sick and can't run a feast? When you find out the menu is only half planned? Why take the worry off their hands, 50 hours before the first remove is due to be served. I think I did quite well, the food was only a bit late, I only ruined one dish, and the shopping was only slightly over budget. There was lots of food (in an emergency I'd rather err on the side of over catering), and judging from comments, I managed to make it all tasty. I'm blessed with living in a shire where every third person seems to be a cooking laurels or cook's guild master, so I had high standards in taste and authenticity, and also the best helpers on the planet. (There's no way the feast could have happened without so many selfless and experienced helpers).

If I'd had an extra 24 hours, I would have been able to draw up a detailed plan of what happened in the kitchen when, and a better list of equipment I wanted to borrow. And I would have been able to do more pre-prep than peel a few carrots and onions. I think then I'd have managed to get the second remove out the hour earlier that I'd intended. (It was still early enough to not be particularly noticed though I think)

Anyway, I'm going to call it a roaring success, especially at job interviews. Actually 2 weeks later I'm still feeling proud. And I'd still like to thank everyone, especially the Friday rescue crew, and a certain friend who managed without her partner while she was feeling miserable.

The feature dish of the first service was the Parma tarts. Since I had a request at the feast, and I'd like my notes to be available to me later (this is a recipe I'd like to try again) here is the recipe semi-redaction I made. The feature dish of the second remove - the cheese tarts- you'll have to ask Estienne for. (although I know it was much more popular than the parma tarts)

Parma Tarts At the feast
Gwir prepared the lovely parma tarts you tasted at the feast. It must have been quite a challenge working without the chance to taste to dish before it was served, nor to improve the dish with a second cooking. Several compromises had to made made in terms of cost, time and ingredient and cooking vessel availability. I'd love to try this recipe again, maybe with the gilding and wafers.

I do not claim this to be a full redaction - there are no exact quantities of spices or explanations of how to make pastry or how much is required. This is just a rendering of a medieval recipe into the type of notes I'd cook directly from. I cannot give you the exact recipe Gwir used, as I doubt she took the time to write down what she did. But I can give you the notes I made that she worked from. And given that each master cook cooks differently anyway, hopefully those notes will be enough for most of you.

The recipe
This recipe is mainly taken from "Du fait de cuisine" (Savoy, Burgandy 1420), from the online version translated by Elizabeth Cook. This seemed most appropriate as Savoy appears to have been part of Burgandy at this time, and it was quite close to the year of the feast 1453.

Scroll down a little from here to find the Parma tart recipe. Also from the same recipe book is parma tarts of fish and nurriz pastries, which are similar recipes.

The text of the original is quite long and unusually detailed for a medieval recipie. So first I transcribed Master Chiquart's original recipe into ingredients and method. (And he must have been able to teach me a few things about running a feast kitchen - what a big feast this must have been.)

ingredients:
salt pork from 3 or 4 pigs,
300 salted pigeons (salted as in boiled in salt water)
200 salted very young chickens or capons
600 salted small birds
lots of lard
6 pounds each figs, dates, pine nuts, prunes, diced (to raisin size)
8 pounds raisins
Large bowlful parsley with leaves torn up a bit, then chopped finely
sage, hyssop, marjoram "in measure", chopped finely
a quintail of best available Crampone or Brie Cheese, cut small,
600 eggs
spices (in mesure) - white ginger, fine powder, grains of paradise,
saffron (for colour), cloves
lots of sugar
2-3000 sugared wafers
washed leaves of spinach or white chard
banners with devices of lord present

method:
1. Saute birds and pork lightly in lard, keeping them separated. Finely chop pork and add herbs.
2. Bray cheese in a mortar, continue braying while gradually add eggs. (Bray: pound; rub; grind; pound in a mortar)
3. Over a hot fire, cook pork in the lard remaining from step 1
4. wash dried fruits & pine nuts in water then white wine, set to drain and dry
5. throw drained fruits into pork, stir well
6. add cheese & egg, while braying strongly, then remove from heat
7. stirring continuously, add spices then lots of sugar
8. grease ceramic pans or dishes with lard
9. put layer of wafers into base of dishes, 4-5 thick
10. put filling on top of wafers
11. put the various birds on top of the filling, distributing fairly evenly
12. put more filling on top of this, then another layer of wafers (same thickness as before)
13. cover top of tart (wafers) with cold lard
14. place tart in hot oven. If wafers begin to burn, place leaves of spinach or chard on top to prevent this.
15. remove tarts from oven and scrape off all burned bits
16. place on fine serving dishes and decorate with gold leaf in the pattern of a chessboard
17. sprinkle powdered sugar on top
18. serve with a small banner of the device of each lord to whom it will be served

Next I attempted to quantify the medieval weights and measures. I was in quite a hurry (remember those 50 hours) so I didn't reference what internet sources I used to translate the terms (and to estimate the weight of a pig). Given an assumption of 1 chicken per large tart, the following quantities per tart result (/200).

ingredients
650g salt pork
1.5 salted pigeons (salted as in boiled in salt water)
1 salted very young chickens or capons
3 salted small birds
lots of lard
14g each figs, dates, pine nuts, prunes, diced (to raisin size)
18g raisins
approx 1 cup parsley
a few leaves? sage, hyssop, marjoram (to taste)
225g of best available Crampone or Brie Cheese
3 eggs
spices to taste
lots of sugar
10-15 sugared wafers

Here are a few of my assumptions:
  • assuming figs are dried as accompanying other dried fruits
  • I think the raisins he talks so may be more like muscatels - sultana sized but closer to a raisin taste.
  • talk of powdering sugar - therefore expect it to be cone or loaf sugar, either brown sugar or more expensive white refined sugar. Since this isn't a confectionery use, I'll assume brown would suffice.
  • internet says quintail ="A hundredweight, either 112 or 100 pounds," but this is much later than this era, so may be different
  • internet suggests a marketable pig at 300-500pounds. guessing pork after removing fat, head, hocks, bones at say 70% of weight = 280 pounds, 130kg
  • cooking temperature and length - similar to you favourite way of doing ember day tart.
These quantities seem quite reasonable to me, judging from other medieval pies I've made. I think the method above combined with this ingredient list actually makes a fair recipie. Thankyou to Master Chiquart.

Finally I made a few alterations for the feast:
  • these quantities are for many tarts, scaled it down to one tart per table, although there was probably one tart per noble and retainers.
  • leaving out cheese, for cost, and allergy catering reasons
  • leaving out pigeons & small birds for cost and obtainability reasons, used extra chicken (ideally twice as much). The chicken used was breasts as modern people aren't used to bones in a pie, and are likely to choke. It would be nice to try the tarts with pigeon, capon and quail one day.
  • parma tarts of fish uses a pastry crust, but not wafers, so simpler versions are obviously possible. The wafer's didn't get bought, so pastry was used.
  • Our meat wasn't salted. As we moderns aren't used to such salty meat (we have fridges), I recommended to perhaps add only a little salt to mixture to compensate.
Comparison
After I had completed this, I found another recipe for Parma tarts, this time in
Le Viandier de Taillevent (France c1395). This one (which is earlier and a little less elaborate) uses less fruit, but also interestingly a pastry crust. I draw from these three recipies that the essential portions of a Parma tart are:
  • main ingredient = meat (unless it specifically states otherwise eg parma tart of fish)
  • shell should be decorative
  • it's decorated, often with banners and gilded
  • it's a smaller personal pie, rather than a large one
  • it's taller than average
  • there should be some layering of meats
  • it should be well spiced and may have added dried fruits
Interestingly as I look now (after the feast) I find more mentions of Parma Tarts. I'd be interested if anyone comes across any other versions of this tart in their travels.

Saturday, 28 July 2007

buttons

I was investigating how to make turk's head buttons, when I ran across this nice site that describes how to make some buttons in other techniques.
Here's my ribbed button (sorry the photos are so dark):

It's pretty simple to make, just time consuming. Take a bead, and some embroidery or perle coton threaded in a blunt tapestry needle. The hole needs to be moderately big, but I found the holes on these beads a little too big (about 3mm in a 9mm bead) making it harder for me to fill up the gap at the end. Tie a knot around the bead. Move the knot to the end of the bead, and then wrap around the bead 5 or so more times, from hole to hole. These are your ribs.Don't pull them too tight or too loose, or it will get difficult later.
Now work perpendicular to these ribs, slipping the needle under a rib, then pass the thread over the rib, and back under the rib lower down the rib. Pull this tight, and poke it as high up on the bead as possible. Do the same on the next rib, and so on until the bead is covered. You can save a step by passing under two ribs at a ime once you gt the hang of things. Make a few stitches freehand at the end to neaten up the end. If you have a large hole like me, you'll need more, with a smaller hole a simple knot (eg french knot) might suffice.

I found a different way to make the even weave button. Here's my finished product:

This version is woven. It sits tighter and neater than the other version (assuming both use a solid core). I don't think this is any harder to make than the ribbed button, and is slightly quicker too. I prefer the elegance of the single colour version, but the multi colour version displays where the threads go better for instruction purposes, and could be cute for some uses.
Start by making a lot of ribs around the bead, the same as the ribbed button, but many more ribs. I prefer enough ribs that the bead is mostly covered, without overlapping. Make sure you have a number of ribs that is a multiple of 3 for your first bead.
Now point your needle perpendicular (tangential) to the ribs and pass it under 3 adjacent ribs. Pass over the top of the next 3 ribs, under the next 3 and so on. When you return to the start, repeat this pattern over and under the same ribs for 3 more turns. Then the following turn, pass the thread under 6 ribs, before resuming this pattern of 3 over, 3 under. After 3 more circuits of the bead, pass the thread under 6 ribs again, and your stitches should be the same as in the first row. Continue until the bottom of the bead, then finish the end with a few stitches if needed.

This bead is worked as a 3 by 3 weave, I think this is a nice looking balance for the thread and bead size. It could be worked in other weaves eg 1 by 1, 2 by 2 , 5 by 5, 3 by 2, etc. Anyway, for the 3 by 3 weave, to look nicest you need a multiple of 3 ribs. Counting might work, but I find it easiest to begin weaving the first row and then if needed add an extra rib or two (using the other end of the string which I've left deliberately long) just before I finish my first lap of the bead, when it's easy to count how many ribs I have. Annother option is to simply have a group of 2 or 4 ribs that sits slightly unsymetrical, but barely noticeable.

Wednesday, 18 July 2007

tabletweaving equipement report

Well I've finished a tubular threaded in tabletweaving project, and a flat threaded in piece (report soon) and I was trying a few new pieces of tabletweaving equipment, so a report on how well the various bits worked.


Silk thread
I used 60/2 silk from the Handweavers Studio. Actually I used 2 varieties of 60/2 silk and one of 90/3 silk. What do those numbers mean? Well the first number is a rating of how many km to the kg or some imperial equivalent, so bigger numbers mean smaller threads. Since different fibres are different, this number will only work to compare silk to silk, but suffice it to say 60/2 is very small, about the thickness of ordinary sewing machine thread. The second number is the number of plies - how many threads were combined together to make the thread. 2 is a common number now as in medieval times.

90/3 is roughly equivalent in size to 60/2, which is why I used it with the other threads. I really didn't like this thread. It didn't behave like the 60/2 threads, it snapped easier (a weft thread snapping!) and deplies easier and snarls easier when i try and embroider with it. It might be plied in a different direction to the others, or it might be individual thinner threads or something, but this one gave me the irrits.

The 60/2 threads worked like a dream on the tubular band. They didn't snap under the strain, they didn't abrade, snag or have lumpy bits. The fineness wasn't a big problem, just made overall weaving time take longer. The silk is harsher than other fibres, and harder on the hands. I almost got a blister from tugging the weft tight (I was tugging it tighter than normal because this project was tubular). On the second flat piece, the 60/2 silk snapped quite a few times. The snapping partially depended how high a tension I was working at. I think I'd prefer to work with thicker or stronger thread most of the time, but I'd be happy enough to do more work with this thread, especially at lower tension.

Parchment cards
I bought these last festival. These particular ones are octagonal shaped with 4 holes.

The octagonal shape didn't work well for 4 hole weaving. the cards would slip 1/8th of a turn out of alignment, and on such small cards it was hard to stop them doing so. Octagonal cards might be ok for 8 holed work, but are silly for 4 holed. I want some square holed cards now.

The size is much smaller than I've worked with before, but this wasn't much of a problem. The cards slipped around the edges more easily, but i think with square cards it would be manageable. The threads didn't get caught on the edges of the cards, nor flip over them. It was easier to turn the cards one handed, or with less help from the second hand. The shed was smaller, but manageable. Probably not very good for learners unless they are determined. I ended up keeping the cards closer to the weaving than I normally do, which made locating the shed easier. I was pleasantly surprised at how easily I worked with cards this size, since I'd previously preferred cards twice the size. I think the smaller cards were better for working with the finer materials. Things might be different if I go back to coarse fibres.

The parchment handled well. It was nicely stiff but flexible, subtly better than the cardboard I've used before. The silk didn't noticeably abrade the parchment, nor did the parchment noticeably abrade the silk. That's good - I want the cards to last a while, but I don't want the threads to be cut up. A couple of other people mentioned at the last monthly bash having cards from the same manufacturer and their cards warping in mild humidity. I haven't had this problem, but I haven't had my cards exposed to humidity either. I might also be at an advantage - working with a fine thread might strain the cards less - the others mentioned working with fatter threads and more cards and having the cards curl a bit from the bulk of thread.

Warp spreader
As far as I know, I have a unique warp spreader. It's an extremely simple idea I thought up and made based on what I'd seen in period illustrations of band looms. I'll write up the details real soon now. This is my warp spreader's first trial in it's job and it worked just fine. I was worried about the huge quantities of beeswax I poked into the holes, but they worked fine and the threads didn't get waxy feeling. The threads weren't abraded by the spreader either that I could see, even though I had it at pretty high tension occasionally. This still needs to be tested with a weaker thread than silk though.

The warp spreader sat upright on the threads by itself, as long as my tension was moderate. The warp spreader helped keep my cards separated from each other - they never flipped over each other once. The spreader did reduce the amount of space I could work when weaving - I need a longer loom to make this practical. When the weaving got too close to the spreader, the cards floated separate from each other, making them harder to turn as a pack. Partly to combat this I worked with my cards closer to the weaving than i normally do. I think this is more in line with how period manuscripts display weaving.

I found I could adjust tension a little by tilting my warp spreader from the vertical towards the horizontal in the plane of the weaving. But I also found I could tilt the whole warp up and down the loom on a gentle diagonal to adjust my overall tension too, and that this generally was more effective and easier to adjust.

The warp spreader worked nicely and I think it looks just like in the pictures. (and yes my feet are on top of the bottom support strut of my loom) A success!

KB76F21
The Hague, KB, 76 F 21
Book of Hours (use of Paris)
Paris; c. 1400-1410

Fol. 14r
Mary weaving in the temple

Looking at the large sword beaters in the above pictures has given me another idea that I've been considering. They could be just exaggerated size, but what if that is real size? Why would anyone want such a large and heavy cumbersome object when the small beater I have works fine? And why are they shown holding the beater in the warp as they drop the bobbin through. That could be artistic license too - showing all stages of weaving at once to give an impression rather than a snapshot. For that matter, why is the bobbin shown so large - it must be tricky to get through the shed.

My tentative hypothesis: If you have a narrow shed from small cards, and a wide sword beater, you can turn the sword beater sideways and make the shed as wide as your sword beater. Now you can drop bobbins through easily if they are bigger than your cards, as long as they are smaller than the width of your sword beater.

Opinions? Anyone tried this out? I need to make/obtain a wide sword beater and a fat bobbin to do so myself.

wire rings

Some of you might have seen my wire rings by now. I'm fascinated by medieval wire jewelry because it's so simple to make with few tools, and looks cool. I've taught making these with stripped copper electrical wire, and was able to briefly explain the context, and get people to make rings and even the slowest was complete within 45 minutes. I can't think of many other medieval mini projects that can be taught on such a short timescale without the teacher doing a lot of preparation work.

Here's my latest collection (in silver so they could be donated as silver rondell tokens):
These are based on an brass wire example from late 13th- early 14th C London, as described in "Dress Accessories".

The original piece is rather carelessly made, with less care to where the wire sits than I now show. They did take care to make sure the ends of the wire pointed outwards, rather than into the finger though.

I've been playing with the subtle changes you can make to the pattern. Here are some closeups as examples.(Sorry the closeup photos are dark, otherwise the reflection off the wire is too much with my primitive photography setup).

With lots of twists close together:With one twist separated by wide gaps:
With two twists separated by gaps:With three twists separated by gaps:
Note that the one-two-three twists represent the first three passes of the neatest way to make these rings - by making multiple passes around the ring. At first I thought it would be better to make all the twists in one pass around the ring, but that doesn't work well in wire. The medieval example though, only makes one pass around the ring - it just doesn't add many twists.

And here's a few experiments (not at all based on medieval precedent), that I did just for fun:

A new tent picture!

Great news - Bildindex now has an English option - click on the union jack flag on the front page

While I was looking on bildindex for a better copy of a 12th C manuscript I know has tents and lamps and sidesaddles and all manner of interesting stuff in it, I found an earlier single bell tent:

f45. Abraham and the 3 angels
Prudentius Manuscript
St Gallen Abbey, Switzerland, 10th C
(Bern Stadtsbibliothek, Cod.264)

Araham's wife has some snazzy clothes too.

As far as I can tell, It's not listed here or here or here, so I think I might have found a depiction hardly anyone knows about.

Here's what I was actually looking for (unfortunately only one page of many so far):
f143 - Biblical figures (Noah, Abraham, Moses, David), centre- Freidrich Barbarosa & sons, bottom - Freidrich on crusade
Petrus de Ebulo, "de rebus Sicilianis carmen"
Salerno, Sicily, c1195
(Bern Burgerbibliothek Cod.120)

I'd love to get my hands on a complete copy of the illustrations of this. Looks like latrobe uni might have something in German.

Other Tents also found while searching:
http://www.bildindex.de/bilder/ch00033f08a.jpg
A 15thC tent and annother from
Schilling's Bern Chronicles 1480's
For more pages (without tents), search bildindex - place Switzerland, Bern, Stadt, Geschicte, allgemeine.

Monday, 2 July 2007

Aachen Cathedral Treasury - Part 2: Stole with brickwork

In the previous post, I've done a rough listing of medieval reenactor interesting contents of Aachen Cathedral, now to my first highlight from a 12th C perspective:

Stole
"stole, Germany? c1200. silk? (w 11cm, l 265cm)"
The stole and mantiple, I found about a year ago while looking for belts. The centre section is a lovely typical example of goldwork (underside couching I think) at it's best. But it's the ends that fascinate. Firstly both end with a fringe which passes through beads before hanging as a fringe. Simple, but very effective, and clearly shown in the photos. Secondly, the Stole has an end section of brickstitch. This is the earliest example of the style I've ever seen. It doesn't look like a later addition, and the rest of the piece looks very typical for 1200 (to my untutored eye), so maybe the labelling is correct, and it truly is a very early piece. It doesn't have the devices or non-geometric motifs of later pieces, but the piece is so small that they wouldn't fit easily. The pattern is geometric, but more complex to count out and stitch than it initially appears.

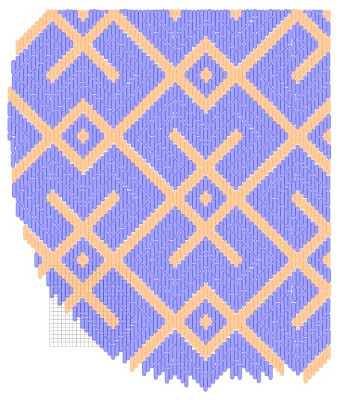
I've graphed it out. On the left is my interpretation of the overall pattern. On the right, I've overlaid it on the original photograph (over the section which sits flattest). I stretched the pattern a little to do so, but did not distort it in any other way. Below is my best guess at where the individual stitches might have been placed. It's based on the layouts of other brickstitch items given in "A Stitch out of Time" since I'm already squinting to see the pattern the colours make. (and I don't have a higher resolution photo). Be sure to click on the image to make it large enough to read. The sharp edges represent how I think the edges were stitched, the soft edges represent places where the pattern continues similarly.


Given the width of 11cm, and my estimate of 4x24=96 stitches we can also estimate stitch density as about 8.7 stitches per cm. I've left a little grid on a section of my pattern, and the squares of this grid would be 8.7stitches/cm or 1.1mm wide squares. I talk about stitch width because stitch length varies. Also the original fabric may not be woven completely evenly in warp and weft, but the embroiderer has compensated well, or it is quite good as there is no apparent elongation of the pattern.

Friday, 29 June 2007

Aachen Cathedral Treasury - Part 1: Catalogue

Bildindex (more properly Marburg Photo Archive) now supports English language. Well sort of - there's still a of of german in there, but less than before. Look for union jack flag to the left to switch languges.

Thanks to a link elsewhere, I was made aware of the awesome stuff in the Aachen Cathedral treasury, so today's topic is a summary of the contents that bildindex has photos of. I'll post about a few of my highlights in subsequent posts.

To look at the photos, select 'places' from the top bar. Now on the left bar, select the following sequence of folders: Aachen > Öffentliche Sammlungen > Domschatz (cathedral)
and within that are subfolders. Below is a listing of what's there (I may have missed a piece of two, but nearly everything). You'll be sure to find something to facinate you.

I've also added links to webpages with colour photos of individual objects. One in particular worth mentioning, for it's high resolution and range is artserv and it's section for the cathedral treasury. (I find it works better under IE than mozilla).

Summary (by subcategory):
>Malerei (paintings)
  • Mary and child, Ungarn, before 1367
  • falkstein Portable altar, Aachen, 1401/1415,
  • Wenzel Portable altar, Prag, 1467/1500
  • Aachener Marientafeln, Meister der Aachener Marientafeln, c1485 (many pictures)
  • Der Aachener Altar / Passionstriptychon, Meister des Aachener Altars, 1515/1520 (many pictures)
>sculptur (sculpture)
>Schreine (shrines)
  • Felixschrein - 14thC gilded silver & silversheets. (h23cm, l 50cm w22.5cm) . Pictures: mi00007c07a-mi00007c08a, mi03344f10a- mi03344f11a
  • Karlsschrein (Charlemange shrine)- 1200-1215 Aachen , gilded silver and enamelled copper. Pictures: mi00007c09a-mi00007c14a, mi00007d01a-mi00007d14a, mi00007e01a-mi00007e14a, mi00007f01a-mi00007f14a, mi00007g01a-mi00007g10a, mi03344f12a- mi03344f14a, mi03344g01a- mi03344g04a, mi09141i12a-mi09141i13a, [search for Aachen]
  • Marienschrien -1220-1238 Aachen. Oak, gilded silver and enamelled copper. (h 95 cm, w 54 cm, l 184 cm). Pictures: mi00007g11a-mi00007g14a, mi00008a01a-mi00008a14a, mi00008b01a-mi00008b14a, mi00008c01a-mi00008c14a, mi00008d01a-mi00008d14a, mi00008e01a-mi00008e14a, mi03344g05a- mi03344f14a, mi03345a01a- mi03345a05a, mi09141i14a, mi09141j01a-mi09141j04a
Reliquiare (reliquaries)
  • Reliquary of Anastasius Byzantine Emporer, 986/1015, [artserv1], [2], [3], [4], [5], [6], [7], [8], [9]
  • Crucifix & reliquary of charlemange, 1101/1200?, gilded silver
  • St Simeons reliquiary, Aachen 1330/1340 [artserv1], [2], [3], [4], [5]
  • disc Reliquiary for a flabellum (huge eclesiastical fan), Vienna?, c1350 [artserv1], [2], [3], [4], [5]
  • Bust figure reliquary of Charlemange 14thC [karl bust], [artserv1], [2], [3], [4]
  • crown, Aachen c1349
  • crown of Margaretha of York 15thC
  • cross relliquary, 14thC
  • Charlemagne reliquary, in the shape of a church, Aachen, 1346/1355, Restored: 1978, (lots of detailed photos)
  • 3 tower reliquary, Aachen, um 1370/1390, Restored 1829, 1978
  • ciborium Relliquaries of the belt of Mary, flagellum-cord (or scourging?) of Christ & belt of christ, Prag?, um 1360
  • reliquary for King Stephen I, Deutschland, after 1370
  • ciborium reliquarys, 1386/1400, Köln 1401/1415,
  • reliquary with true cross and Agnus Dei, Hans von Reutlingen, 1501/1515 [artserv]
  • statue reliquary of Peter, Hans von Reutlingen, 1510
  • arm reliquary for Charlemange, Lyon, 1481 [arm reliquary]
  • monstrance, Hans von Reutlingen, 1520, [artserv1], [2]
  • 19th C reliquary of true cross
>sonstiges edelmetall (miscellaneous precious metals)
  • goblets 1497-1522, 16th C and 16th-early 17th C.
  • paten (plate) c1200, engraved gilded silver. Pictures: MI00010c03a.jpg-MI00010c04a.jpg
  • 18th C candle sticks
  • Lothair cross, Western Germany, c1000, with 19th & 20th C "restorations" [scroll down, 1st pic], [artserv1], [2], [3], [4], [5], [7], [8], [9], [10], [11], [12], [13], [14], [15]
  • "Breast cross of charlemange", 1101-1200, restoration 1871, (h 8.5cm) Pictures: MI00010e04a.jpg
  • dove staff?, 1201/1300 Pictures: MI03345e01a.jpg
  • eagle topped staff 15th C [artserv1], [2], [3], [4], [5]
  • clasp for a cope, c1180, reworked 1870, gilded silver (19x16cm). Pictures: MI00010e06a.jpg [artserv1], [2]
  • various very decorative (good closeups) clasps for copes, dated: 1371-1381, 1376-1400, 1401-1415, before 1520, 14thC, 14th C [artserv-16thC]
  • box for a crown (relquary?) England, 1475
  • beaker& case of the holy Elizabeth 15-16thC
  • carrying cross, Western Germany, 1146/1155, bronze & wood, hollowcast & gilded. Picture: MI00010f11a.jpg
  • coat of arms, Ungarn, 1371/1381
  • seal, Ungarn, 1528
  • Aquamanile in the form of a Bust, Aachen?, 1201/1215, bronze, hollowcast & gilded. (h 18.3cm). Pictures: MI09141j11a.jpg-MI09141j12a.jpg, mi03345f13a.jpg-mi03345f14a.jpg,MI00010g02a.jpg, MI00010f12a.jpg-MI00010f14a.jpg, MI00010g01a.jpg-
  • bookcover of the schatzkammer bible, Westdeutschland, um 1020 [artserv1], [2], [3], [4], [5], [6], [7]
  • 19th C bishop's staff, 20th C pectoral pendant, 18th C waferbox?
>Elfenbein (ivory)
>textilen (textiles)
  • Many 6thC silk fragments, Antinoe, byzantium, Alexandria, sasanid, East Rome, Persia
  • more fragments, mostly silk: 7-8th C Persian, 8-9th C Persian, 8-9th C sasanid, 9thC? islamic or byzantine, 10-11th C byzantine
  • 10thC byzantine elephant patterned fabric from the "Karlsschrein"
  • sicilian-arabic silk from the "Karlsschrein" c1200
  • "bernhardskastel" (Bernhardt's Cope) 1160-70. Probably beaded. Pictures: MI00011b05a.jpg-MI00011b06a.jpg [artserv1], [2]
  • stole & mantiple, Deutschland? c1200. silk? (w 11cm, l 265cm)Picture: MI00011b07a.jpg
  • 13th C silk cope Picture: MI00011b08a.jpg
  • 13th or 14thC Pluviale /cope (beadwork?) Picture:MI00011b09a.jpg-MI00011b011b.jpg [artserv1], [2], [3], [4], [5]
  • 15th C Damatic
  • 15thC chausible
  • 15thC picture
  • 16thC stole
  • 16thC heavily embroidered cope (lots of closeups)
  • annother 16thC cope
  • clothing of the "gnadenbildes" 1627
  • several 17-18thC vestments
>handschrifte (manuscripts)
  • "Schatzkammer Bible" start of 9thC
  • "Silver book cover of the Otto Bible" c1020
  • Liutuar or Otto Bible, Reichenau c990 (very well illustrated) [artserv1], [2]
>sonstiges (other/miscellaneous)
  • "so called knife of charlemange" (in sheaf), England 700-1100 or maybe 10-11thC. Pictures: mi00011g14a, mi03346a08a [artserv]
  • "so called armorial case of Richard von Cornwallis" Limoges, 1246/1255, Cedar (red stained), Copper & enamel, studded? & gilded. (h 38.5 cm, w 40 cm, l 79 cm). Pictures: mi00011g03a-mi00011g07a, mi03346a09a-mi03346a12 [scroll down, 2nd pic]

There is one major item that doen't appear on bildindex but does on artserv:
  • Book cover, metalwork upper Rhine area, c1170-80 with 10th C byzantine ivory plaques [artserv1], [2], [3], [4], [5]

I've also updated my German glossary post , with many of the new terms I've had to translate for the above.

[edit: more posts about the Aachen Cathedral treasury]

Tuesday, 29 May 2007

Admont Bible

Admont bible, Salzberg early 12th C, (Österreichische Nationalbibliothek, Wien. Cod. ser. nov. 2701 and 2 pages in École Nationale Superieure des Beaux-Arts, Paris. PC 22788)

The Admont Bible was produced in Salzburg, Austria, c1140's or maybe earlier (it's a topic of debate). Most of the book ended up in Hungary by the mid 13th C (it was bought back by Austria in 1937), except two leaves which ended up in France.

There is a lovely website with pictures of the manuscript and a history of it. Also on that site are links to a 14th C (Hungarian Angevin is 14th C !) and 15th C manuscript.

Dodwell finds it one of the best productions of the thriving world leading Romanesque Salzburg manuscript school. He says it's highly byzantine influenced, which I find quite clear to see in some of the women's hairstyles, decorative motifs, draperies, and more subtle details.


Women in this manuscript
This manuscript is not the best source material as are biblical figures, but the women certainly appear to be wearing fashionable clothes, not old fashioned ones. The answered question is how much is reality and how much fantasy?


f11 Boaz and Ruth. Ruth's sacrifice
  • Ruth is a down on her luck noble, depicted as faithful to her family, and doing the right thing, not a slut like Salome. In the first picture, Ruth is begging from and later courting a noble relative. In the second she works in the fields to feed herself and her mother in law.
  • The two pictures show differences in dress that may correspond to that change in activity.
  • In the First picture her dress has trim at neck and hemline, in the second none is apparent.
  • The first dress is shorter (although not the mid calf I expected) to display her long chemise underneath, and keep the precious trim off the floor. The second chemise may or may not be quite short - we can't see under her dress.
  • The first chemise is trimmed at the wrists, the second is not.
  • The first dress has wide flared sleeves, the second has loose sleeves that stop at her elbow - out of her way.
  • All of these seem practical changes to a dress for doing work.
  • The hairstyle in the first picture is more elaborate (possibly a byzantine style?) whereas in the second picture her plaits are enclosed in a covering and she wears a hat. While covering the hair while working is practical, I am not convinced that this style is more practical or quicker than the first style. A nice veil would be better, but maybe this would clash with her status as an available widow, and object of romance.

f12 Hannah and Peninnah,
  • Hannah, the favoured wife of Elkhanah, can't get pregnant, while the second wife Peninnah can.
  • Both Hannah (I'm assuming she's the childless one) and Peninnah wear similarly cut dresses and veils. The dresses are floor length, probably moderately loose in the body, and have flared sleeves.
  • Hannah's dress is from a patterned fabric, perhaps this displays her favoured status. (patterned fabrics are likely to cost more)
  • Both dresses are trimmed at the cuffs and hem. Hannah's dress has more decoration depicted on her trim.
  • The cuffs of Hannah's chemise or whitish layer underneath is trimmed, Peninnah's in not visible. No wrinkle effect is depicted on these tight sleeves.
  • Both women wear similar veils. Interestingly both are coloured veils, whereas white veils are more common.
  • No belt is visible.
f12 Hannah's sacrifice.
  • Elkhanah didn't mind that Hannah was childless, and still gave Hannah a larger portion of the sacrifice.
  • Hannah's dress is cut similarly to the last picture.
  • A small white blob is visible at the bottom of her maunche. Looking backwards, I think it might be visible on both women in the last picture too. I think this is what I've seen earlier, and thought might be a sleeve lining.


f12 Eli and Hannah
  • Hannah pleads with a priest to give her a son. (and it works, and all ends happily)
  • Hannah wears a red dress, with bell shaped sleeves - these seem to flare above the arm as well as below.
  • The dress is decorated at the v-shaped neck and has a couple of subtle lines of decoration above the hem
  • The dress appears to have been belted in tight at the waist with a wide yellow fabric band. (A corsolet?!)
  • A chemise is visible at the wrists with decorated cuffs, but interestingly I can't see it at her neck despite the lower v-neck of the dress.
  • Her hair is parted in the middle and plaited, probably in a single plait.

f18 The story of Hoshea
  • Hosea was a prophet who married a prostitute supposedly on god's orders. She probably cheats on him, he divorces her, then he can't stay away and buys her back from a lover or client.
  • The second picture depicts Hosea's inconstant wife in bed. She wears a cute beanie cap, and in the full picture I can just see pale yellow shirts to her ankles.
  • The second figure holding the child might be a midwife or just Hosea's wife on a more formal occasion?
  • A fairly simple dress, full length, gently flared sleeves from the elbow.
  • Who said pink wasn't period? Well actually this doesn't prove anything - the artist might just have the colour on his palette, but the colours used do generally seem to be plausible.
  • I wonder how she gets such wonderful folds in her veil in the first picture?
  • Has that white bit peaking from the bottom of the sleeve again.
  • The headwear provides a contrast between the lady in bed and the lady nursing. The veil appears to be headwear for a mature lady, while a prostitute wears young fashion of a cap.


f24 The affliction of Job
  • God permits Satan to test Job's faith by afflicting him with bad stuff, like the boils pictured. 3 male friends and his wife try to get him to give up on God, but he refuses.
  • The lady in red is mostly likely Job's wife, who refutes god and dies. I'm not sure who the second lady is - she doesn't seem to fit the story.
  • Both ladies wear loose dresses with flared sleeves. The lady in pinks' sleeves are a more traditional shape, with trim. I think the lady in red's sleeves are supposed to be the same, just badly drawn.
  • The lady in pink's sleeve has the white blob at the bottom again.
  • White chemises show at the sleeves of both garments.
  • Both wear veils. the y have a similar drape about the head, showing some of the neck, but the lady in red's veil has a loose end over her shoulder. This may represent a (partially undone) veil in which ends are crossed over the neck and flipped behind the head. the lady in pink's veil shows strong fold lines in opposing directions at the neck. the loose end looks a lot to me like the shape made by tapered fabric, rather than square, for example the corner of a half circle.

f26 Bride and groom (not illustrated)
  • It's very hard to see this picture, but the bride must be the one dressed in pink.
  • The garment has flared sleeves, with some decoration at cuff and collar.
  • There are also two vertical lines. They could be plaits, but i think she is wearing a veil. I think they look more like two lines of decoration, along side seams or just inside of them.

Costume accessories - men's hats
Hats from folio 9 & folio 10


Also in the manuscript are a number of interesting men's hats. I'm used to phygian caps and beanie caps, these caps are a slight variation in exact shape. But what caught my notice especially is the vertical stripes on the hats. Hats can easily be made by naalbinding or sprang, and I've been speculating (along with others) if 12th C hats in these styles might be made so. So far there's been no evidence.

Could these vertical lines be an indication? Maybe, but another hat from the same manuscript is in a diamond pattern, which could still be sprang, but a very different representation of it, so maybe we are just seeing a decorative finish by the artist.
Hat from folio 14